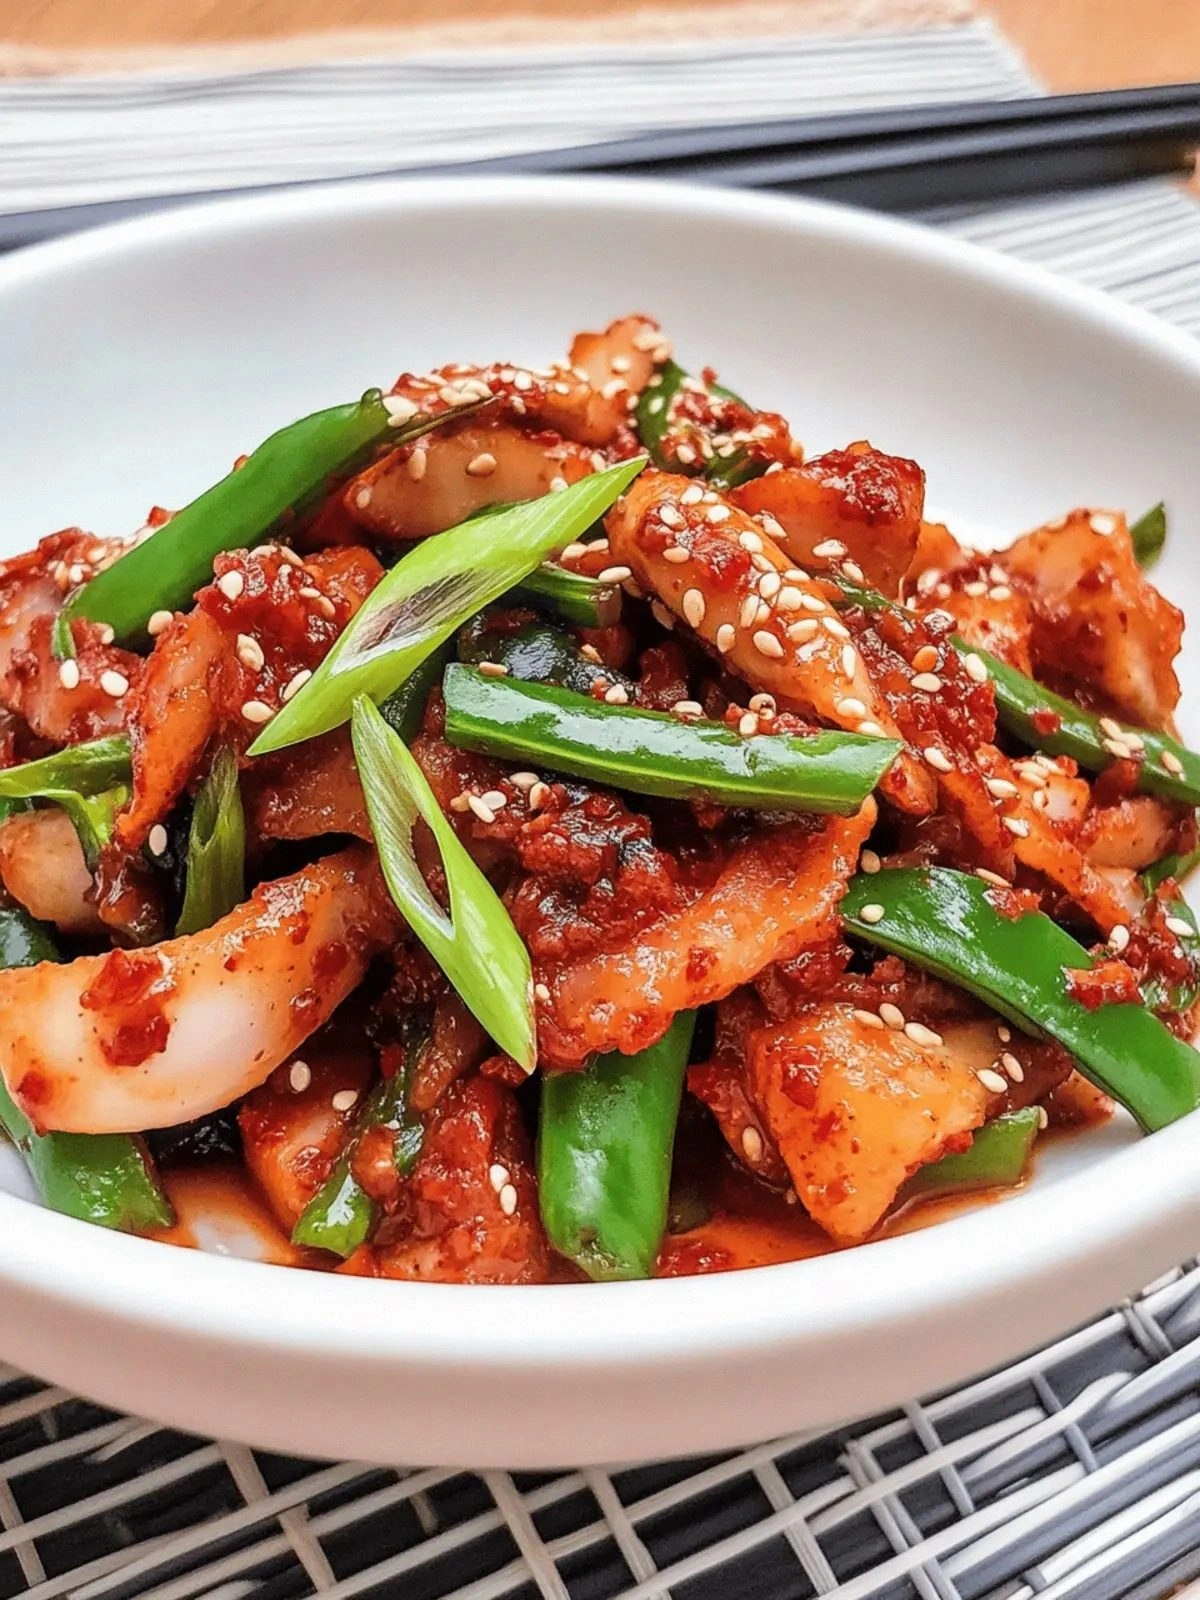
The first time I tried to make honey chicken, I ended up with a sticky mess that looked like a kitchen disaster in slow motion. I had the chicken coated in a syrupy glaze that clung to the pan, and the sauce was so thick it turned the skillet into a miniature aquarium. But the aroma that filled the kitchen was undeniable—sweet, savory, and a hint of citrus that made my mouth water even before I tasted it. That moment taught me that a simple dish can become a showstopper if you get the balance right. From that day on, I was determined to master the perfect honey chicken.
Picture the scene: a sizzling pan, the sound of caramelizing sugars, and the steam that curls like a fragrant cloud. The visual is a golden sheen that promises a glossy finish, while the scent of toasted garlic and fresh ginger dances through the air. The taste is an explosion of umami from the soy, a gentle sweetness from the honey, and a bright tang from the rice vinegar. The texture is a delightful contrast—crisp edges that crackle with each bite, and a tender interior that melts in your mouth. The feel of the dish is comforting, almost nostalgic, yet it carries a modern twist that feels like a culinary revelation.
What sets this version apart is that every element is carefully calibrated to create a sauce that coats the chicken like velvet, yet still allows the meat to shine through. I’ve refined the ratios to avoid the common pitfalls of too-sweet or too-salty, and I’ve introduced a quick thickening trick that gives the glaze a silky, clingy finish without heavy roux. The result is a dish that looks restaurant‑grade but is made in your own kitchen with pantry staples. I dare you to taste this and not go back for seconds. If you’ve ever struggled with sticky sauces, you’re not alone — and I’ve got the fix.
Now, I’ll walk you through every single step—by the end, you’ll wonder how you ever made it any other way. The secret is a simple technique that turns ordinary chicken into a caramelized masterpiece, and a few unexpected ingredients that elevate the flavor profile. This isn’t just a recipe; it’s a culinary lesson that you’ll carry forward into every sticky sauce you create. Let’s dive in and discover why this honey chicken is hands down the best version you’ll ever make at home.
What Makes This Version Stand Out
- Balance: The sauce strikes the perfect equilibrium between sweet, salty, and umami, ensuring no single flavor overwhelms the others.
- Texture: A quick cornstarch slurry thickens the glaze to a glossy coat that clings to each bite without becoming syrupy.
- Ease: All ingredients are pantry staples, and the method requires no specialized equipment—just a skillet and a whisk.
- Speed: The entire dish comes together in under 30 minutes, making it ideal for week‑night dinners without sacrificing flavor.
- Versatility: Swap chicken thighs for breasts, or add a splash of sesame oil for an extra layer of aroma—this recipe adapts to your taste.
- Make‑ahead Potential: The glaze can be prepared in advance and stored; reheat gently to preserve the glossy finish.
- Crowd‑pleaser: The sweet‑sticky glaze is a hit with kids and adults alike, making it perfect for family gatherings.
Inside the Ingredient List
The Flavor Base
Soy sauce is the backbone of the sauce, providing depth and a savory umami that balances the honey’s sweetness. A quarter cup of soy sauce is enough to season the chicken without overpowering it, but feel free to use a low‑sodium version if you’re watching salt intake. If you skip soy sauce, the dish will lose its complex savory note and become a one‑dimensional sweet glaze.
Honey is the sweet heart of this dish, adding natural sugars that caramelize beautifully. The 1/4 cup amount is calibrated to give the sauce enough body without turning it into a syrup. Using a darker honey can introduce a richer, almost molasses‑like depth, but a lighter honey keeps the glaze bright.
Rice vinegar gives the sauce a bright, acidic lift that cuts through the richness of the chicken and the sweetness of the honey. Two tablespoons are ideal for a balanced tang. If you don’t have rice vinegar, apple cider vinegar works as a close substitute, though it’s slightly fruitier.
Garlic and ginger bring aromatic layers that elevate the dish from simple to unforgettable. Minced garlic releases its flavor quickly, while freshly grated ginger adds a subtle heat that lingers. Skipping either will diminish the dish’s complexity; keep both for the full experience.
The Texture Crew
Cornstarch is the secret to that glossy, clingy glaze. When mixed with a tablespoon of water, it forms a slurry that thickens the sauce in seconds. If you forget the water, the cornstarch will clump and ruin the texture—so keep that small splash handy.
Water is essential for the slurry; it activates the cornstarch and ensures a smooth consistency. A tablespoon is enough for 4 servings, but if you’re scaling up, double the amount accordingly. Skipping water will result in a thick, gritty sauce that clings unevenly.
The Protein
Chicken thighs or breasts are the star of the show. I prefer thighs for their fat content, which keeps the meat juicy and flavorful. If you use breasts, keep an eye on cooking time to avoid drying them out.
I recommend cutting the chicken into bite‑size pieces so they cook evenly and absorb the glaze thoroughly. A 1 lb portion is perfect for four people, providing generous servings without excess.
The Final Flourish
Olive or vegetable oil is used to sear the chicken, creating a caramelized crust that locks in juices. One tablespoon is sufficient for a single skillet, but you can add a bit more if you’re cooking a larger batch.
Salt and pepper are added to taste. While the soy sauce and honey provide some saltiness, a pinch of pepper adds a subtle heat that balances the sweetness. If you’re watching sodium, reduce the soy sauce slightly and compensate with a dash of pepper.
Everything’s prepped? Good. Let’s get into the real action...
The Method — Step by Step
- First, pat the chicken pieces dry with paper towels. This step is crucial because excess moisture prevents the chicken from browning properly. The pan should be hot before you add the oil, ensuring a quick sear. I’ll be honest — I once left the pan too cool and the chicken ended up steaming instead of searing. Don’t make that mistake; a hot skillet is your best friend.
- Add the tablespoon of oil to the skillet and swirl until it coats the bottom. Once the oil shimmers, drop in the chicken pieces skin‑side down if you’re using thighs. Let them cook untouched for about 4–5 minutes until a golden crust forms. Flip them and cook for an additional 3 minutes on the other side. The goal is a caramelized exterior that locks in juices.
- While the chicken is searing, whisk together the soy sauce, honey, rice vinegar, minced garlic, and grated ginger in a small bowl. The mixture should be smooth; any lumps will ruin the glaze’s silky texture. This is where the sauce starts to build flavor. I’ll be honest — I once tried to add the sauce too early, and it caramelized before the chicken was ready. Keep the sauce ready but don’t pour it yet.
- Once the chicken has a nice crust, pour the sauce mixture over the pieces. The sauce should bubble immediately, signaling that the pan is hot enough. Stir gently to coat all sides. The aroma that fills the kitchen will convince you that the dish is about to become spectacular. Let it simmer for 2–3 minutes, allowing the flavors to meld.
- Now it’s time for the thickening act. In a separate small bowl, dissolve 1 teaspoon of cornstarch in 1 tablespoon of water, whisking until smooth. Add this slurry to the pan, stirring constantly. The sauce will begin to thicken and become glossy. Watch closely; the sauce should coat the back of a spoon. If it’s too thin, add a touch more slurry, but be careful not to over‑thicken.
- Continue simmering for another 2 minutes, letting the sauce reduce slightly. The chicken should be fully cooked, with an internal temperature of 165°F (74°C). The glaze should have a sheen that makes the dish look like it’s been dipped in liquid gold. This step is pure magic.
- Taste the sauce and adjust seasoning if needed. Add a pinch of salt if it’s too mild, or a splash of rice vinegar if it’s too sweet. The final glaze should strike a balance—sweet, salty, and tangy all at once. I’ll be honest, I once over‑seasoned and had to dilute the sauce with a little water. Keep a small bowl of water handy.
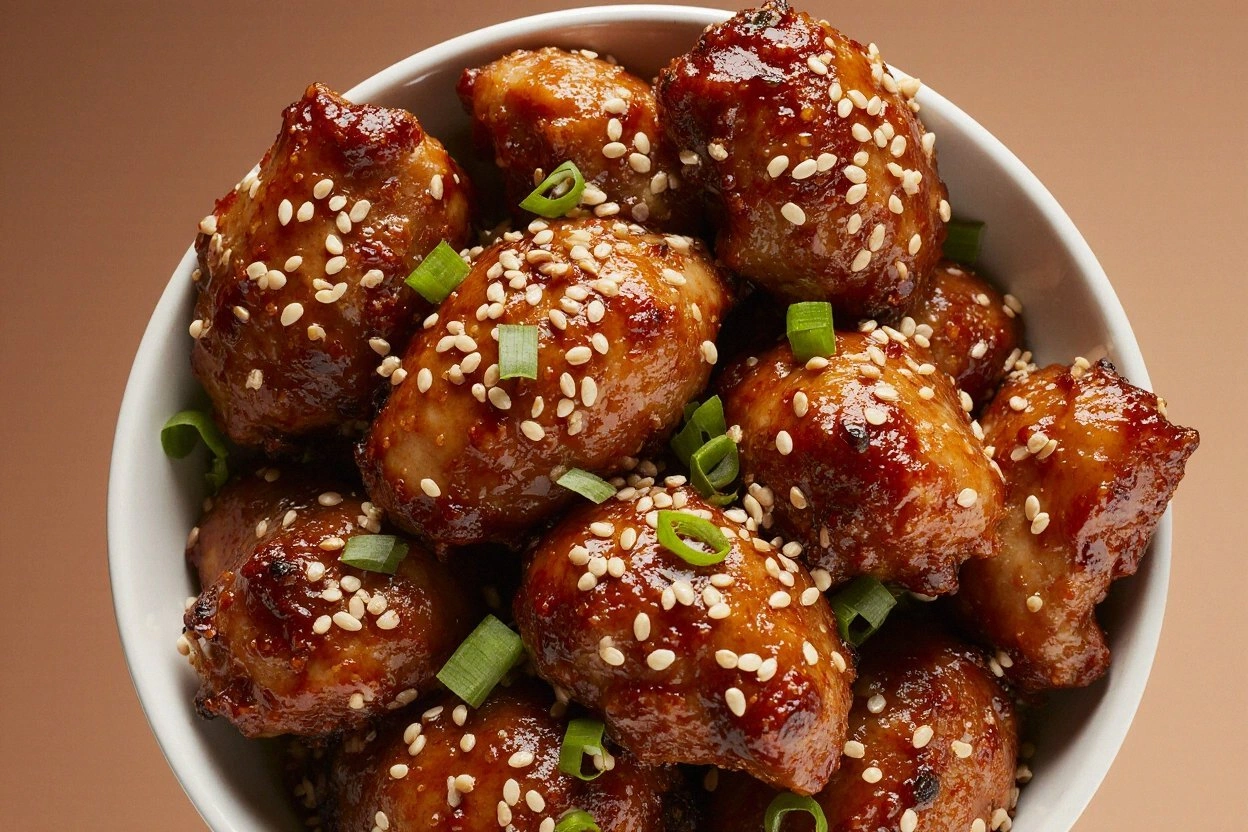
- Serve immediately over steamed rice or noodles. Sprinkle toasted sesame seeds or chopped green onions for an extra burst of flavor and color. The dish is best enjoyed hot, with the glaze still glossy and clingy. Picture yourself pulling this out of the skillet, the whole kitchen smelling incredible, and the family rushing to the table. That’s the moment you’ll cherish.
That’s it—you did it. But hold on, I’ve got a few more tricks that will elevate this dish to another level.
Insider Tricks for Flawless Results
The Temperature Rule Nobody Follows
Many cooks assume a low simmer is enough, but a medium‑high heat is essential for a caramelized crust. The higher heat sears the chicken quickly, sealing in juices and creating a golden exterior. I once tried a lower heat and the chicken ended up soggy. Keep the flame at medium‑high for the first sear.
Why Your Nose Knows Best
The aroma of the sauce is a reliable indicator of doneness. When the honey caramelizes, it releases a sweet, nutty scent that signals the glaze is ready. If the scent is too sharp, it’s burning; if it’s too flat, it needs more time. Trust your nose—it’s a seasoned chef’s secret tool.
The 5-Minute Rest That Changes Everything
After you finish cooking, let the chicken rest for five minutes before serving. This allows the juices to redistribute, ensuring each bite is moist and flavorful. I once skipped the rest and the chicken tasted dry. The rest is a small step that makes a big difference.
Avoiding Sticky Sauce Messes
If your sauce starts to stick to the pan, lower the heat immediately. A sudden drop in temperature can cause the sugars to burn. Keep a small splash of water on hand to loosen the sauce if needed. A quick stir will restore the glaze’s silky texture.
The Perfect Sauce Consistency
Aim for a glaze that coats the back of a spoon but still runs freely. If it’s too thick, add a teaspoon of water and whisk. If it’s too thin, let it simmer a bit longer. The right consistency ensures each piece is coated evenly without being drenched.
Creative Twists and Variations
This recipe is a playground. Here are some of my favorite ways to switch things up:
Spicy Sriracha Honey Chicken
Add a tablespoon of sriracha to the sauce for a kick that balances the sweetness. The heat complements the honey, creating a complex flavor profile that’s perfect for spice lovers. Serve over rice for a fiery dinner.
Citrus‑Infused Orange Honey Chicken
Replace the rice vinegar with freshly squeezed orange juice and add a teaspoon of orange zest. The citrus adds brightness and a subtle floral note that lifts the dish. Pair it with jasmine rice for an aromatic experience.
Thai Coconut Honey Chicken
Swap the water in the cornstarch slurry for coconut milk and add a splash of fish sauce. The coconut adds creaminess, while the fish sauce deepens the umami. This version is a nod to Thai street food.
Garlic‑Rich Garlic Honey Chicken
Double the amount of minced garlic and add a pinch of crushed red pepper flakes. The extra garlic gives a robust flavor, and the pepper flakes provide a subtle heat. This version is great for garlic enthusiasts.
Herb‑Enhanced Honey Chicken
Finish the dish with a handful of chopped fresh basil or cilantro before serving. The herbs add freshness and a burst of color. It’s a simple way to elevate the dish without adding extra calories.
Vegetarian Sweet & Sticky Honey “Chicken”
Use tofu or tempeh instead of chicken for a plant‑based version. Marinate the tofu in the sauce for 15 minutes before cooking. The tofu absorbs the glaze, creating a satisfying vegan alternative.
Storing and Bringing It Back to Life
Fridge Storage
Store leftovers in an airtight container in the refrigerator for up to 3 days. The sauce will thicken slightly as it cools, but it remains delicious. Let it sit at room temperature for 15 minutes before reheating to restore its glossy texture.
Freezer Friendly
For longer storage, freeze the dish in a freezer‑safe container for up to 2 months. Thaw overnight in the refrigerator before reheating. The flavor stays intact, and the sauce will re‑glaze beautifully.
Best Reheating Method
Reheat gently in a skillet over medium heat, adding a splash of water or broth to loosen the sauce. Stir frequently until heated through. Adding a tiny splash of water before reheating steams the dish back to perfection, preventing the glaze from drying out.