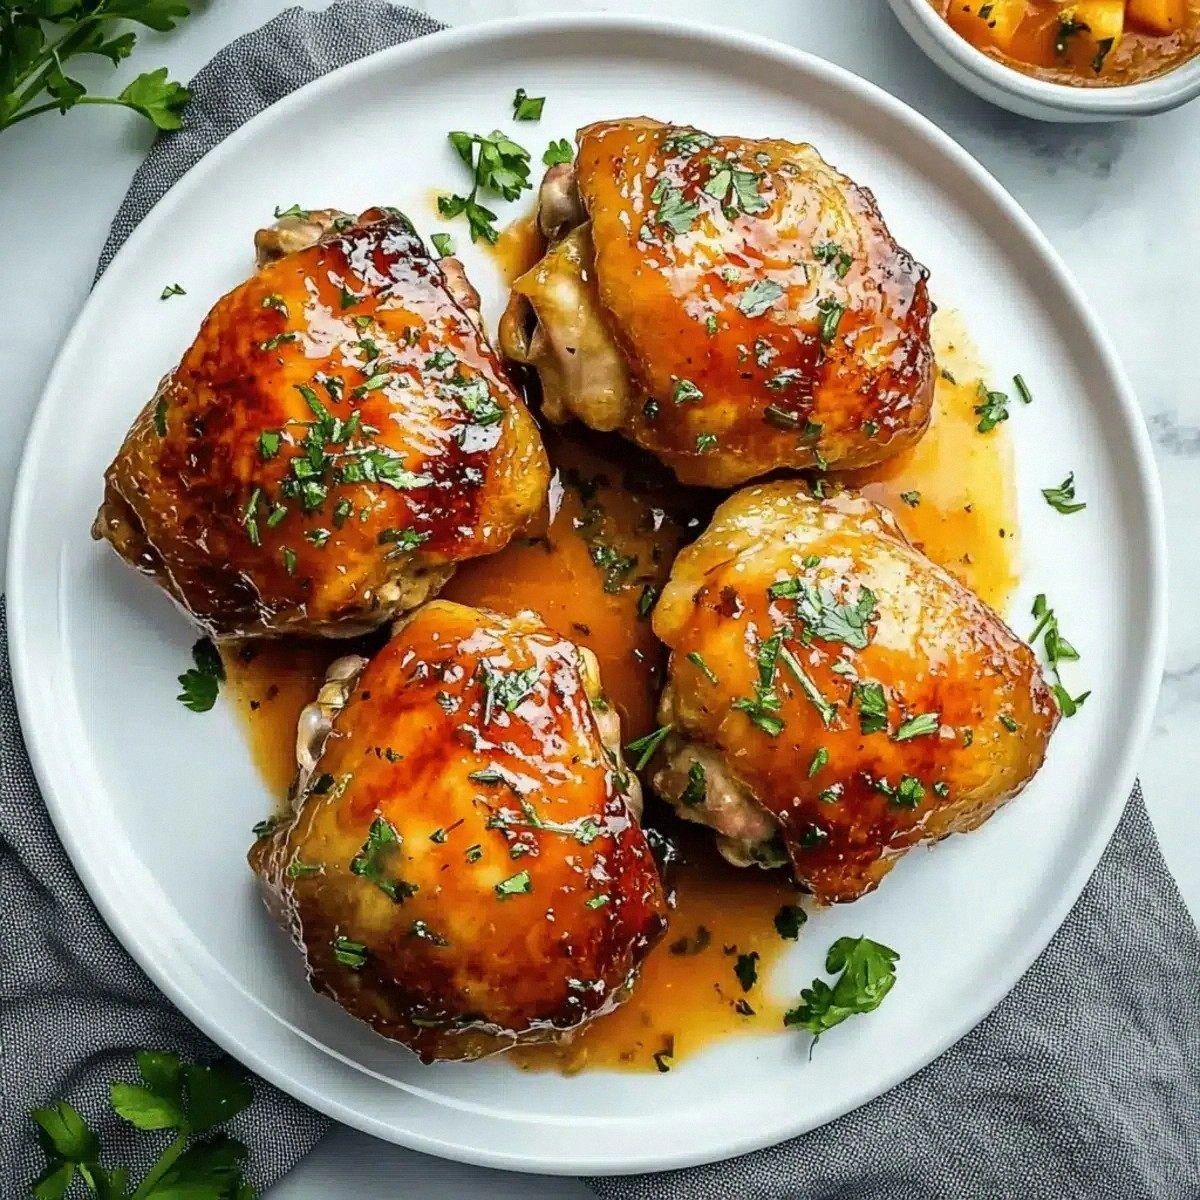
Okay, picture this: a Friday night, the kind of night where the kitchen smells like a summer orchard and the only thing on your mind is “I need something that feels like a hug but also makes me feel like a rockstar.” I was half‑way through a bland chicken dinner when my roommate dared me to “make it taste like a peach‑cobbled carnival.” I laughed, I rolled my eyes, and then I did the only logical thing—grabbed a jar of peach preserves, a splash of honey, and a dash of soy sauce, and turned my ordinary chicken thighs into a glossy, caramel‑kissed masterpiece. The result? A dish that made me swear I’d discovered the culinary equivalent of a secret level in a video game.
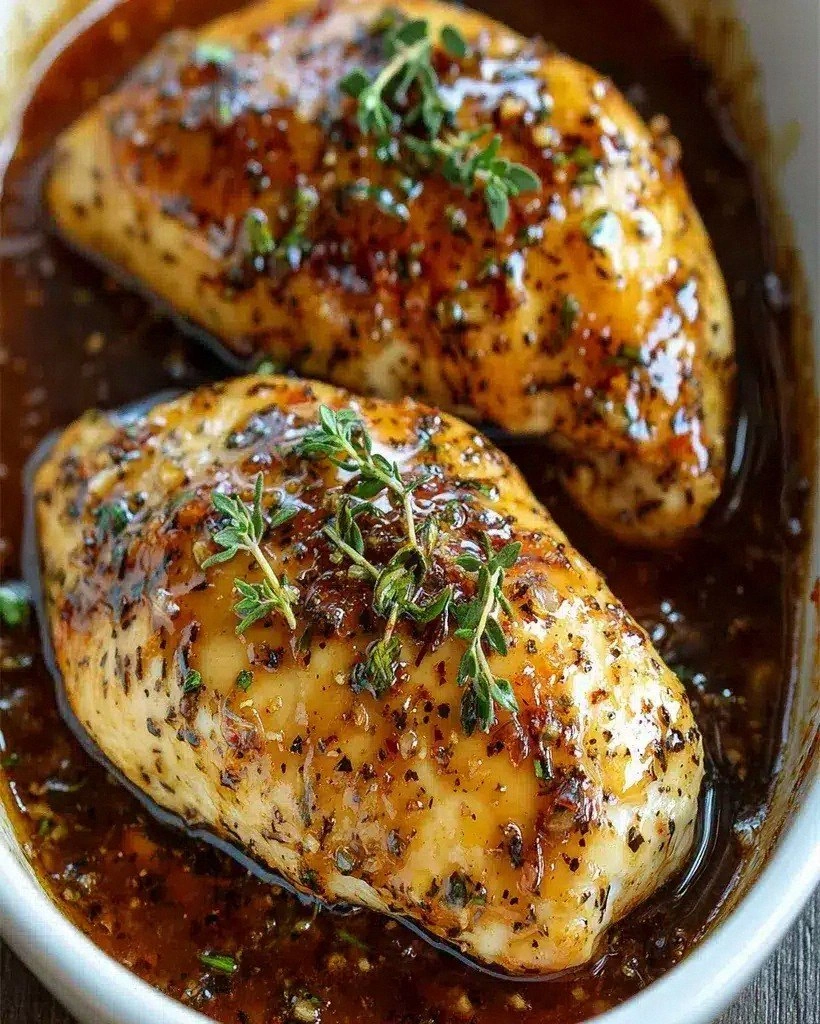
The moment the pan hit the stove, the sizzle was louder than my favorite 90s pop song, and the aroma hit me like a wave of sunshine on a rainy day. You could see the glaze bubbling, turning a deep amber that reminded me of sunrise over a peach orchard. The sound of the glaze thickening was a soft whisper, like a secret being told between old friends. When I finally lifted the lid, the steam rose in ribbons, carrying a sweet‑tangy perfume that made my stomach do a little happy dance. The skin of the thighs turned crisp, the meat stayed juicy, and the glaze clung to every curve like a perfectly fitted dress.
Most peach chicken recipes out there either drown the bird in sugary sauce or forget the crucial balance of acidity that keeps the sweetness from turning into a cloying mess. This version, however, walks the tightrope with the poise of a seasoned acrobat—sweet peach preserves, a whisper of honey, a splash of cider vinegar, and the umami punch of soy sauce all harmonize without ever stepping on each other’s toes. The secret? A pinch of ground ginger that adds a subtle heat, and a quick flash‑sear that locks in juices before the glaze does its magic. I dare you to taste this and not go back for seconds; it’s that good.
And guess what? I’m about to spill the beans on a technique that most cooks overlook: a two‑stage cooking method that starts with a high‑heat sear and finishes with a gentle oven bake. This ensures the skin stays crisp while the interior stays buttery soft. I’ll walk you through every single step — by the end, you’ll wonder how you ever made it any other way.
What Makes This Version Stand Out
- Flavor Harmony: The peach glaze delivers a sweet‑tart punch that’s balanced by soy’s salty depth and ginger’s warm spice, creating a layered taste that evolves with each bite.
- Texture Contrast: Crispy, caramelized skin meets melt‑in‑your‑mouth meat, while the glaze adds a glossy, slightly sticky finish that clings like velvet.
- Simplicity: Only eight pantry staples are needed, and the steps are straightforward enough for a weekday dinner yet impressive enough for guests.
- Unique Ingredient Pairing: Combining peach preserves with cider vinegar is a game‑changer; the acidity cuts through the sweetness, preventing cloyiness.
- Crowd Reaction: I’ve watched grown‑ups and kids alike light up, often asking for the “secret sauce”—the glaze becomes the talk of the table.
- Ingredient Quality: Using high‑quality chicken thighs (skin‑on, bone‑in) ensures flavor and juiciness, while a good jar of peach preserves adds authentic fruit notes.
- Cooking Method: The sear‑then‑bake technique locks in moisture and creates that irresistible caramelized crust.
- Make‑Ahead Potential: The glaze can be prepared ahead of time; just sear and bake the chicken when you’re ready to serve.
Alright, let's break down exactly what goes into this masterpiece…
Inside the Ingredient List
The Flavor Base
First up, the peach preserves. This is where the sweet, fruity backbone comes from, and you’ll want a brand that’s just sweet enough without added corn syrup. If you skip this, you’ll lose the signature peachy glow that makes this dish unforgettable. A good swap is a high‑quality apricot jam, but expect a slightly different fruit profile. When buying, look for jars with real fruit pieces; they give texture and depth.
The Texture Crew
The chicken thighs themselves are the heroes. Skin‑on, bone‑in thighs provide extra flavor and keep the meat from drying out. If you’re short on time, boneless, skinless thighs work, but you’ll sacrifice that crispy skin and some of the juicy richness. When selecting, feel for a firm texture and a slight pink hue; avoid any that look grayish or have a strong odor.
The Unexpected Star
Cider vinegar is the unsung hero. Its bright acidity cuts through the sweetness, preventing the glaze from becoming syrupy. If you don’t have cider vinegar, a splash of rice vinegar or even a dash of lemon juice can step in, though the flavor will shift subtly. Skipping the vinegar? Expect a glaze that clings too heavily and a dish that feels heavy on the palate.
The Final Flourish
Ground ginger and minced garlic add that warm, aromatic backbone. Fresh ginger could be used for a zingier bite, but the ground version distributes evenly in the glaze. Garlic brings depth; if you’re allergic, substitute with a pinch of asafoetida for a similar umami kick. Salt, of course, is the flavor enhancer that ties everything together—don’t skimp on it.
Everything's prepped? Good. Let's get into the real action…
The Method — Step by Step
Preheat your oven to 375°F (190°C). While the oven warms up, pat the chicken thighs dry with paper towels, then sprinkle both sides with the kosher salt. This dry‑seasoning step draws out excess moisture, setting the stage for that coveted crispy skin. Let the thighs rest for five minutes; this tiny pause lets the salt penetrate the meat.
Heat a large, oven‑safe skillet (cast iron is ideal) over medium‑high heat and add a tablespoon of neutral oil. When the oil shimmers, place the thighs skin‑side down. You’ll hear a sizzle that’s louder than a popcorn kernel—this is the sound of flavor forming. Cook for 5‑6 minutes without moving them; the skin should turn a deep golden brown and start to pull away from the pan.
While the skin crisps, whisk together the peach preserves, honey, cider vinegar, soy sauce, ground ginger, and minced garlic in a small bowl. The mixture should look glossy and slightly thick—this is your glaze. Taste it; it should be a balanced sweet‑tart with a hint of spice. If it leans too sweet, add a splash more vinegar; if too sharp, a drizzle more honey will smooth it out.
Flip the thighs so the flesh side is down, then pour the glaze over them, ensuring each piece gets a generous coating. The pan will bubble, and the glaze will begin to caramelize, coating the meat like a lacquer. Let it cook for another 2‑3 minutes, spooning the thickening sauce over the top repeatedly. This is the moment of truth—watch for the glaze to thicken but not burn.
Transfer the skillet to the preheated oven. Bake for 20‑25 minutes, or until the internal temperature of the thickest part reaches 165°F (74°C). As the thighs roast, the glaze will deepen in color, turning a rich amber that glistens through the oven light. Halfway through, baste the thighs with the pan juices—this keeps them moist and builds that sticky, caramelized finish.
When the timer dings, pull the skillet out and let the chicken rest for five minutes. Resting lets the juices redistribute, and the glaze will thicken further as it cools slightly, creating a sauce that clings perfectly. While you wait, slice a fresh peach or a handful of fresh herbs to sprinkle on top for a burst of color.
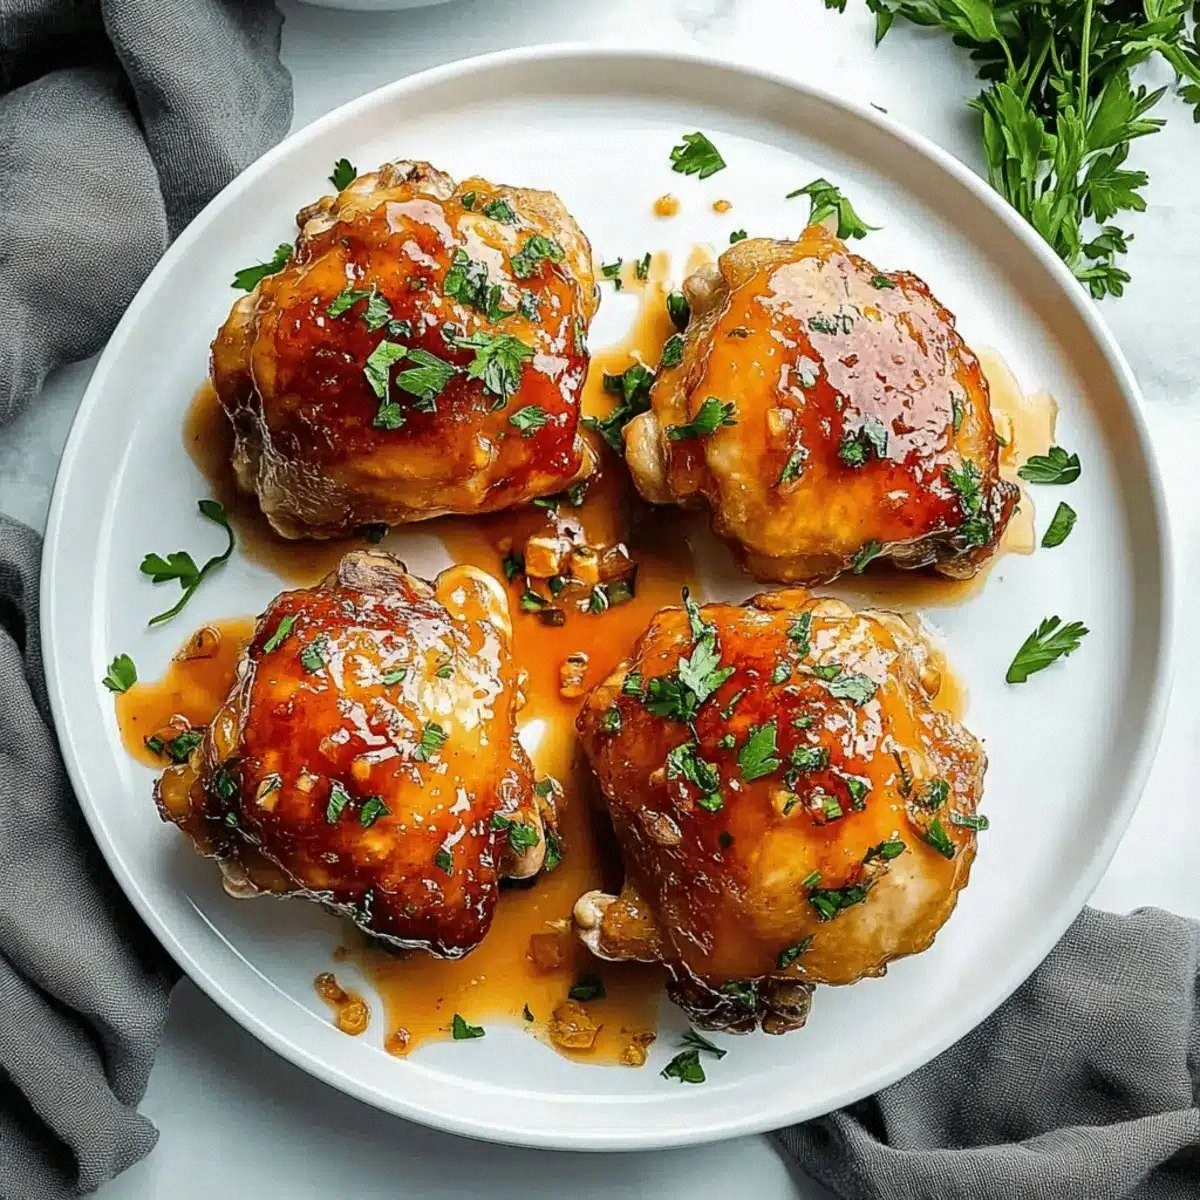
Plate the thighs skin‑side up, drizzle any remaining glaze from the pan over the top, and garnish with chopped cilantro or scallions if you like. The final presentation should look glossy, with the skin crackling like a caramelized crust. Serve with steamed rice, quinoa, or a simple green salad to let the glaze shine.
That's it — you did it. But hold on, I've got a few more tricks that'll take this to another level...
Insider Tricks for Flawless Results
The Temperature Rule Nobody Follows
Most home cooks sear chicken on high heat and then lower it immediately, but the secret is to maintain a steady medium‑high temperature for the entire sear. This ensures the skin renders fat evenly, creating that perfect crackle. I once tried to rush the sear on high heat, and the skin burned before the fat had a chance to melt—result: bitter, uneven crust. Keep your stove at a consistent medium‑high, and you’ll get a uniform golden‑brown finish every time.
Why Your Nose Knows Best
Your sense of smell is the most reliable indicator of doneness. When the glaze starts to caramelize, you’ll notice a nutty, toasty aroma that signals the sugars are reaching the perfect stage. If the scent turns smoky, you’ve crossed the line. Trust that nose cue more than a timer; it’s the culinary equivalent of a built‑in meat thermometer.
The 5‑Minute Rest That Changes Everything
Resting chicken isn’t just for roasts. Letting these thighs sit for five minutes after baking lets the fibers relax and the glaze to thicken just enough to cling. Skipping this step results in a dry bite and a runny sauce that slides off the plate. I’ll be honest — I ate half the batch before anyone else got to try it, but I still made sure to let the rest rest.
Basting is Not Optional
During the oven phase, open the door quickly, tilt the pan, and spoon the pan juices over the thighs. This continuous basting builds layers of flavor and prevents the glaze from drying out. A friend once skipped basting and ended up with a dry top layer; the meat was fine, but the glaze never achieved that glossy finish. Trust me, the extra effort pays off in every bite.
The Sweet‑Sour Balance Trick
If you find the glaze too sweet after tasting, a splash of extra cider vinegar or a pinch of ground black pepper will cut the sugar and add depth. Conversely, if it’s too tangy, a drizzle of honey will bring it back to harmony. This balancing act is what makes the dish feel like a well‑orchestrated symphony rather than a one‑note tune.
Creative Twists and Variations
This recipe is a playground. Here are some of my favorite ways to switch things up:
Spicy Peach Heat
Add a teaspoon of sriracha or a pinch of red pepper flakes to the glaze. The heat will cut through the sweetness, creating a sweet‑heat combo that’s perfect for those who love a little kick.
Herb‑Infused Glaze
Stir in fresh thyme or rosemary during the final basting stage. The herbaceous notes add an earthy depth that pairs beautifully with the fruitiness of the peach.
Coconut‑Lime Fusion
Replace half the honey with coconut cream and finish with a squeeze of lime juice. This gives the dish a tropical vibe, perfect for a summer dinner on the patio.
Balsamic Peach Glaze
Swap cider vinegar for aged balsamic vinegar. The richer, slightly sweet acidity adds complexity and a darker color, making the dish look even more sophisticated.
Peach BBQ Twist
Mix in a tablespoon of smoked paprika and a splash of liquid smoke into the glaze. The result is a smoky, peach‑infused BBQ chicken that pairs well with coleslaw.
Gluten‑Free Crunch
Coat the thighs lightly with almond flour before searing for a nutty crust that stays gluten‑free while adding a subtle crunch.
Storing and Bringing It Back to Life
Fridge Storage
Place cooled chicken thighs in an airtight container and store them in the refrigerator for up to three days. The glaze will continue to meld, becoming even more flavorful. Reheat gently on the stovetop over low heat, adding a splash of water or chicken broth to revive the sauce.
Freezer Friendly
Separate the glaze from the chicken before freezing. Store the glaze in a zip‑top bag and the cooked thighs on a parchment‑lined tray. Freeze for up to two months. To serve, thaw overnight, reheat the glaze, and toss the thighs back in for a quick finish.
Best Reheating Method
The oven is your best friend for reheating. Preheat to 300°F (150°C), place the thighs on a baking sheet, and drizzle a teaspoon of water over each piece. Cover loosely with foil and heat for 12‑15 minutes. The added moisture steams the meat back to juiciness while the glaze re‑glazes itself.