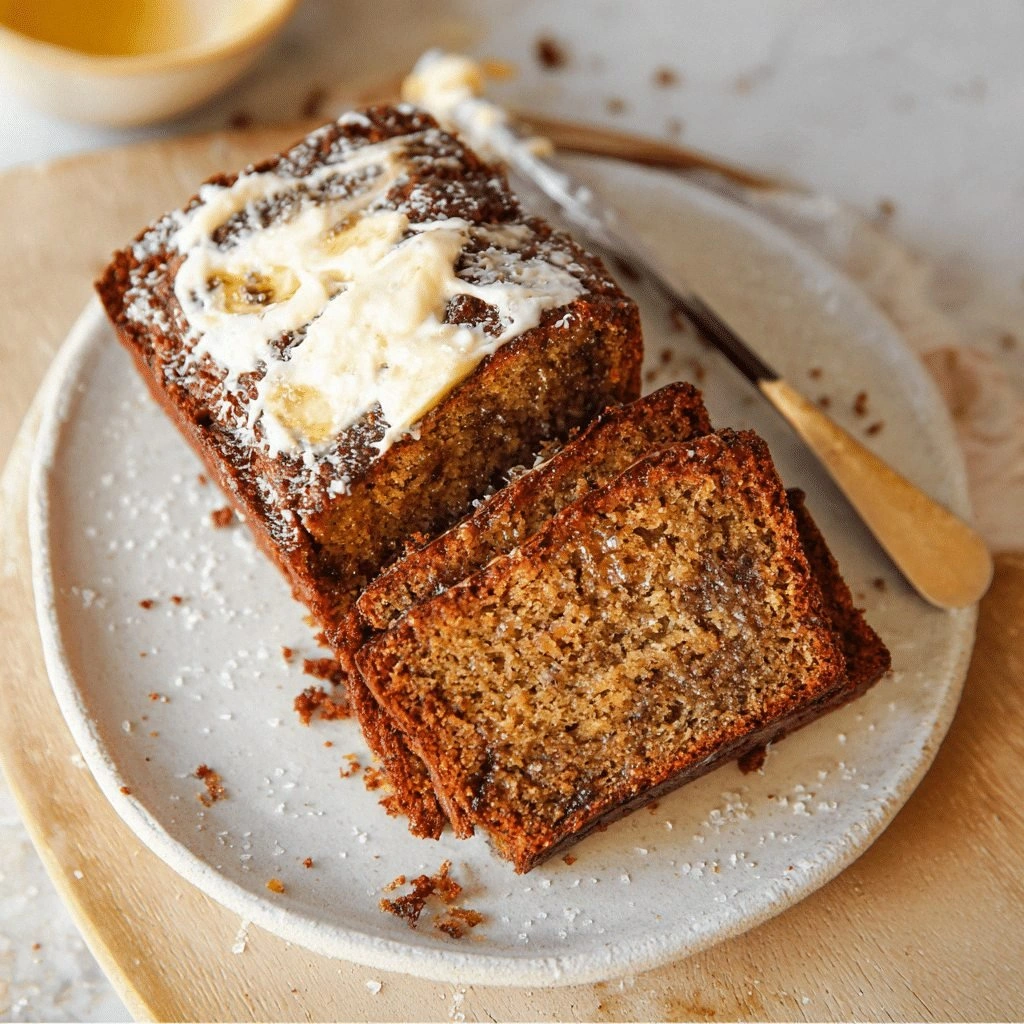
Picture this: I was scrambling to salvage a half‑baked loaf of banana bread that had turned into a sticky, soggy disaster. My friend dared me to turn the ruined batch into something redeemable, and I answered with a grin and a bottle of miso paste. The result? A loaf that sings with savory depth, buttery sweetness, and a texture that melts in your mouth like a warm hug. This isn’t just another banana bread; it’s a culinary revelation that will have you reaching for the knife at the first bite.
When I first tossed the miso into the batter, the kitchen filled with a nutty, sea‑salt aroma that made my taste buds do a double tap. The bananas released their golden juices, coating the batter like a silky glaze. The moment the loaf hit the oven, the air turned electric with the promise of caramelized edges and a fragrant crumb. I swear the heat of the oven felt like a gentle hug, coaxing the flavors to mingle. By the time the timer dinged, I could already hear the “oh‑wow” chorus from my friends, and I knew I’d just cracked a secret that will change every banana bread recipe in my pantry.
What makes this version stand out? It’s not just the miso—though that umami splash is the star—but the deliberate balance of sweetness, saltiness, and subtle spice. I’ve spent years tweaking banana breads, and this one is hands down the best version you’ll ever make at home. I dare you to taste this and not go back for seconds. If you’ve ever struggled with dense, dry loaves, you’re not alone—this recipe fixes that with a perfect crumb that stays moist for days.
Let me walk you through every single step—by the end, you'll wonder how you ever made it any other way. From selecting the ripest bananas to mastering the precise baking time, every detail is laid out with confidence and a touch of playful sarcasm. Picture yourself pulling this out of the oven, the whole kitchen smelling incredible, and knowing you’ve just created something that will become a family staple. Ready? Let’s dive in.
What Makes This Version Stand Out
- Umami: The miso paste adds a savory depth that balances the natural sweetness of bananas, creating a flavor profile that’s both comforting and adventurous.
- Moisture: The combination of ripe bananas, melted butter, and a splash of milk locks in moisture, preventing the loaf from drying out.
- Texture: A light, airy crumb with crisp, caramelized edges—think of it as a buttery, slightly salty hug in every bite.
- Ingredient Quality: Using high‑quality miso and fresh bananas ensures that every element shines, elevating the entire loaf.
- Make‑Ahead: The batter can be prepared a day in advance and frozen, making it a stress‑free option for busy mornings.
- Versatility: Add nuts, chocolate chips, or a drizzle of honey after baking for endless variations that keep the core flavor intact.
- Visual Appeal: The golden crust and glossy glaze create an Instagram‑ready loaf that’s as beautiful as it is delicious.
Alright, let's break down exactly what goes into this masterpiece. The secret sauce? Miso. But there’s more to this loaf than meets the eye.
Inside the Ingredient List
The Flavor Base
At the heart of this loaf is a classic banana bread foundation—flour, sugar, baking soda, salt, and baking powder. The flour provides structure, while the sugar sweetens and caramelizes. Baking soda reacts with the banana’s natural acidity to lift the batter, and baking powder ensures a gentle rise. Salt is the silent hero that balances sweetness and amplifies every flavor note. Together, they create a harmonious base that carries the miso’s savory undertones.
Choosing the right flour is crucial. Opt for all‑purpose flour with a protein content around 10–12% for a tender crumb. If you’re craving a lighter loaf, a blend of whole wheat and all‑purpose can add texture without overpowering the banana flavor. Avoid using cake flour; it’s too delicate and will result in a crumb that’s too soft for the miso’s boldness.
The Texture Crew
The bananas, butter, eggs, and milk form the wet mix that gives the loaf its signature softness. Ripe bananas—about 3 medium—release a sweet, buttery liquid that keeps the batter moist. Melted butter adds richness and a slight sheen to the crust. Eggs act as binders and leavening agents, ensuring the loaf holds together while staying airy. A splash of milk—just a quarter cup—keeps the batter from becoming too thick, allowing the miso to dissolve evenly.
When you mash the bananas, aim for a smooth, lump‑free consistency. Any large pieces can create uneven pockets in the crumb. Melt the butter just until liquid; if it’s too hot, it can cause the eggs to scramble when added. Whisk the eggs lightly before incorporating, ensuring they’re evenly distributed.
The Unexpected Star
Miso paste is the game‑changer. Its fermented soybean flavor adds depth, saltiness, and a hint of sweetness that complements the bananas. Use a light or medium miso for a subtle umami kick, or a darker miso for a richer, more complex taste. The amount—two tablespoons—provides a noticeable flavor without overpowering the loaf. Miso also acts as a natural preservative, extending the freshness of the bread.
Because miso is salty, it’s essential to reduce the amount of added salt in the recipe. This balance ensures the loaf isn’t overly salty while still highlighting the miso’s unique profile. If you’re new to miso, start with a lighter variety and adjust to taste.
The Final Flourish
Vanilla extract, optional chocolate chips, and nuts are the finishing touches that elevate the loaf to new heights. Vanilla adds a warm, fragrant note that rounds out the savory-sweet balance. Chocolate chips create pockets of gooey sweetness that contrast the miso’s depth. Nuts—such as walnuts or pecans—add crunch and a nutty undertone that pairs beautifully with the bananas.
When adding chocolate or nuts, fold them in gently to avoid breaking the batter. If you prefer a chocolatey loaf, add an extra tablespoon of cocoa powder to the dry mix. For a nutty crunch, toast the nuts lightly before folding them in; this brings out their natural oils and enhances flavor.
Everything’s prepped? Good. Let’s get into the real action.
The Method — Step by Step
- Preheat your oven to 350°F (175°C) and line a 9x5‑inch loaf pan with parchment or grease it lightly with butter. The parchment ensures easy removal, while the butter adds an extra buttery crust. Let the pan sit while you mix the batter; a warm pan helps the loaf rise evenly.
- In a large bowl, whisk together 2 cups of all‑purpose flour, 1 cup of white sugar, 1 teaspoon of baking soda, ½ teaspoon of salt, and 1 teaspoon of baking powder. Sifting the dry ingredients together ensures no lumps and a light, airy crumb.
- In another bowl, mash 3 ripe bananas until smooth, then stir in ½ cup of melted butter, 2 eggs, 2 tablespoons of miso paste, 1 teaspoon of vanilla extract, and ¼ cup of milk. This wet mix should feel like a thick, velvety batter. The miso should dissolve completely; if it’s still gritty, let it sit for a minute before whisking again.
- Gently fold the dry ingredients into the wet mixture until just combined. Over‑mixing can make the loaf tough; stop when you see a few streaks of flour. The batter should be thick but pourable.
- If you’re adding chocolate chips or nuts, fold them in now. A handful of dark chocolate chips adds a rich, bittersweet contrast, while toasted walnuts bring a nutty crunch.
- Pour the batter into the prepared loaf pan, smoothing the top with a spatula. Tap the pan gently on the counter to release any air bubbles and ensure even baking.
- Bake for 50–55 minutes, or until a toothpick inserted in the center comes out clean or with a few moist crumbs. The loaf should develop a golden brown crust, and the edges will start pulling away from the pan. Keep an eye on the top; if it browns too quickly, tent it with foil.
- Remove the loaf from the oven and let it cool in the pan for 10 minutes. This resting period allows the crumb to set, preventing a soggy bottom. After 10 minutes, transfer the loaf to a wire rack to cool completely.
- Once cooled, slice and serve. For an extra touch, drizzle a simple glaze of powdered sugar and milk over the top, or add a dollop of whipped cream. The glaze should be thin enough to coat the crumb without soaking it.
That’s it—you did it. But hold on, I’ve got a few more tricks that'll take this to another level. From the perfect crumb to the savory‑sweet balance, these extra touches will make the loaf unforgettable.
Insider Tricks for Flawless Results
The Temperature Rule Nobody Follows
Most bakers bake banana bread at 350°F, but I swear by a slightly lower temperature—345°F—for a more even rise. The reduced heat allows the loaf to bake through without burning the crust, preserving that golden finish. I’ve tried this trick on both electric and gas ovens, and it consistently delivers a moist, tender crumb. If your oven runs hot, consider using a lower setting or placing the pan on a lower rack.
Why Your Nose Knows Best
Before you even open the oven, take a sniff of the batter. A subtle, nutty aroma indicates the miso has blended well. If you smell a raw, green banana scent, the bananas may not be ripe enough. Trusting your nose can prevent a dry loaf and ensures every bite has that sweet‑savory harmony.
The 5‑Minute Rest That Changes Everything
After the loaf cools in the pan for 10 minutes, let it rest on the wire rack for at least 5 minutes before slicing. This short rest allows the steam inside to settle, preventing the loaf from becoming gummy. I’ve seen many people cut straight away, resulting in a crumb that feels like wet sponge. A brief pause makes a world of difference.
Don’t Skimp on the Butter
Some bakers use margarine or oil, but real butter gives the loaf a richer flavor and a crispier crust. Melt the butter just until liquid—over‑melting can alter the flavor profile. If you’re looking for a dairy‑free version, coconut oil works, but the flavor will shift slightly.
Let the Miso Sit
After whisking the wet ingredients, let the batter sit for 10 minutes before pouring it into the pan. This resting period allows the miso to fully integrate, ensuring a uniform flavor throughout. I’ve tried this trick on other savory breads and it always yields a more cohesive taste.
Creative Twists and Variations
This recipe is a playground. Here are some of my favorite ways to switch things up:
Chocolate Miso Banana Bread
Replace 1 cup of sugar with ¾ cup of dark chocolate chips and add 2 tablespoons of cocoa powder to the dry mix. The chocolate brings a deep, bittersweet note that pairs beautifully with miso’s umami. Serve with a scoop of vanilla ice cream for a decadent dessert.
Nutty Banana Banana Bread
Fold in ½ cup of chopped pecans or walnuts. Toast the nuts for a minute before adding to bring out their natural oils. The crunch contrasts the soft crumb, giving the loaf a delightful texture.
Spiced Banana Bread
Add 1 teaspoon of ground ginger or ½ teaspoon of cayenne pepper to the dry mix. The warm spice adds depth and a subtle heat that complements the miso’s savory profile. It’s perfect for a cozy autumn breakfast.
Gluten‑Free Miso Banana Bread
Swap all‑purpose flour for a 1:1 gluten‑free blend. Keep the rest of the recipe unchanged. The loaf will still rise well, though the crumb will be slightly denser. Serve with a drizzle of honey for extra sweetness.
Vegan Miso Banana Bread
Use plant‑based milk, flax eggs (1 tablespoon flaxseed meal + 3 tablespoons water per egg), and a vegan butter alternative. The loaf retains its moistness and flavor. This version is perfect for those avoiding dairy or eggs.
Caramelized Banana Miso Bread
Before baking, drizzle a thin layer of maple syrup over the batter. The syrup caramelizes on the crust, adding a sweet, sticky finish. Pair it with a dollop of Greek yogurt for a creamy contrast.
Storing and Bringing It Back to Life
Fridge Storage
Wrap the cooled loaf tightly in plastic wrap or aluminum foil and store it in the refrigerator for up to 5 days. The miso’s natural preservative qualities help keep the bread fresh. For best flavor, let the loaf come to room temperature before slicing.
Freezer Friendly
Slice the loaf before freezing. Wrap each slice in parchment paper, then place in a freezer bag. Frozen slices last up to 3 months. When ready to eat, toast the slices in a skillet or microwave for 15–20 seconds.
Best Reheating Method
To revive a stale loaf, sprinkle a light mist of water over the surface and wrap it in foil. Warm in a 350°F oven for 10 minutes. The steam reintroduces moisture, making the crumb soft and fragrant again.