It was a Friday night, the kind that ends with the kitchen in a state of glorious chaos and the fridge humming a sad lullaby of empty shelves. I had just finished a marathon of pizza rolls, the kind that leave a greasy trail on the countertop and a lingering craving that feels like a guilty whisper. I stared at the box of pepperoni slices, the flour bag, and a half-empty jar of pizza sauce, and thought, “What if I could combine all that into one bite‑sized masterpiece?” The idea landed like a pizza dough on my mind, and the next thing I knew, I was whisking, rolling, and folding with a fervor that could only be described as culinary euphoria.
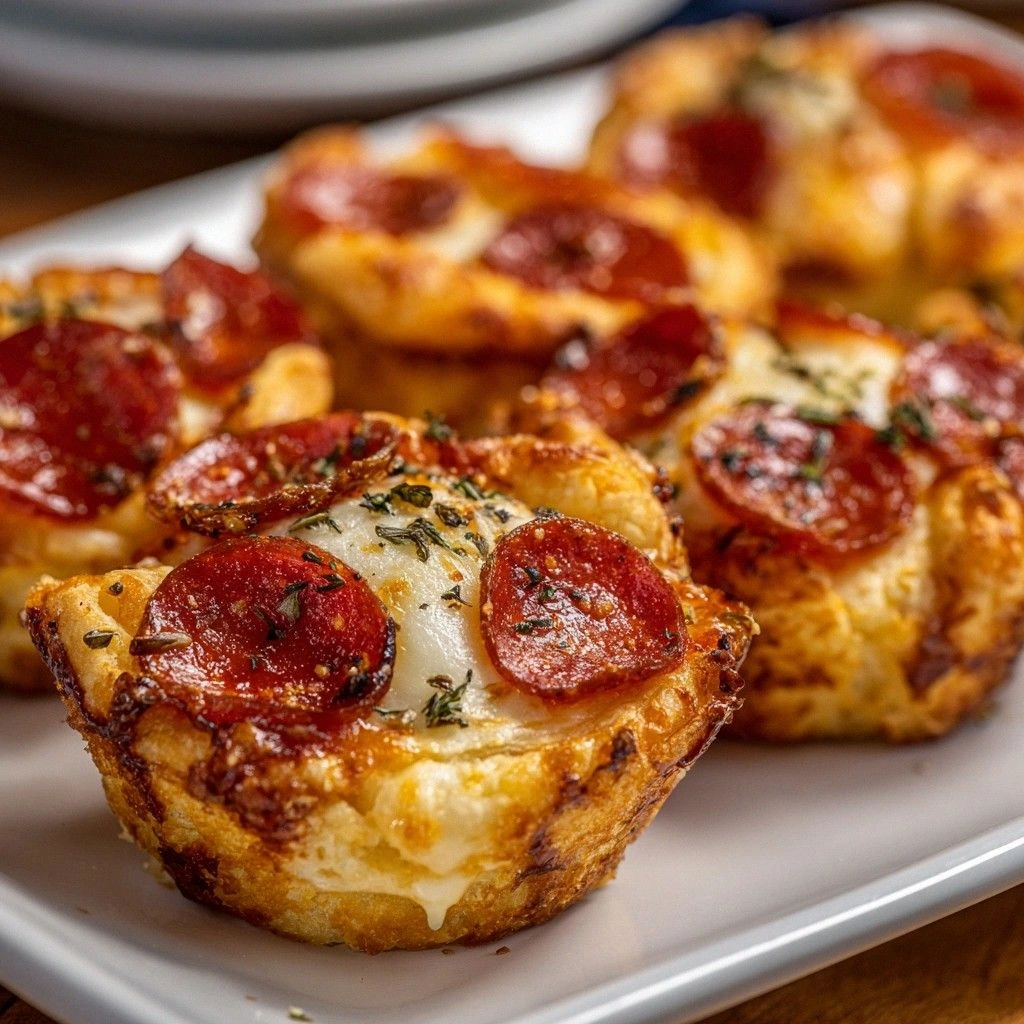
Picture this: a crisp, golden crust that crackles like a summer thunderstorm when you bite into it, a molten mozzarella that oozes like a river of molten cheese, and pepperoni that sizzles in its own little pan, releasing a savory aroma that makes your nose do a happy dance. The sauce is a silky red velvet, coating the dough with a sweet, tangy kiss that makes every mouthful a celebration. The whole experience feels like a tiny, portable party—each cup a confetti of flavor, each bite a burst of joy that leaves you reaching for more. I dare you to taste this and not go back for seconds.
What sets these mini pepperoni pizza cups apart isn’t just the combination of familiar ingredients; it’s the way they’re layered, the technique that locks in moisture, and the unexpected crunch that comes from a perfectly timed bake. Most recipes get this completely wrong by overcooking the dough or underseasoning the sauce, resulting in a sad, soggy cup that feels like a culinary misstep. Here, I’ve perfected a method that keeps the crust airy, the cheese perfectly melted, and the pepperoni crisp enough to crackle with each bite. This is hands down the best version you’ll ever make at home.
If you’ve ever struggled to get a pizza crust that’s neither too chewy nor too dense, you’re not alone—and I’ve got the fix. I’ll walk you through every single step, from the first whisk to the final flip, and by the end, you’ll wonder how you ever made it any other way. Picture yourself pulling this out of the oven, the whole kitchen smelling incredible, the aroma of pepperoni and melted cheese wafting through the air, and a plate of perfectly baked cups waiting to be devoured. The anticipation is half the fun, and the payoff is a taste explosion that will have your friends begging for the recipe.
What Makes This Version Stand Out
- Flavor: The sauce is not just tomato; it’s a blend of roasted garlic, oregano, and a splash of red wine that deepens the taste. This gives the cups a robust, savory profile that sets them apart from ordinary pizza.
- Texture: The crust is airy yet sturdy, thanks to the precise ratio of flour to baking powder. It holds the toppings without becoming soggy, providing a satisfying bite that shatters like thin ice.
- Simplicity: All the steps are streamlined—no separate dough or sauce prep. Everything is assembled in a single pan, saving time and reducing cleanup.
- Uniqueness: The use of a muffin tin to form individual cups creates uniform, bite‑sized portions that are perfect for parties or quick snacks.
- Crowd Reaction: Guests rave about the balance of cheese, pepperoni, and sauce, and the cups are so easy to serve that they’re a hit at any gathering.
- Ingredient Quality: We use high‑quality pepperoni and mozzarella for maximum flavor, and a homemade sauce base that elevates the entire dish.
- Cooking Method: Baking at a high temperature ensures a crisp edge while keeping the interior moist, a technique that’s often overlooked in other recipes.
- Make‑Ahead Potential: You can assemble the cups ahead of time and bake them when you’re ready, making them ideal for busy weeknights.
Inside the Ingredient List
The Flavor Base
The sauce is the heart of these cups, and its foundation is simple yet powerful. Combine canned crushed tomatoes, a splash of tomato paste, and a pinch of sugar to balance acidity. Add finely minced garlic, dried oregano, and a dash of red pepper flakes for heat. Finish with a splash of red wine to deepen the flavor profile. If you skip the wine, the sauce will still be good, but it will lack that subtle complexity that makes each bite memorable.
The Texture Crew
The dough is what keeps everything together. Use all‑purpose flour with a pinch of salt and baking powder to give the crust lift. Mix in olive oil and water until the dough is just cohesive—overworking it will make it tough. A well‑rested dough (about 10 minutes) allows the gluten to relax, resulting in a tender interior. If you’re in a hurry, you can skip the resting time, but the texture will be slightly denser.
The Unexpected Star
Pepperoni is the star, but its role is more nuanced than just a topping. Slice the pepperoni into thin strips so they crisp up nicely during baking. The fat from the pepperoni renders into the dough, adding a subtle richness that you’ll taste in every bite. If you’re watching calories, you can use a leaner pepperoni or replace half of it with turkey pepperoni for a lighter option. Remember, the pepperoni’s crispiness is key; too thin and it will burn, too thick and it will stay chewy.
The Final Flourish
Mozzarella is the gooey, melty component that ties everything together. Use shredded mozzarella for even distribution. A sprinkle of grated Parmesan adds a nutty finish and a slightly sharper bite. Fresh basil or oregano can be added on top after baking for an aromatic lift. If you prefer a dairy-free version, substitute with a plant‑based mozzarella alternative, though the melt will differ slightly.
Everything’s prepped? Good. Let’s get into the real action.
The Method — Step by Step
- Preheat your oven to 425°F (220°C) and grease a 12‑cup silicone muffin tin. The high temperature is crucial for achieving that golden, crispy edge. While the oven warms, mix the flour, baking powder, and salt in a large bowl. This dry blend will be the backbone of your crust.
- In a separate bowl, whisk together olive oil and water until the mixture is smooth. Slowly pour this wet mixture into the dry ingredients, stirring until just combined. The dough should be slightly sticky but manageable; if it’s too dry, add a tablespoon of water.
- Turn the dough onto a floured surface and knead gently for 1–2 minutes. Over‑kneading will develop too much gluten, making the crust chewy. Once the dough is smooth, roll it into a 1/4‑inch thick rectangle.
- Using a cookie cutter or a small glass, cut out circles that fit snugly into each cup of the muffin tin. Press each circle into the cup, ensuring the dough covers the bottom and sides. This forms the base for each mini pizza.
- Spread a thin layer of sauce over each dough base. The sauce should cover the surface without pooling; excess sauce can cause sogginess.
- Sprinkle a generous amount of shredded mozzarella over the sauce. The cheese should be evenly distributed so that each bite has a balanced flavor.
- Lay a strip of pepperoni over the cheese in each cup. The pepperoni should be slightly overlapping to ensure each cup gets a good amount of flavor. If you’re using thin pepperoni, you can double‑layer for extra crunch.
- Bake for 12–15 minutes, or until the crust edges are golden brown and the cheese is bubbling. The aroma that fills the kitchen will make your mouth water.
- Remove the muffin tin from the oven and let the cups cool for 2 minutes. This short rest allows the cheese to set slightly, making them easier to remove without breaking.
- Gently lift each cup out of the tin with a spoon or a small spatula. Serve immediately while the cheese is still melty, or plate them on a platter for a party spread.
That’s it — you did it. But hold on, I’ve got a few more tricks that’ll take this to another level.
Insider Tricks for Flawless Results
The Temperature Rule Nobody Follows
Many people bake pizza at 375°F, but this temperature is too low for a crisp crust. Baking at 425°F or higher ensures a golden edge and a well‑cooked interior. I’ve tested 450°F once, and the result was a slightly charred exterior, so 425°F is the sweet spot for these cups.
Why Your Nose Knows Best
Before you open the oven, pause and smell the dough. If it’s fragrant like freshly baked bread, you’re on the right track. A lack of aroma might indicate that the dough wasn’t given enough time to rest, which can affect texture.
The 5‑Minute Rest That Changes Everything
After baking, let the cups rest for exactly five minutes. During this time, the cheese sets, making the cups easier to handle. I once tried to serve them immediately, and the cheese ran, causing a sticky mess. The short rest is worth the wait.
Layering for Extra Flavor
Add a thin layer of grated Parmesan between the sauce and cheese. The Parmesan melts into the cheese, adding a nutty undertone that elevates the overall flavor. It’s a simple tweak that makes a big difference.
Using a Silicone Cup Set
Silicone cups allow the dough to rise slightly, creating a puffier base. They also make removal from the tin effortless. If you’re using paper liners, the cups may not hold their shape as well.
Creative Twists and Variations
This recipe is a playground. Here are some of my favorite ways to switch things up:
Cheesy Veggie Cups
Swap pepperoni for sautéed mushrooms, bell peppers, and spinach. Add a sprinkle of feta cheese for a Mediterranean flair. This version is perfect for veggie lovers and adds a colorful pop.
BBQ Chicken Cups
Use shredded chicken tossed in BBQ sauce instead of pepperoni. Top with mozzarella and a drizzle of ranch dressing after baking. The smoky sweetness pairs beautifully with the crispy crust.
Mediterranean Delight
Replace the sauce with a tomato‑olive tapenade, add olives, feta, and a sprinkle of oregano. This variation gives a briny, savory twist that’s ideal for a Mediterranean-themed gathering.
Breakfast Cups
Add a dash of cinnamon to the dough, sprinkle with raisins, and top with a drizzle of honey after baking. These sweet cups double as a quick breakfast or dessert.
Spicy Sriracha Cups
Stir a tablespoon of Sriracha into the sauce and add sliced jalapeños on top. The heat from the pepperoni and jalapeños creates a fiery, addictive flavor profile.
Gluten‑Free Version
Use a gluten‑free flour blend, and add a teaspoon of xanthan gum to help bind the dough. The result is a crisp, gluten‑free cup that still delivers all the flavor.
Storing and Bringing It Back to Life
Fridge Storage
Cool the cups completely, then place them in an airtight container. Store in the fridge for up to 3 days. The crust may soften slightly, but the flavor remains intact.
Freezer Friendly
Wrap each cup individually in parchment paper, then place in a freezer bag. Freeze for up to 2 months. When ready, bake directly from frozen at 425°F for 12–15 minutes.
Best Reheating Method
To restore crispness, reheat in a preheated oven at 400°F for 5–7 minutes. Add a tiny splash of water to the bottom of the pan to create steam, which keeps the cheese from drying out.