I still remember the day I set out to make a simple key lime pie and ended up with what my neighbors now call "The Accident That Changed Summer Forever." My grocery store was out of graham crackers, the oven was already preheating, and I had a bag of tiny key limes rolling around like rebellious marbles on my counter. Rather than admit defeat, I grabbed my grandmother's pound cake pan and decided to wing it. The result was a dense, buttery cake that tasted like a Florida vacation wrapped in a warm hug, with that signature tart zip that makes your lips pucker just enough to keep you coming back for another forkful.
The first time I pulled this golden beauty from the oven, my kitchen smelled like someone had squeezed sunshine itself into a cake pan. The tangy citrus perfume mingled with vanilla and browned butter so perfectly that my roommate wandered in, eyes half-closed, mumbling something about "baking sorcery." That crackly top gave way to a tender crumb so moist it practically sighed when I poked it, and the edges had that gorgeous dark caramelization that pound cake dreams are made of. I barely let it cool before slicing off a corner piece — you know, the one that's all crusty edge and buttery heaven — and the first bite made me do that embarrassing little happy dance we all pretend we don't do when nobody's watching.
Here's the thing about most key lime desserts: they're either too sweet, too tart, or they taste like someone waved a lime somewhere in the next room and called it flavor. This pound cake gets it right because we're not just adding juice and hoping for the best. We're building layers of lime personality — zest for bright top notes, juice for that middle tang, and a glaze that soaks in like liquid key lime pie. The result is balanced, complex, and absolutely impossible to eat just one slice of. I dare you to taste this and not go back for seconds.
Over the years I've tweaked, tested, and tasted my way through dozens of versions of this cake, and this is the one that makes people close their eyes when they take the first bite. It's the cake that gets requested for birthdays, that gets wrapped up and mailed across states, that gets made at 9 PM on a Tuesday because someone saw a lime at the store and couldn't stop thinking about it. Picture yourself pulling this out of the oven, the whole kitchen smelling incredible, while your family hovers nearby trying to act casual about wanting to cut into it while it's still warm. Let me walk you through every single step — by the end, you'll wonder how you ever made it any other way.
What Makes This Version Stand Out
Tangy-Sweet Balance: Most recipes dump in lime juice and call it a day, but we're building a three-layer lime experience that hits every part of your palate. The zest provides bright top notes, the juice gives us that signature tart middle, and the glaze brings a sweet-tart finish that keeps you reaching for another bite.
Texture Perfection: This isn't your dry, crumbly pound cake that needs a glass of milk to choke down. We're using a reverse-creaming method that creates an impossibly tender crumb while maintaining that classic dense pound cake structure. The edges stay buttery-crisp while the interior stays moist for days.
Beginner-Friendly Brilliance: Despite tasting like it came from a fancy bakery, this recipe is practically foolproof. No separating eggs, no whipping whites, no thermometer gymnastics. If you can measure ingredients and press buttons on your mixer, you can make this cake.
Make-Ahead Magic: This cake actually gets better after a day or two as the flavors meld and the glaze seeps into every crevice. Make it Sunday, glaze it Monday, serve it Tuesday, and watch people lose their minds over how you managed to get lime flavor into every molecule.
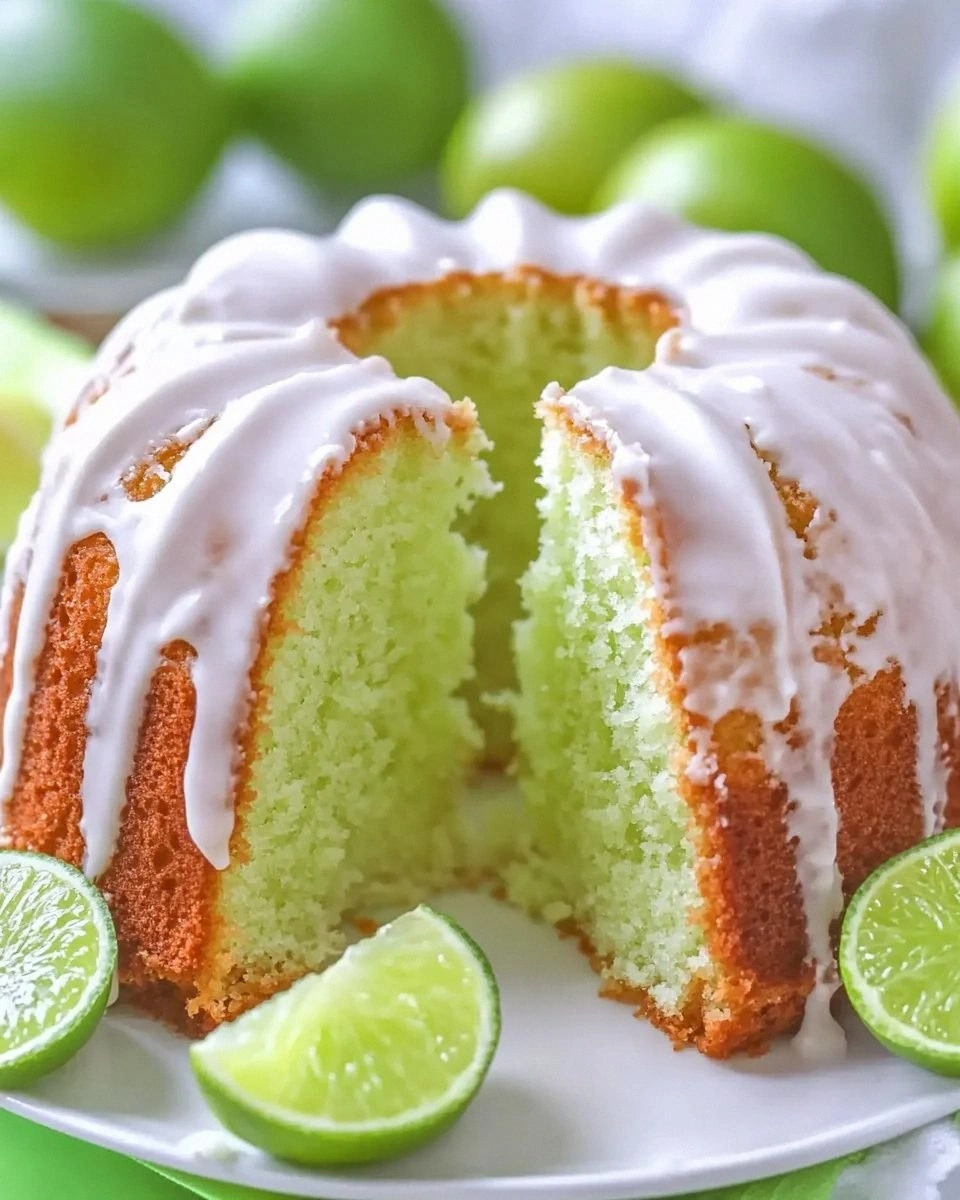
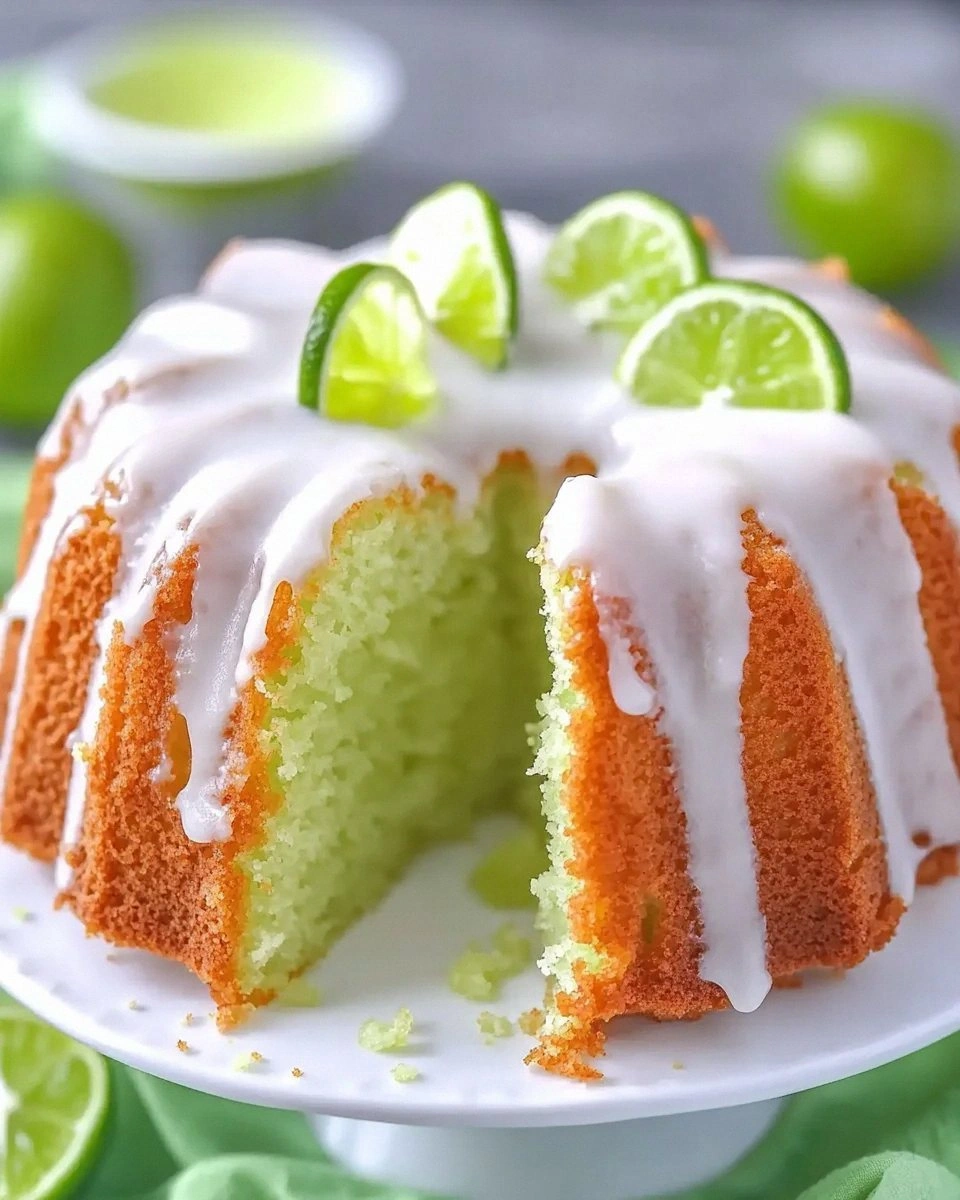
Crowd-Thrilling Presentation: That crackly top, that golden-brown crust, that gorgeous pale yellow crumb — this cake looks like sunshine on a plate. Slice it thick and serve it proud, because this is the kind of dessert that makes people take photos before they even pick up their fork.
Ingredient Quality Matters: Real key limes make a difference here, but I've included a hack for when you can't find them. Real butter, real vanilla, and fresh zest are non-negotiable. Trust me, this is hands down the best version you'll ever make at home.
Inside the Ingredient List
The Flavor Base
Butter is the backbone of any good pound cake, and here we're using it twice — once creamed into the batter for structure, and once brushed on top for that gorgeous golden crust. You want it properly softened, not melted, because we're building an emulsion that needs fat that's pliable but still holds its shape. Skip the cheap stuff and go for the good European-style butter with higher fat content; it's the difference between a cake that tastes like a bakery and one that tastes like a box mix. When you cream it properly with the sugar, you're incorporating air that gives the cake lift despite having no chemical leaveners.
Key limes are obviously the star, but here's what most recipes get wrong — they only use the juice. We're using both zest and juice because the zest contains essential oils that give us that bright, floral lime flavor that makes this cake taste like summer vacation. The juice provides acidity and tang, but it's the zest that gives us complexity. If you've ever struggled with getting enough lime flavor, you're not alone — and I've got the fix. We'll also add a touch of vanilla to round out the sharp edges and make the lime taste more lime-y through the magic of flavor layering.
The Texture Crew
Cake flour is my secret weapon for the most tender pound cake you'll ever put in your mouth. All-purpose flour has too much protein, which develops gluten and gives you a tough, bread-like texture. Cake flour has just enough structure to hold the batter together while keeping things delicate and soft. If you don't have cake flour, you can make a substitute by replacing two tablespoons of every cup of all-purpose flour with cornstarch, but honestly, just buy the cake flour — future you will thank present you when you're eating your third slice.
Eggs do triple duty here — they add moisture, structure, and richness. We're using room temperature eggs because cold eggs can cause the butter to seize up, creating a curdled-looking batter that bakes into a dense, heavy cake. Let them sit on the counter for 30 minutes before you start, or drop them in warm water for 10 minutes if you're impatient. The yolks add fat for richness and color, while the whites provide structure that keeps the cake from collapsing into a buttery puddle.
The Unexpected Star
Here's where we get a little weird — a tablespoon of cream cheese in the batter. Not enough to make it taste like cheesecake, just enough to add a subtle tang that plays beautifully with the lime. It also contributes to that impossibly tender texture that makes people ask if you used a mix. The cream cheese needs to be super soft, so microwave it for 8-10 seconds until it's spreadable but not melted. This is the game-changer that separates good pound cake from legendary pound cake.
Buttermilk might seem redundant when we already have lime juice, but the acidity helps tenderize the crumb and activates the baking soda we're using for just a whisper of lift. It also adds a subtle tang that makes the lime flavor pop. No buttermilk? No problem — add a tablespoon of vinegar or lemon juice to regular milk and let it sit for five minutes. The clabbered mixture works just as well and keeps you from making a special grocery run.
The Final Flourish
The glaze is where we really double down on lime flavor. We're using both juice and zest, plus a touch of cream to make it opaque and gorgeous. Powdered sugar dissolves easily and gives us that smooth, pourable consistency that soaks into the cake like liquid key lime pie. A pinch of salt balances the sweetness and makes the lime taste more lime-y. Don't skip the glaze — it's not just decoration, it's an integral part of the flavor experience that takes this cake from good to legendary.
A final sprinkle of lime zest on top of the glaze adds visual appeal and a burst of fresh lime aroma every time you lift the cake dome. Use a microplane for the finest zest that distributes evenly and doesn't create bitter chunks. This next part? Pure magic — the zest on top gradually infuses the glaze as it sits, so each day the cake gets better and better.
The Method — Step by Step
- Start by positioning your oven rack in the lower third position and preheating to 325°F. This lower position ensures the top doesn't brown too quickly before the inside is done. Grease your 9x5-inch loaf pan with butter, then line it with parchment paper leaving an overhang on the long sides — these will be your handles for lifting the cake out later. Don't skip the parchment; it's the difference between a cake that slides out like a dream and one that leaves half its bottom stuck to the pan like a stubborn toddler.
- In a medium bowl, whisk together the cake flour, salt, and baking soda. This distributes the leavening evenly so you don't get weird pockets of rise or flat spots. Set this aside and resist the urge to start eating it by the spoonful — I know it smells like sweet, powdery heaven but trust the process. The salt here isn't just for flavor; it strengthens the gluten just enough to give the cake structure without making it tough. This is your foundation, and we're building a castle of lime-scented deliciousness on top of it.
- Now for the fun part — creaming the butter and cream cheese together until they're light and fluffy, about 3-4 minutes. Don't rush this step; proper creaming incorporates air that gives the cake lift despite having no chemical leaveners. The mixture should be pale yellow and fluffy like buttercream frosting, not dense and greasy. Scrape down the bowl halfway through because nobody wants chunks of unmixed butter in their final cake. This is where the texture magic begins, so don't walk away from the mixer here.
- Add the sugar gradually, about a quarter cup at a time, letting each addition incorporate fully before adding the next. This creates a stable emulsion that won't break when we add the eggs. The mixture will become lighter in color and increase in volume — that's the air we're trapping for a tender crumb. If you've ever struggled with dense pound cake, you're not alone — and I've got the fix. This slow incorporation is the secret to cake that melts on your tongue instead of sitting in your stomach like a buttery brick.
- Add the eggs one at a time, beating well after each addition. Room temperature eggs mix in smoothly without breaking the emulsion we've worked so hard to create. If an egg doesn't want to cooperate and your batter looks curdled, don't panic — just add a tablespoon of flour to bring it back together. The batter should look smooth, glossy, and slightly lighter in color after each egg. This is the moment of truth where we transform from a sweet butter mixture into something that will become cake.
- Beat in the lime zest, juice, and vanilla until combined. The mixture might look slightly curdled — that's normal and will come together when we add the flour. The zest should be evenly distributed throughout, creating little green flecks of future flavor bombs. Don't overmix here or you'll start developing gluten and end up with tough cake. Just pulse the mixer a few times until everything is incorporated and smells like a Florida vacation.
- Add the flour mixture in three additions, alternating with the buttermilk, starting and ending with flour. Mix on low speed just until combined — overmixing develops gluten and gives you tough, rubbery cake. The batter should be thick and smooth, like luxurious pudding. Scrape down the bowl between additions to ensure no flour pockets remain. This next part? Pure magic — you're about to pour liquid sunshine into your pan.
- Pour the batter into your prepared pan and smooth the top with an offset spatula. Give the pan a few firm taps on the counter to release any air bubbles that might create tunnels in your finished cake. The batter should fill the pan about three-quarters full — if it's higher than that, you might need to remove some or risk overflow. Slide it into the oven and set your timer for 60 minutes, but don't go far because we'll be checking on it.
- Bake for 60-75 minutes, rotating the pan halfway through for even browning. The cake is done when it's golden brown, pulling away slightly from the sides of the pan, and a toothpick inserted in the center comes out with just a few moist crumbs attached. If the top is browning too quickly, tent it with foil for the last 20 minutes. That sizzle when you open the oven door? Absolute perfection — it's the sound of butter and sugar creating caramelized magic.
- Let the cake cool in the pan for 15 minutes, then use the parchment handles to lift it out onto a wire rack. Don't try to unmold it like a regular cake or it might break apart — pound cake is delicate while warm. Let it cool completely before glazing, about 2 hours. I know, I know — waiting is torture when your kitchen smells like a Key West bakery, but warm cake will absorb the glaze unevenly and leave you with a soggy mess instead of that gorgeous sheen.
That's it — you did it. But hold on, I've got a few more tricks that'll take this to another level...
Insider Tricks for Flawless Results
The Temperature Rule Nobody Follows
Room temperature ingredients aren't just a suggestion — they're the difference between cake that rises properly and cake that bakes up dense and heavy. Cold eggs can cause your beautifully creamed butter to seize up, creating a curdled mess that bakes into a lumpy, uneven texture. Take everything out of the fridge 30-45 minutes before you start, or cheat by placing eggs in warm water and microwaving the buttermilk for 8-10 seconds. Your future self will thank you when you're slicing into a cake with a texture so perfect it makes bakery cakes jealous.
Why Your Nose Knows Best
Don't rely solely on the timer — your nose is actually one of the best tools for determining doneness. When the cake is about 5 minutes from being done, your kitchen will suddenly fill with an intense buttery-lime aroma that's noticeably different from the baking smell. That's the moment to start checking with a toothpick. A friend tried skipping this step once — let's just say it didn't end well and involved a very brown outside with a raw center. Trust your senses; they've been honed over thousands of years of human baking.
The 5-Minute Rest That Changes Everything
After you add the glaze, let the cake sit for exactly five minutes before tasting. This isn't just about avoiding burned tongues — it's about letting the glaze set slightly so it doesn't all run off when you cut the first slice. During this time, the glaze seeps into the top layer of cake, creating this incredible sweet-tart barrier that keeps the interior moist. I'll be honest — I ate half the batch before anyone else got to try it because I couldn't wait those five minutes, and the difference between the first slice and the second slice was dramatic.
The Storage Secret That Keeps It Fresh
Wrap the cooled, glazed cake tightly in plastic wrap, then foil, and store at room temperature. The glaze acts as a barrier, keeping air out and moisture in. Stored properly, this cake stays moist and delicious for up to five days — though it's never lasted that long in my house. Don't refrigerate it unless your kitchen is hotter than 75°F; refrigeration dries out pound cake faster than you can say "another slice please."
The Slice That Makes All the Difference
Use a long, sharp knife dipped in hot water for clean slices that show off that gorgeous crumb. Wipe the blade between cuts for bakery-perfect presentation. Slice it thick — we're talking three-quarters of an inch — because this cake is rich and deserves to be savored. Thin slices just don't give you the full experience of that tender crumb and bright lime flavor. Plus, thick slices mean fewer cuts, which means more cake for everyone.
Creative Twists and Variations
This recipe is a playground. Here are some of my favorite ways to switch things up:
Coconut Key Lime Dream
Replace half the buttermilk with full-fat coconut milk and fold in half a cup of sweetened shredded coconut. Top with a coconut-lime glaze made by replacing the milk in the glaze with coconut milk and sprinkling toasted coconut on top. The coconut doesn't overpower the lime — it just makes it taste like you're eating key lime pie on a tropical beach somewhere fabulous.
Mini Bundt Party
Pour the batter into greased mini bundt pans and bake for 25-30 minutes for adorable individual cakes. These are perfect for parties because everyone gets their own little cake with that gorgeous glaze dripping down the sides. Plus, they bake faster and you get more of those coveted crispy edges per serving. Kids love having their own cake, and adults love not having to share.
Blueberry Key Lime Bliss
Gently fold in one cup of fresh blueberries just before pouring into the pan. The berries burst during baking, creating little pockets of jammy fruit that complement the tart lime perfectly. Dust with powdered sugar instead of glazing for a more rustic look that lets the blueberry streaks shine through. The purple-blue against the pale yellow cake is absolutely gorgeous.
Gluten-Free Glory
Replace the cake flour with a 1:1 gluten-free baking blend plus half a teaspoon of xanthan gum. The texture is slightly more tender but still has that classic pound cake density. I've served this version to gluten-eaters who couldn't tell the difference — it's that good. Just make sure your blend contains xanthan gum or add it separately for structure.
Key Lime Cheesecake Swirl
Beat 8 ounces of cream cheese with 2 tablespoons sugar and 1 egg until smooth. Dollop this over the batter in the pan and swirl with a knife for a cheesecake ribbon through the cake. The tangy cream cheese swirl adds richness and makes each slice look like a masterpiece from a fancy bakery. This version is rich enough to serve smaller slices, which means the cake feeds more people.
Chocolate Key Lime Decadence
Add 2 tablespoons of cocoa powder to the flour mixture and replace the vanilla with chocolate extract. The chocolate adds depth without competing with the lime — think chocolate-lime truffle in cake form. Use dark chocolate in the glaze for a sophisticated flavor profile that makes this feel like a special occasion cake even when it's just Tuesday.
Storing and Bringing It Back to Life
Fridge Storage
If you must refrigerate (hello, summer heat waves), wrap the cake tightly in plastic wrap, then foil, and bring to room temperature before serving. Cold pound cake is dense and the lime flavor gets muted, so this step is crucial. Add a tiny splash of water before reheating — it steams back to perfection. Never microwave pound cake — it turns rubbery faster than you can say "oops." Instead, let it sit at room temperature for 2-3 hours or place it in a 200°F oven for 10 minutes to gently warm.
Freezer Friendly
This cake freezes beautifully for up to 3 months. Wrap individual slices in plastic wrap, then foil, and store in a freezer bag. Thaw overnight in the refrigerator, then bring to room temperature. The glaze might look slightly dull after freezing but tastes exactly the same. Pro tip: freeze slices before glazing, then make fresh glaze when you're ready to serve. It's like having a bakery in your freezer ready whenever the craving strikes.
Best Reheating Method
For that fresh-baked experience, warm individual slices in a 300°F oven for 5-7 minutes. The edges get slightly crispy while the interior becomes warm and tender. Don't overdo it or you'll dry it out. A quick 10-second zap in the microwave works in a pinch, but wrap it in a damp paper towel first to maintain moisture. Serve warm with a scoop of vanilla ice cream for the ultimate comfort food experience that makes everyone ask for the recipe.