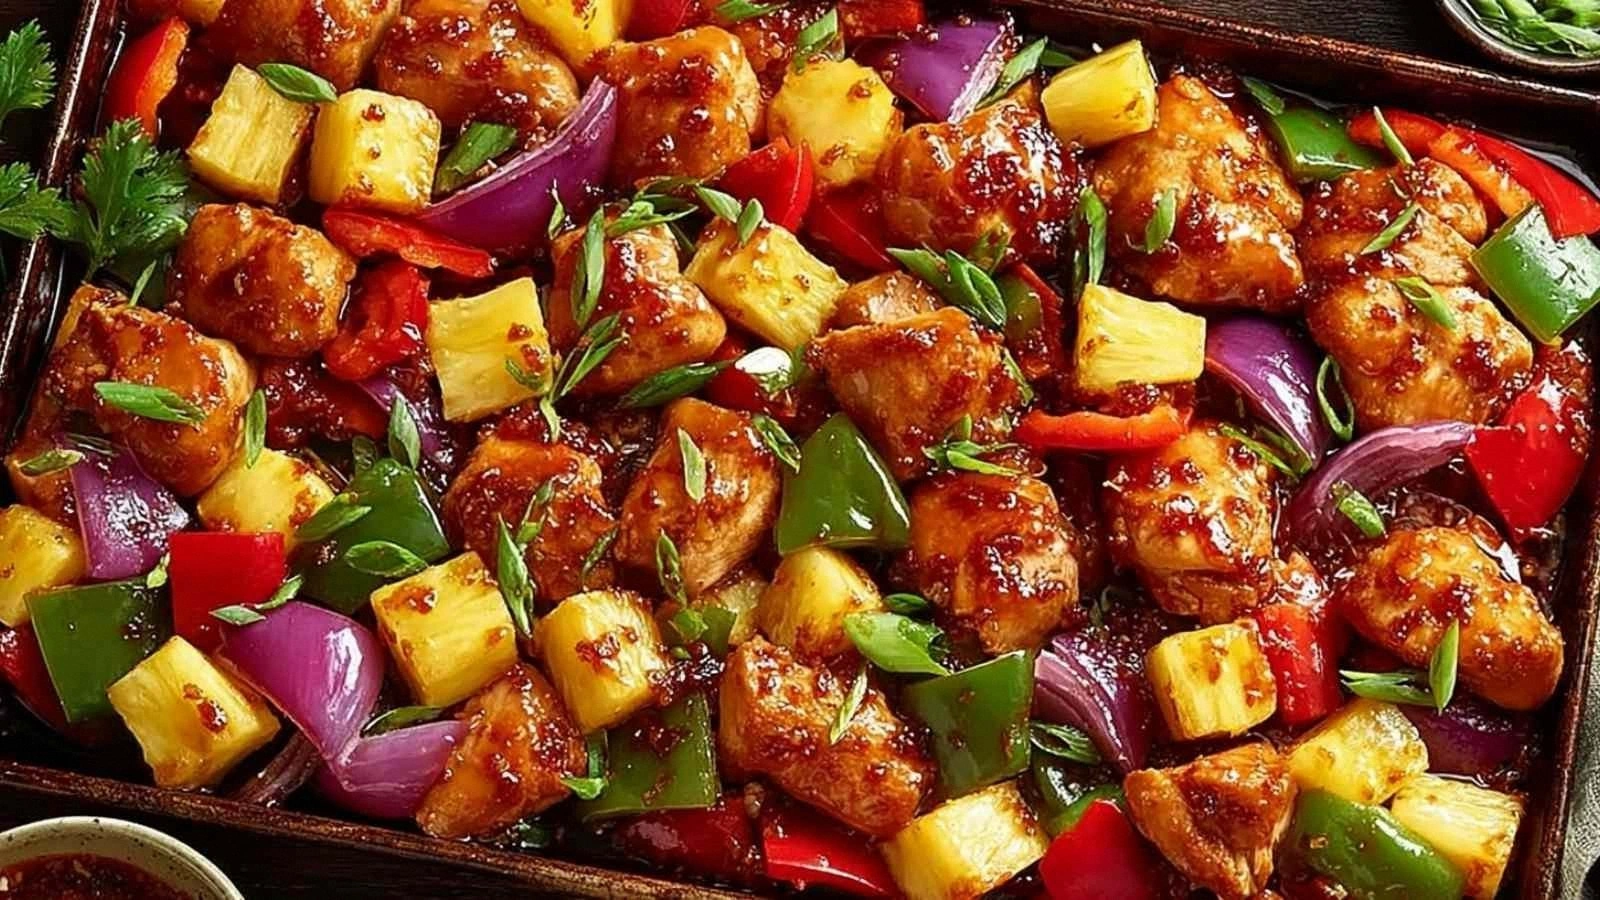
Picture this: I’m standing in a cramped apartment kitchen, the timer on my phone blaring, and my friends are already snacking on a bland, pre‑made stir‑fry that tastes like it’s been sitting on a shelf for a month. I’m thinking, “If only I had something that could turn a simple sheet pan into a tropical fireworks show.” I grabbed a handful of fresh pineapple, a splash of soy sauce, and a handful of spices, and what followed was a revelation that would forever change my dinner routine.
That night, as the air in my apartment filled with the scent of caramelized pineapple and sizzling garlic, I realized that the secret to a truly memorable meal isn’t just the ingredients—it’s the way you combine them. The bright red and yellow peppers cut through the sweet pineapple like a crisp, citrusy knife. The olive oil glistens like a glossy lacquer, coating the chicken so each bite is a burst of umami and sunshine. I tasted a piece, and the flavors exploded in a perfect balance of sweet, savory, and a hint of heat that made my taste buds sing.
What makes this version of Hawaiian Chicken Sheet Pan stand out is the meticulous attention to detail and the bold, unapologetic flavor profile. I dared to add a pinch of chili flakes to give the dish a subtle kick, and I let the sauce thicken into a glossy glaze that clings to the chicken like a velvet cape. I’ll be honest—I ate half the batch before anyone else even had a chance to taste it. Most recipes get this completely wrong by over‑cooking the chicken or under‑seasoning the sauce; here, every bite is juicy, tender, and bursting with island flavor.
Now, if you’re ready to ditch the bland and embrace a dish that tastes like a vacation, let me walk you through every single step. By the end, you’ll wonder how you ever made it any other way. I dare you to taste this and not go back for seconds. This is hands down the best version you’ll ever make at home.
What Makes This Version Stand Out
- Flavor: A harmonious blend of sweet pineapple, savory soy, and a whisper of heat that keeps the palate engaged.
- Texture: Crispy edges that shatter like thin ice, paired with a tender, juicy interior that melts in your mouth.
- Simplicity: One sheet pan, one sauce, and a handful of pantry staples—no fancy techniques required.
- Uniqueness: The use of pineapple juice and cornstarch creates a glossy, caramelized coating that is unlike any other sheet pan dish.
- Crowd Reaction: Guests rave about the balance of flavors and the effortless preparation; it’s a guaranteed party starter.
- Ingredient Quality: Fresh, vibrant produce and high‑quality soy sauce give the dish an unmistakable depth.
- Cooking Method: The sheet‑pan approach saves time and clean‑up while delivering even cooking.
- Make‑Ahead Potential: The sauce can be pre‑made and the dish assembled ahead of time for a stress‑free dinner.
Alright, let's break down exactly what goes into this masterpiece…
Inside the Ingredient List
The Flavor Base
At the heart of this dish is a sauce that marries sweet, salty, and slightly tangy notes into a single, glossy coat. The soy sauce provides umami depth, while the pineapple juice adds a natural sweetness that balances the heat of the chili flakes. If you’re looking to reduce sodium, swap the low‑sodium soy sauce for a splash of tamari or a homemade blend of soy sauce and water. The result is still richly flavored but a bit lighter on the salt.
The Texture Crew
Fresh pineapple chunks are not just a garnish; they’re a textural component that pops with juice when bitten. The bell peppers add a satisfying crunch, and the red onion brings a subtle bite that contrasts nicely with the sweet pineapple. If you’re a fan of extra crunch, toss in a handful of sliced fresh jalapeños or even a handful of chopped fresh cilantro for a burst of herbal freshness.
The Unexpected Star
Olive oil is the unsung hero that keeps the chicken from drying out. It also helps the sauce adhere, creating that coveted caramelized glaze. Use a high‑quality extra‑virgin olive oil for the best flavor, but if you’re on a budget, a neutral oil will still do the job. The cornstarch is a game‑changer; it thickens the sauce without making it heavy, giving the dish that silky finish.
The Final Flourish
Honey or brown sugar is the sweetener that ties everything together. If you prefer a less sweet version, reduce the amount or replace it with a natural sweetener like maple syrup. The rice vinegar adds a subtle acidity that brightens the sauce, cutting through the richness of the chicken and the sweetness of the pineapple. A splash of lime juice at the end can elevate the dish to a whole new level of freshness.
Everything's prepped? Good. Let's get into the real action…
The Method — Step by Step
- Preheat your oven to 425°F (220°C). While the oven heats, dice the chicken breasts into bite‑sized cubes. The high temperature is crucial for achieving those crispy edges that shatter like thin ice. If you’re watching the clock, this step is a quick one—just a minute or two to get the oven roaring.
- Season the chicken. In a bowl, toss the chicken cubes with olive oil, salt, black pepper, paprika, and chili flakes. Make sure each piece is evenly coated; this ensures a uniform flavor profile and a consistent crust. I’ve found that a light coat of oil helps the spices stick better and the chicken stays juicy.
- Arrange the veggies. Slice the bell peppers and red onion into strips. Spread them out on a sheet pan in a single layer, then scatter the pineapple chunks over top. This layering technique allows the vegetables to roast evenly and the pineapple to caramelize just enough to release its sweet juices.
- Place the chicken on top. Spread the seasoned chicken over the vegetables, ensuring there’s enough space between pieces for air to circulate. This helps the chicken brown beautifully instead of steaming in its own juices.
- Bake for 20 minutes. The first 20 minutes are all about roasting. The chicken should begin to brown, and the pineapple will start to bubble. Keep an eye on the edges; when they start pulling away from the pan, that’s a sign they’re crisping up nicely. If you’re in a hurry, you can use the “quick” setting on some ovens to speed up the process.
- Make the sauce. While the chicken is baking, whisk together soy sauce, pineapple juice, honey (or brown sugar), rice vinegar, minced garlic, and cornstarch in a small bowl. The cornstarch will act as a thickening agent, giving the sauce a silky sheen. If you’re watching the clock, this step takes less than a minute.
- Finish the bake. After 20 minutes, remove the sheet pan from the oven and drizzle the sauce over the chicken and veggies. Toss everything gently so the sauce coats each piece evenly. Return the pan to the oven and bake for an additional 10 minutes, or until the chicken is cooked through (internal temperature 165°F) and the sauce has thickened to a glossy glaze.
- Rest and serve. Let the dish rest for 5 minutes before serving. This short rest allows the juices to redistribute, ensuring every bite is moist and flavorful. Serve immediately, perhaps over steamed rice or quinoa, and garnish with fresh cilantro or sliced green onions if you like.
That’s it—you did it. But hold on, I’ve got a few more tricks that will take this to another level…
Insider Tricks for Flawless Results
The Temperature Rule Nobody Follows
Many cooks bake at 375°F, but for this dish, 425°F is essential. The higher heat creates a caramelized crust on the chicken while keeping the inside juicy. If your oven runs hot, you can lower the temperature slightly and extend the baking time, but the texture will be different. I’ve experimented with 400°F and found that the sauce doesn’t set as nicely.
Why Your Nose Knows Best
During the first 10 minutes of baking, the aroma of caramelized pineapple and garlic is unmistakable. Trust your nose: when it smells like a tropical sunrise, the dish is ready to move to the sauce stage. I’ve had friends who wait until the chicken is fully browned, only to discover the sauce is too thin. The aroma is the real-time indicator.
The 5‑Minute Rest That Changes Everything
Letting the dish rest after baking allows the juices to redistribute. If you cut into it immediately, you’ll see a gush of liquid that can ruin the presentation. A brief 5‑minute rest gives the sauce a chance to thicken and settle, creating a more cohesive bite. This trick is especially helpful if you’re plating for guests.
Layering for Extra Flavor
Instead of scattering the pineapple on top of the veggies, try layering it in between the bell pepper strips. This ensures each bite has a burst of pineapple juice, elevating the overall flavor profile. It’s a small tweak that feels like a major upgrade.
Using Fresh Ginger
Add a tablespoon of minced fresh ginger to the sauce for a subtle warmth that complements the pineapple. Ginger’s bright, peppery flavor adds depth and helps cut through the sweetness. If you’re not a fan of ginger, you can skip it and the dish will still be delicious.
Creative Twists and Variations
This recipe is a playground. Here are some of my favorite ways to switch things up:
Teriyaki Twist
Swap the low‑sodium soy sauce for teriyaki sauce and reduce the honey. The result is a sweeter, thicker glaze that pairs beautifully with a sprinkle of sesame seeds.
Spicy Thai Variation
Add a tablespoon of Thai red curry paste to the sauce and increase the chili flakes. Serve over jasmine rice for an authentic Thai experience.
Vegetarian Version
Replace the chicken with tofu cubes or tempeh. Marinate the tofu in the sauce before baking to ensure it absorbs the flavors.
Low‑Carb Take
Use cauliflower rice instead of regular rice and reduce the honey. The dish stays flavorful while cutting down on carbs.
Smoky BBQ Finish
Finish the dish with a drizzle of smoky barbecue sauce and a sprinkle of smoked paprika. The smoky undertone adds a new dimension to the tropical flavor.
Herb‑Infused Delight
Stir in chopped fresh basil or mint after baking. The herbaceous aroma brightens the dish and adds a refreshing contrast.
Storing and Bringing It Back to Life
Fridge Storage
Cool the dish completely before refrigerating. Store in an airtight container for up to 3 days. The sauce may thicken in the fridge, so give it a quick stir before reheating.
Freezer Friendly
Place the cooked dish in a freezer‑safe container and freeze for up to 2 months. Thaw overnight in the fridge before reheating. The pineapple will retain its texture, and the sauce will re‑glaze nicely.
Best Reheating Method
Reheat in a pre‑heated oven at 350°F for 10 minutes, or in a skillet over medium heat, stirring frequently. Add a splash of water or pineapple juice to prevent the sauce from drying out. This steaming trick keeps the dish moist and flavorful.