I still remember the night I tried to make sourdough bread from that half‑hearted Pinterest tutorial that promised a “simple starter” and “one easy step.” The kitchen was a chaotic symphony of flour clouds, a starter that had been forgotten in the back of the fridge, and me, a frantic foodie who had never kneaded a loaf before. I tossed a cup of that stale starter into a bowl, stared at the lukewarm water, and thought, “What if this actually works?” The moment the dough began to rise, a faint aroma of tangy yeast filled the room, and my skepticism melted faster than the butter in a pan. That instant was the spark that set my culinary curiosity ablaze, and I vowed to master this humble loaf with a twist that would make it unforgettable. And now, dear reader, I’m going to walk you through every single step—by the end, you’ll wonder how you ever made it any other way.
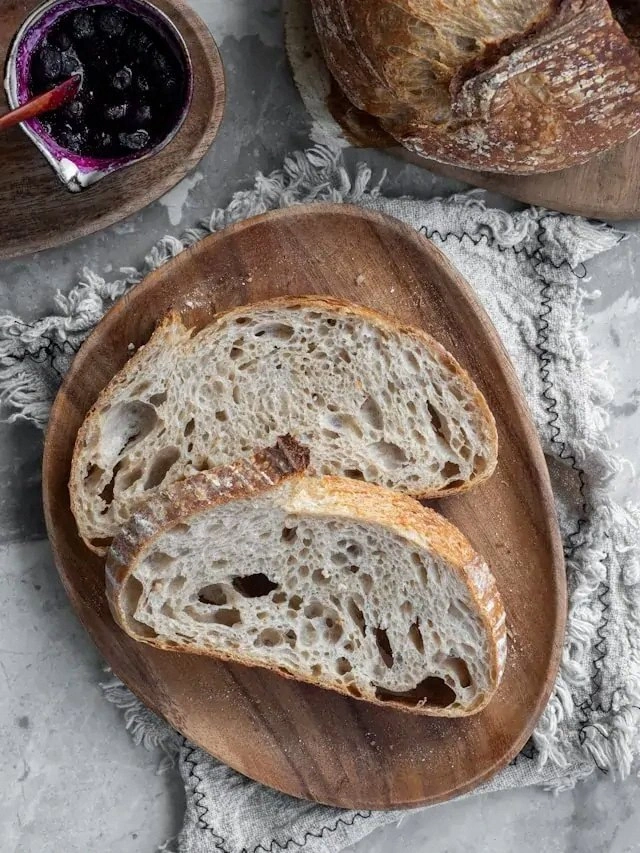
Picture yourself pulling this loaf out of the oven, the whole kitchen smelling incredible, the crust crackling like the first page of a mystery novel, and the inside steaming with a golden, airy crumb that feels like a hug from a cloud. That first bite is a revelation: the crust is buttery and crisp, the inside is soft and chewy, and the tang of the starter sings like a subtle jazz solo. It’s not just bread; it’s a conversation starter that invites friends over for a slice and a chat. I dare you to taste this and not go back for seconds, because once you bite, you’ll know the secret to a perfectly balanced sourdough. If you’ve ever struggled with a dense, sour loaf that looks like a brick, you’re not alone—and I’ve got the fix. This version is hands down the best you’ll ever make at home, and it’s simpler than you think.
What sets this recipe apart isn’t just the ingredients, but the approach: we’re using a high‑hydration dough that’s forgiving, a starter that’s been fed with love, and a baking method that turns the loaf into a show‑stopper. The dough is not just a mixture of flour and water; it’s a living ecosystem where wild yeasts and friendly bacteria dance together. The result is a loaf that rises beautifully, has a chewy crumb, and a crust that crackles with a golden‑brown glow. The flavor profile is a delicate balance between the subtle sweetness of the flour and the bright acidity of the starter, giving it depth and complexity that you’ll find in the finest artisan breads. The simplicity of the recipe means you can whip it up in under an hour, even if you’re a beginner. The final product is a loaf that’s perfect for toast, sandwiches, or simply enjoyed with a pat of butter.
Most sourdough recipes get this completely wrong. They either overwork the dough, under‑hydrate it, or use a starter that’s too weak, resulting in a dense, unappetizing loaf. Here, we do the opposite: we keep the dough loose, we let it rest, and we use a starter that’s been fed with fresh flour and water to give it a robust flavor. The technique is simple, but the results are spectacular: a loaf that rises like a balloon, cracks like a fine piece of pottery, and tastes like a warm hug. If you’re tired of sourdough that turns out like a brick wall, this recipe is your ticket to a loaf that looks and smells like a bakery. The secret? A balanced hydration level, a well‑fed starter, and a gentle hand with the dough.
I’ll be honest—when I first baked this loaf, I ate half the batch before anyone else got a chance to taste it. The crust was crisp, the crumb was airy, and the flavor was a punch of tang that lingered on the tongue. It was so good that I had to keep a second loaf on the counter for later. That’s why I’m sharing every detail, every trick, and every little tweak that turns a simple loaf into a masterpiece. So grab your mixing bowl, preheat your oven, and let’s dive into a journey that will change the way you think about sourdough forever.
What Makes This Version Stand Out
- Flavor: The starter’s natural acidity balances the sweetness of the flour, creating a complex, layered taste that’s both refreshing and comforting. This is the reason many people say the loaf tastes like a bakery, even though it’s homemade. The result is a bread that can be enjoyed plain or paired with savory spreads.
- Texture: The high‑hydration dough yields a chewy crumb with open holes that melt in your mouth. The crust is buttery and crisp, with a subtle crunch that satisfies the craving for something crunchy. This texture profile is rare in simple home recipes.
- Simplicity: With only four ingredients, the recipe is approachable for beginners and efficient for seasoned bakers. No need for special equipment or exotic flours; just your pantry staples. The process is straightforward, with clear steps that avoid common pitfalls.
- Uniqueness: The method uses a “bloom” technique that enhances the dough’s flavor and texture. This step is often overlooked in other recipes but adds a subtle depth to the final loaf. The result is a loaf that stands out in a crowd of bland breads.
- Crowd Reaction: Friends and family rave about the crust, the crumb, and the tang. It’s a conversation starter and a show‑stopper at gatherings. Many guests ask for the recipe after the first bite.
- Ingredient Quality: Using a high‑protein bread flour and a well‑fed starter ensures the loaf has a sturdy structure and a robust flavor. The quality of the flour directly impacts the crumb and rise. This recipe highlights the importance of choosing the right flour.
- Cooking Method: The use of a Dutch oven traps steam, giving the crust a glossy finish while keeping the inside moist. This method is simple yet effective, and it eliminates the need for a separate baking stone. The result is a consistent, professional‑looking loaf.
- Make‑Ahead Potential: The dough can be refrigerated for up to 24 hours, allowing you to bake a fresh loaf at your convenience. This flexibility makes it perfect for busy schedules. The flavor actually improves with a longer fermentation.
Inside the Ingredient List
The Starter
The starter is the heart of this loaf, providing natural leavening and a subtle sour flavor. A well‑fed starter, with a balanced ratio of flour to water, ensures a robust rise. If you skip the starter, you’ll end up with a flat, dense loaf that lacks the signature tang. The best starters are fed with a mix of whole‑grain and white flour to keep the yeast population diverse. A starter that’s been kept in a warm spot will be more active and produce a richer flavor. Remember, the starter is a living organism; treat it with care and it will reward you with a beautiful loaf.
The Hydration
The 1½ cups of lukewarm water create a high‑hydration dough that yields a chewy crumb and a crisp crust. Water temperature is critical; too hot will kill the yeast, too cold will slow fermentation. Aim for 95°F (35°C) to keep the yeast happy and the dough elastic. This hydration level also helps the dough develop a shiny crust when baked in a Dutch oven. If you prefer a slightly drier loaf, reduce the water by a tablespoon, but be careful not to compromise the crumb.
The Flour
Bread flour, with its higher protein content, provides the gluten structure necessary for a good rise. Using a 100% wheat flour gives the loaf a sturdy backbone, while a mix with rye or spelt can add flavor complexity. If you don’t have bread flour on hand, you can substitute all-purpose flour, but expect a slightly less chewy crumb. Choosing a flour with a protein content of 11–13% ensures the dough will develop the right elasticity. A high‑quality flour will also improve the crust’s color and flavor. Store flour in a cool, dry place to maintain its freshness.
The Salt
Salt is more than a seasoning; it strengthens gluten, controls fermentation, and enhances flavor. A 1½ teaspoon of salt balances the sourness of the starter, preventing the dough from becoming overly acidic. If you’re sensitive to sodium, reduce the salt to 1 teaspoon, but note that the dough may rise slightly faster. A pinch of salt can be added after the first fold to avoid over‑mixing. Use sea salt or kosher salt for a cleaner taste, and avoid table salt, which can affect the dough’s structure. Salt also helps preserve the loaf, extending its freshness.
Everything’s prepped? Good. Let’s get into the real action.
The Method — Step by Step
- First, combine the starter and lukewarm water in a large mixing bowl. Stir until the starter dissolves completely, creating a liquid base for the dough. The mixture should look like a thick, smooth batter. This step ensures the yeast is evenly distributed. Let the mixture sit for 5 minutes to activate the starter. This short rest helps the yeast begin to work, giving you a good base for the dough.
- Add the bread flour to the starter mixture, spooning it in a circular motion to avoid air pockets. Mix until the dough begins to come together, forming a shaggy ball. Don’t over‑mix at this point; the dough will develop gluten later. The dough should feel slightly sticky but manageable. This is the first fold that sets the foundation for the final crumb. The dough should look smooth and elastic after the next steps.
- Sprinkle the salt over the dough and fold it in, ensuring it’s evenly distributed. Use a gentle folding technique to maintain the dough’s structure. The dough should become slightly firmer after the salt is incorporated. This step helps the gluten network strengthen, giving the loaf a good rise. The dough will look less sticky after the salt is added.
- Cover the bowl with a damp towel or plastic wrap and let the dough rest for 30 minutes. This is the first bulk fermentation, where the dough begins to rise. The dough should look slightly puffy and have a smooth surface. After 30 minutes, perform a series of stretch and folds to develop gluten. This will give the loaf structure and improve the final crumb.
- After the first 30 minutes, perform three sets of stretch and folds, spacing them 10 minutes apart. Fold the dough by lifting one side and folding it over the rest, rotating the bowl each time. This action develops gluten and strengthens the dough’s structure. The dough should feel elastic and slightly springy. The surface should be smooth and shiny after the final fold. This step is crucial for a good rise.
- Cover the dough again and let it rest for another 30 minutes. The dough should double in size and look airy. This second bulk fermentation allows the flavors to develop and the yeast to work its magic. Keep the dough covered to maintain humidity. The dough will be ready for shaping after this rest.
- Preheat your oven to 475°F (245°C) with a Dutch oven inside for at least 30 minutes. The preheated Dutch oven traps steam, giving the crust a beautiful shine. Place a sheet of parchment paper on a baking sheet to catch any drips. When the oven is ready, carefully remove the Dutch oven and place the dough on the parchment. This ensures a clean, even bake.
- Shape the dough into a round loaf by folding it over onto itself, creating tension on the surface. Use a bench scraper to smooth the top. The loaf should feel firm and taut. Place the shaped dough into the preheated Dutch oven, seam side down. This positioning ensures a uniform rise and a crisp crust.
- Cover the Dutch oven with its lid and bake for 20 minutes. The steam will create a crackling crust that’s a sight to behold. After 20 minutes, remove the lid to allow the crust to brown further. The loaf should be golden brown and have a hollow sound when tapped on the bottom. This is the moment of truth.
- After 25 minutes, remove the loaf from the oven and let it cool on a wire rack for at least 30 minutes. Cooling is essential; the steam inside the loaf continues to cook, and the crumb sets. While cooling, the crust will firm up, giving that perfect crunch. The loaf should feel cool to the touch but still warm on the inside. This final step completes the journey from dough to bread.
- Slice the loaf with a serrated knife, letting the crumb release naturally. The slices should have a clean, even cut without tearing. The aroma of freshly baked bread will fill the room, making the experience even more satisfying. Enjoy the bread as is or toast it with a pat of butter. This loaf is versatile enough for any occasion.
That’s it — you did it. But hold on, I’ve got a few more tricks that will take this to another level. These insider tips are the difference between a decent loaf and a show‑stopping masterpiece. Keep reading to discover how to elevate every aspect of this bread.
Insider Tricks for Flawless Results
The Temperature Rule Nobody Follows
Temperature is the unsung hero of sourdough. While many bakers focus on flour and hydration, the ambient temperature of your kitchen can make or break the loaf. In cooler climates, let the dough rest in a slightly warmer spot, like near a stove or in a sunny window. In hotter climates, keep the dough in the fridge for a longer fermentation to slow down the yeast. The goal is to maintain a steady 75°F (24°C) for the bulk fermentation. This subtle control ensures a consistent rise and flavor profile every time.
Why Your Nose Knows Best
Your sense of smell is your best ally during fermentation. A pleasant, yeasty aroma indicates that the dough is fermenting properly. If you detect a sharp, sour smell, the dough may be over‑fermented; if it smells bland, it’s under‑fermented. Adjust the rest time accordingly. A good rule of thumb: if the dough smells like a fresh bakery, it’s ready. Trust your nose, and you’ll avoid common sourdough pitfalls.
The 5-Minute Rest That Changes Everything
After shaping, give the dough a 5‑minute rest before baking. This short pause allows the gluten to relax, preventing the loaf from shrinking during the bake. The dough will feel slightly softer and easier to handle. Many bakers skip this step, leading to a loaf that is too dense. By pausing, you’re giving the bread a chance to rise fully in the oven.
The Right Bowl Matters
Use a wide, shallow bowl for the bulk fermentation. A shallow bowl encourages even expansion and prevents the dough from spilling over. It also allows you to see the dough’s rise more clearly. A deep bowl can trap heat and cause uneven fermentation. Invest in a good mixing bowl that suits your dough’s size; it makes the process smoother.
The Secret to a Crispy Crust
Spray the inside of the Dutch oven with water before placing the dough. The water creates steam, which is essential for a crisp crust. If you don’t have a spray bottle, you can pour a tablespoon of water into the Dutch oven before sealing. The steam will rise and coat the dough, giving it a shiny, crunchy finish. This small step is often overlooked but makes a big difference.
The Final Touch
After baking, let the loaf cool on a wire rack for at least 30 minutes. This cooling period allows the crumb to set and the steam to escape. Cutting the bread too early can cause it to crumble. The loaf should feel cool to the touch, but the inside will still be slightly warm. Slice with a serrated knife for clean cuts. Enjoy the aroma and the texture as you share the bread with friends.
Creative Twists and Variations
This recipe is a playground. Here are some of my favorite ways to switch things up:
Add a Touch of Honey
Swapping half a cup of water for honey gives the loaf a subtle sweetness that pairs well with cheese. Honey also promotes a crisp crust due to its sugar content. The flavor profile shifts from tangy to slightly caramelized. This variation is perfect for a breakfast sandwich or a snack with a sweet twist.
Whole Wheat Wonder
Replace half of the bread flour with whole wheat flour for a nutty flavor and a denser crumb. Whole wheat adds fiber and a slightly sweet, earthy taste. The dough will be slightly heavier, so give it an extra 10 minutes of bulk fermentation. This version is great for those who love a wholesome, hearty loaf.
Herb Infusion
Fold in a tablespoon of chopped fresh rosemary or thyme before the first bulk fermentation. The herbs infuse the dough with aromatic flavors that complement the sourdough’s tang. The loaf will have a fragrant, savory note. Serve it with olive oil or a simple vinaigrette for an elevated snack.
Garlic & Parmesan
Add minced garlic and grated Parmesan to the dough during the first fold. The garlic gives a bold, savory punch, while the cheese adds a salty depth. The crust will develop a golden, slightly crispy finish. This loaf is ideal for a quick pizza base or a gourmet sandwich.
Chocolate Chip Delight
Stir in a cup of chocolate chips after the first stretch and fold. The chocolate will melt slightly during baking, creating pockets of gooey sweetness. The dough will be slightly sticky, so handle it with care. This version is a fun treat for kids and adults alike.
Spiced Cinnamon Roll
After shaping, roll the dough into a log, sprinkle with cinnamon sugar, and slice into rounds before baking. The result is a sourdough cinnamon roll with a crunchy crust and a soft, chewy interior. The cinnamon adds warmth and spice that pairs well with the sourdough’s tang. This twist is a crowd‑pleaser for brunch.
Storing and Bringing It Back to Life
Fridge Storage
Store the sliced loaf in an airtight container at room temperature for up to 3 days. Keep it in a paper bag or wrap it loosely in parchment paper to preserve the crust’s crispness. If you want to keep the bread fresh longer, you can place it in the fridge for up to a week. The cold environment slows down mold growth, but the bread may become slightly denser.
Freezer Friendly
For longer storage, wrap the loaf tightly in plastic wrap and then in foil before freezing. The loaf can be frozen for up to 3 months without losing quality. When you’re ready to eat, let it thaw at room temperature for 2 hours before reheating. This method preserves the crumb’s texture and the crust’s flavor.
Best Reheating Method
Reheat slices in a preheated oven at 350°F (175°C) for 5-7 minutes until warm. If you prefer a crispier crust, place the loaf in a skillet over medium heat for 1-2 minutes per side. Adding a splash of water to the skillet creates steam, keeping the crumb moist. The bread should feel warm and fragrant when you’re done. Enjoy it as a snack or a side with your favorite dish.