It started with a kitchen disaster that would have made even the most seasoned baker flinch. I was trying to impress my friends with a spooky dessert for a Halloween party, but the chocolate I melted turned into a glossy sludge that clung to the bottom of the pot. The next thing I knew, I was scrambling to salvage the batch, and that frantic moment sparked an idea that would turn a fiasco into a flavor sensation.
Picture this: the air thick with the sweet, buttery scent of melted Oreos, the faint hiss of chocolate as it sizzles, and the satisfying clink of a spatula against a silicone mat. My eyes were glued to the glossy surface, hearing the subtle crackle as the chocolate cooled, and I could almost taste the crunch of crushed cookies melting into a silky coating. The texture was a paradox—crunchy on the outside, silky on the inside—creating a mouthfeel that feels like a secret whispered by a candy bar.
What makes this version stand out from every other Oreo bark recipe out there is the deliberate layering of flavors and textures. I use a blend of dark and milk chocolate to give a depth that ordinary single‑type chocolate lacks, and I add a pinch of sea salt that cuts through the sweetness like a fresh breeze. The result is a bark that feels indulgent yet balanced, and it’s the kind of dessert that turns heads at any gathering. Most recipes get this completely wrong by using only one type of chocolate or by forgetting the subtle touch of salt.
And there’s a twist you won’t expect: a splash of vanilla extract that brings the chocolate’s richness to the forefront, and a quick freeze that locks in the crunch. I dare you to taste this and not go back for seconds. That’s the promise I’ll keep you to while I walk you through every single step—by the end, you’ll wonder how you ever made it any other way.
What Makes This Version Stand Out
- Flavor Depth: Combining dark and milk chocolate creates a layered taste that feels both bold and comforting, unlike the flat sweetness of single‑type chocolate barks.
- Texture Contrast: The crushed Oreos give a satisfying crunch that juxtaposes the smooth chocolate coating, producing a bite that is simultaneously chewy and crisp.
- Balanced Sweetness: A pinch of sea salt cuts through the sugar, preventing the bark from feeling cloying and giving it a savory edge.
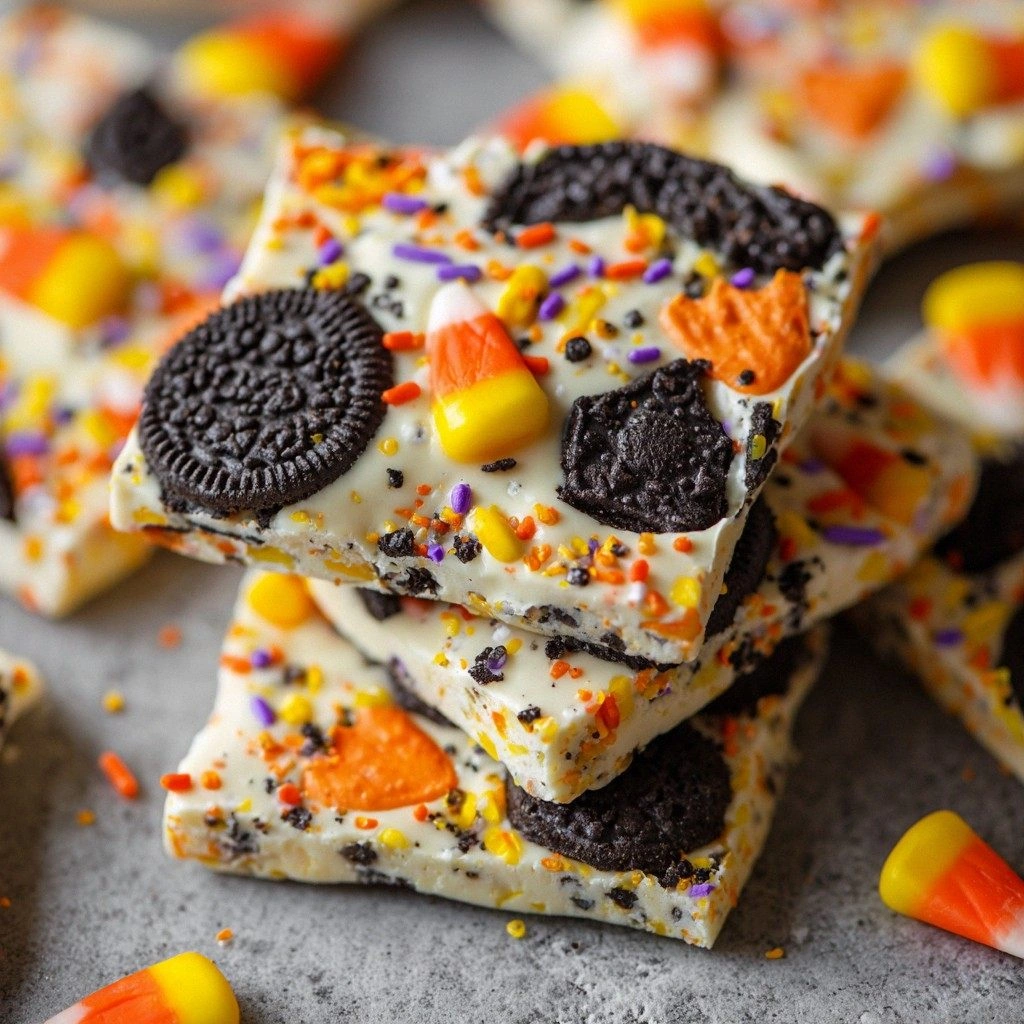
- Visual Appeal: The dark chocolate base with white Oreo shards looks like a piece of Halloween candy art, perfect for themed parties.
- Make‑Ahead Friendly: Once cooled, the bark keeps for weeks in the fridge, making it a stress‑free dessert that can be prepared ahead of time.
- Ingredient Quality: Using high‑quality chocolate and fresh Oreos ensures a richer flavor profile and better mouthfeel.
- Quick & Simple: The recipe requires no baking, only a few minutes of stirring and a short chill, making it ideal for last‑minute planners.
- Kid‑Friendly: The crunchy bits are a hit with children, while the chocolate richness satisfies adult palates.
Alright, let’s break down exactly what goes into this masterpiece...
Inside the Ingredient List
The Flavor Base
Dark chocolate is the backbone of this bark, providing a robust, slightly bitter undertone that balances the sweet Oreos. I use 1 cup of high‑grade dark chocolate, chopped into small pieces to melt evenly. If you’re a fan of a more mellow finish, replace the dark chocolate with milk chocolate; the result will be creamier but less complex. Skipping the dark chocolate entirely will leave the bark feeling one‑dimensional.
The Texture Crew
Crushed Oreos are the star of the show, delivering that signature crunch. I crush 2 cups of whole Oreos using a food processor or a zip‑lock bag and a rolling pin, ensuring the crumbs are fine enough to coat the chocolate without forming clumps. If you prefer a more uniform bite, pulse the cookies until you get a powdery consistency. If you skip the Oreos, you’ll lose the iconic cookie flavor and the bark will become a plain chocolate slab.
The Unexpected Star
A splash of vanilla extract (1 teaspoon) is the secret ingredient that elevates the chocolate’s aroma, giving it a floral brightness that’s often missing in simple chocolate bars. Vanilla also smooths out the sweetness, creating a more rounded flavor profile. Without it, the bark can taste flat, especially if you’re using a chocolate with a high sugar content.
The Final Flourish
Butter (1/4 cup) and powdered sugar (1 tablespoon) are added to the melted chocolate to create a silky, glossy finish that makes the bark shine like a polished trophy. The butter softens the chocolate, preventing it from becoming too hard and brittle once it cools, while the sugar adds a subtle crunch when it crystallizes on the surface. If you omit the butter, the bark may crack as it sets, and if you skip the powdered sugar, you’ll miss the delicate snap that signals a perfectly finished piece.
Everything's prepped? Good. Let’s get into the real action...
The Method — Step by Step
- Begin by chopping the dark chocolate into small, even pieces and placing them in a heat‑proof bowl. Set the bowl over a pot of simmering water, ensuring the bottom of the bowl never touches the water. Stir constantly until the chocolate is fully melted and glossy. This gentle melt prevents scorching and preserves the chocolate’s natural sheen. The aroma should be rich and buttery, signaling that the chocolate is ready for the next step.
- In a separate bowl, melt the butter over low heat until it’s just fluid. Add the powdered sugar and stir until it’s fully dissolved, creating a silky butter‑sugar mix. This mixture will help the chocolate set with a smooth texture and prevent cracking. If the butter starts to separate, lower the heat and whisk vigorously to re‑emulsify.
- Combine the melted chocolate with the butter‑sugar mixture, whisking until the mixture is uniform and glossy. The consistency should be thick enough to coat the back of a spoon but still pourable. At this point, add the vanilla extract, stirring until it’s fully incorporated. The vanilla will diffuse through the chocolate, enhancing its aroma.
- Fold in the crushed Oreos gently, ensuring each crumb is coated with chocolate. Use a spatula to stir until the mixture is evenly distributed, but avoid over‑mixing, which can cause the Oreos to clump. The goal is a uniform bark with visible Oreo shards that add crunch.
- Line a silicone baking mat or parchment paper on a flat surface. Pour the chocolate‑Oreo mixture onto the mat, spreading it with a spatula to a thickness of about 1/2 inch. The thickness should be thin enough to allow the bark to set quickly but thick enough to hold the Oreo shards. If the bark is too thin, it won’t have enough body.
- Place the mat in the refrigerator for 30 minutes, or until the bark is firm but still slightly pliable. The cooling process should be fast enough to preserve the crunch of the Oreos. If you’re in a hurry, a quick freeze for 10 minutes will also work, but the bark will be slightly more brittle.
- Once set, remove the bark from the mat and break it into bite‑size pieces. Use a sharp knife or kitchen scissors to cut clean lines, ensuring each piece has a clean edge. The pieces should snap with a satisfying crack, signaling that the bark has the perfect crunch.
- Store the bark in an airtight container at room temperature for up to a week, or in the refrigerator for longer freshness. If you’re storing it in the fridge, let it sit at room temperature for 10 minutes before serving to restore the chocolate’s glossy shine.
- Optional: For an extra pop of flavor, dust the bark with a pinch of sea salt before serving. The salt will enhance the chocolate’s richness and give a subtle savory note that balances the sweetness.
That’s it— you did it. But hold on, I’ve got a few more tricks that will take this to another level...
Insider Tricks for Flawless Results
The Temperature Rule Nobody Follows
Chocolate is temperamental; if it’s too hot, it’ll become dull and won’t set properly. Use a chocolate thermometer and keep the melt at 86°F (30°C) for dark chocolate and 82°F (28°C) for milk chocolate. A simple thermometer ensures the chocolate remains at the optimal temperature, giving the bark a glossy finish and preventing bloom.
Why Your Nose Knows Best
As the chocolate cools, it will emit a faint, sweet scent that signals it’s ready for the next step. Trust your nose: if you can smell chocolate but not the buttery aroma of the butter‑sugar mix, it’s time to add the Oreos. This sensory checkpoint helps avoid premature setting or over‑melted chocolate.
The 5‑Minute Rest That Changes Everything
After cutting the bark into pieces, let them rest on the counter for 5 minutes before serving. This brief pause allows the chocolate to firm up just enough to hold its shape, but still remain slightly pliable for that perfect bite. Skipping this step can result in brittle pieces that break on the first bite.
Seal the Edges
If you’re making a larger batch, consider sealing the edges of the bark by brushing a thin layer of melted chocolate along the perimeter before it sets. This creates a smooth edge that’s less prone to chipping and gives a polished look.
Keep It Cool, Keep It Fresh
Store the bark in a cool, dry place. If you live in a humid environment, place the container in the refrigerator to prevent the chocolate from blooming. A cool environment keeps the bark crisp and the chocolate firm.
Creative Twists and Variations
This recipe is a playground. Here are some of my favorite ways to switch things up:
Chocolate‑Covered Peanut Butter Oreos
Swap the dark chocolate for a mix of dark and peanut butter chocolate, and add a drizzle of peanut butter before the final freeze. The nutty flavor pairs wonderfully with the cookie crunch, creating a dessert that feels like a decadent candy bar.
Spiced Pumpkin Oreo Bark
Add a pinch of pumpkin pie spice (cinnamon, nutmeg, clove) to the melted chocolate for a seasonal twist. This variation is perfect for October gatherings, giving the bark a warm, aromatic flavor that evokes crisp autumn evenings.
Mint Chocolate Oreo Bark
Incorporate a few drops of peppermint extract into the chocolate mixture. The mint will cut through the sweetness and leave a refreshing aftertaste, making it a great palate cleanser during a dessert spread.
Caramelized Banana Oreo Bark
Fold in caramelized banana slices along with the Oreos. The banana adds a subtle sweetness and a chewy texture, turning the bark into a multi‑layered treat that’s both fun and delicious.
Dark Chocolate & Sea Salt Oreo Bark
Use only dark chocolate and sprinkle a generous amount of flaky sea salt on top before chilling. The salt enhances the chocolate’s bitterness, creating a sophisticated flavor profile that adults will love.
Gluten‑Free Oreo Bark
Replace the standard Oreos with gluten‑free versions and use a gluten‑free chocolate blend. This version keeps the same indulgent texture while being safe for those with gluten sensitivities.
Storing and Bringing It Back to Life
Fridge Storage
Keep the bark in an airtight container at room temperature for up to a week. The airtight seal prevents moisture from entering, which could cause the chocolate to bloom. If the bark becomes slightly soft, let it sit at room temperature for a few minutes before serving.
Freezer Friendly
Store the bark in a freezer‑safe container for up to 3 months. When you’re ready to enjoy it, thaw in the refrigerator overnight. The slow thaw preserves the texture and prevents condensation from forming on the surface.
Best Reheating Method
To revive a slightly stale bark, add a tiny splash of water (about 1 teaspoon) to a small saucepan, bring to a gentle simmer, then remove from heat. Dip the bark in the warm water for 5 seconds, then pat dry with a paper towel. This steam trick restores the chocolate’s shine and crispness.