I was halfway through a batch of cookies, the dough thick and sticky, when the kitchen lights flickered and the oven door slammed shut. I stared at the mess of flour on the counter, my heart racing, and thought, “This is exactly why I never trust a midnight bake.” The panic settled in like a damp blanket, but my taste buds were already screaming for something sweet, something comforting. I remembered the last time I had tripped over a bag of chocolate chips that had fallen on the floor and melted into a gooey puddle—so much chocolate, yet so much mess. The scene was a chaotic symphony: the clatter of pans, the hiss of steam, the faint scent of burnt sugar. In that moment, I made a silent promise to myself that the next sweet creation would be flawless, indulgent, and utterly unforgettable.
Fast forward to the next evening, and I found myself standing in a sunlit kitchen, a bowl of chocolate chips gleaming like tiny moons. The air was already fragrant with the promise of coconut and cocoa, and I could almost taste the velvety richness before the first bite. My friends had called me up for a midnight snack, and I was ready to deliver a treat that would silence the kitchen chaos for good. I had spent hours researching truffles, trying to find the perfect balance between melt-in-your-mouth texture and a satisfying crunch. I was determined to make a recipe that would make every kitchen disaster seem trivial. The result? A simple, yet decadent, chocolate coconut truffle that would become the talk of every gathering.
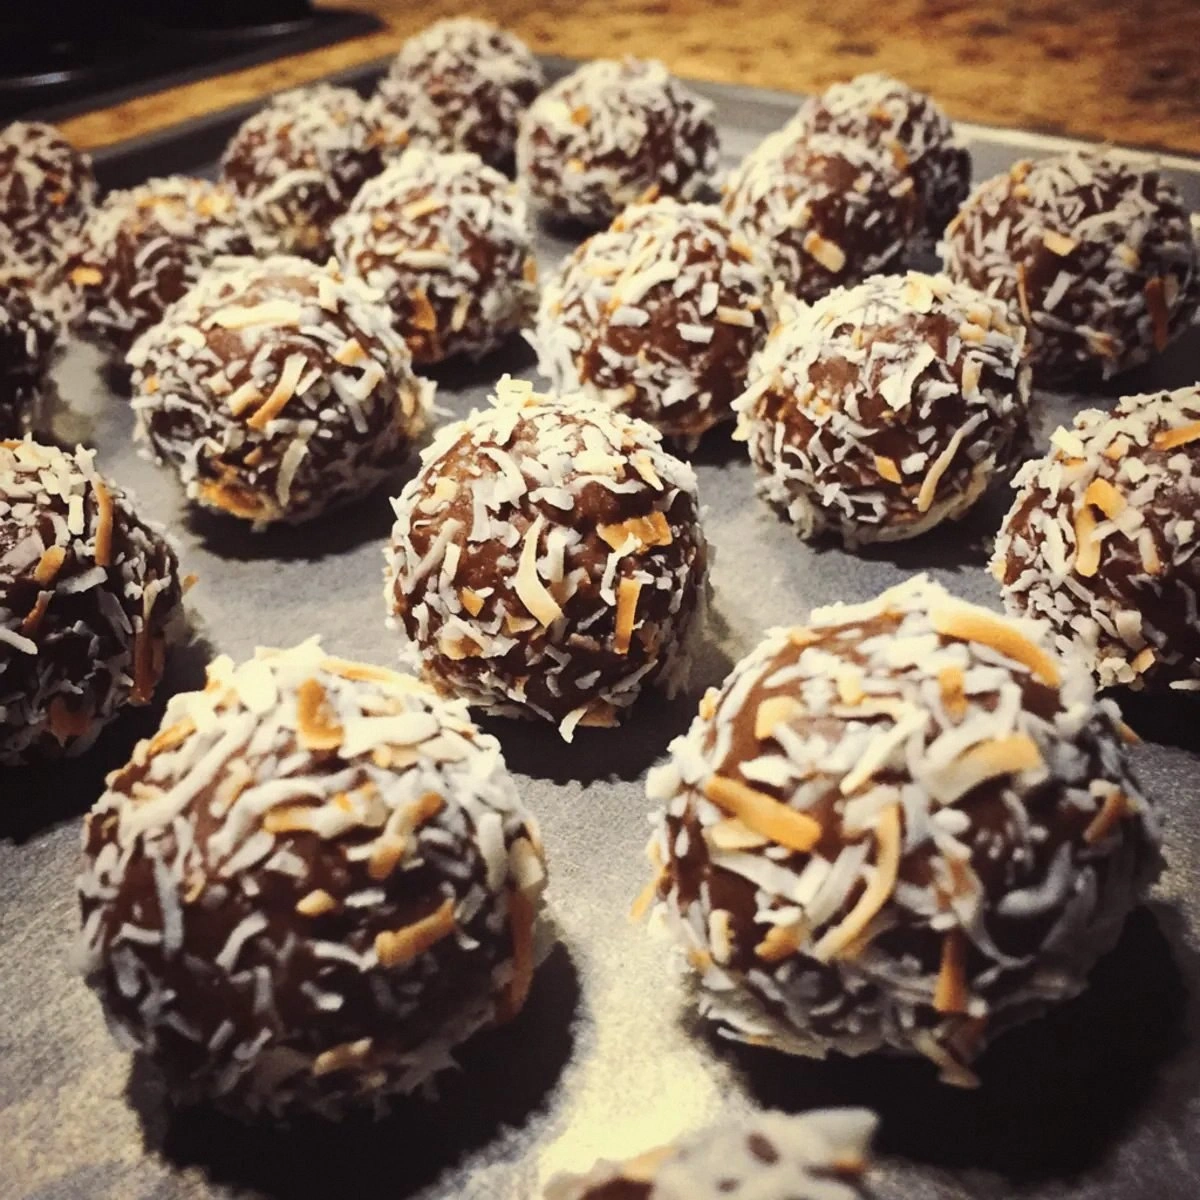
Picture this: a bite-sized ball of chocolate that melts in your mouth, releasing a burst of coconut that lingers like a tropical breeze. The outer coating of shredded coconut gives a subtle crunch that contrasts beautifully with the silky chocolate center. The vanilla undertone adds a layer of warmth, while the sea salt flakes provide a subtle counterpoint that enhances every bite. The texture is like a miniature snowflake—soft, airy, and utterly irresistible. The aroma alone is enough to make anyone’s mouth water, and the visual appeal is a feast for the eyes. This is the kind of dessert that turns an ordinary evening into a celebratory moment.
I dare you to taste this and not go back for seconds; the first bite will leave you craving the next one. This is hands down the best version you'll ever make at home, and the secret lies in the simple yet precise technique that I’ll share with you. I’ll be honest—before I perfected this recipe, I ate half the batch before anyone else got a chance to try it. Most recipes get this completely wrong, overcomplicating the process or undercooking the chocolate. Picture yourself pulling these truffles out of the fridge, the whole kitchen smelling incredible, and watching as your guests’ faces light up. And now, ready for the game-changer? Let’s walk through each step together.
The first thing you’ll notice is the ease of preparation; no fancy equipment, just a saucepan and a spoon. The chocolate chips melt into a glossy, silky sauce that coats the coconut like velvet. The heavy cream is the secret to achieving that smooth, spreadable consistency. Adding butter at the right moment unlocks a buttery depth that makes the truffles feel luxurious. The vanilla extract is not just flavor—it’s the aroma that lingers in the air, drawing people in. The final dusting of shredded coconut and sea salt flakes gives that satisfying crunch and a hint of oceanic brightness.
I’ve spent countless evenings experimenting with different types of chocolate, from milk to dark, and I found that semi-sweet chips strike the perfect balance. The coconut, whether sweetened or unsweetened, adds a tropical sweetness that pairs beautifully with chocolate. Heavy cream gives the mixture a luscious, silky texture that holds the truffles together. Butter brings a subtle richness that elevates the overall flavor profile. Vanilla extract provides a fragrant, comforting note that ties everything together. Sea salt flakes add a delicate contrast that makes the chocolate shine even brighter.
If you’re a purist, you might wonder why I didn’t use dark chocolate or unsweetened coconut. The truth is, the semi-sweet chips give a gentle sweetness that doesn’t overpower the chocolate’s depth. The sweetened coconut keeps the truffles light and airy, preventing them from feeling dense. Heavy cream is the key to achieving that smooth, melt-in-your-mouth quality that makes these truffles so irresistible. Butter adds a silky finish that makes the truffles feel indulgent. Vanilla extract, though small in quantity, offers a fragrant warmth that lingers after each bite. Sea salt flakes add a subtle bite that brings out the chocolate’s richness.
The beauty of this recipe is its versatility. You can easily tweak it to suit different dietary preferences or flavor profiles. For a vegan version, simply replace the heavy cream with coconut milk and use plant-based chocolate chips. For a nutty twist, add chopped almonds or hazelnuts to the mix. If you’re a fan of spices, a pinch of cinnamon or a dash of cayenne pepper can add a surprising depth. For a more decadent treat, drizzle melted chocolate on top before rolling in coconut. The possibilities are endless, and each variation offers a new sensory experience. Experimentation is the name of the game, and I’m excited to see what you’ll create.
Now that the story is set, let’s dive into the details that make this recipe a culinary masterpiece. The first thing you’ll need is a bowl that can hold the chocolate, coconut, and cream. A sturdy saucepan is essential for melting the chocolate evenly. A spoon or spatula will help you stir the mixture without splattering. A small bowl will hold the sea salt flakes for a quick sprinkle. A measuring cup or spoon is necessary for accurate measurements. Finally, a tray or plate to set the truffles on while they cool. With these tools, you’re ready to start the chocolate adventure.
The first ingredient, semi-sweet chocolate chips, is the foundation of the truffle’s flavor. These chips melt quickly and provide a smooth, glossy sauce. They also offer a balanced sweetness that doesn’t overpower the coconut. The chocolate should be chopped finely to ensure even melting. Use a medium heat to avoid burning the chocolate. Once melted, it should be glossy and free of lumps.
Next, sweetened shredded coconut adds both flavor and texture. It should be evenly distributed throughout the mixture. Coconut also absorbs the chocolate, creating a chewy consistency. The sweetness of the coconut balances the chocolate’s bitterness. It also adds a subtle tropical aroma that enhances the overall experience. The coconut should be toasted lightly for extra flavor, but not burnt.
Heavy cream is the secret to achieving a silky, spreadable consistency. It’s added after the chocolate has melted, allowing the mixture to thicken slightly. The cream also helps the truffles hold their shape. It’s important to use heavy cream rather than light or half-and-half for the best results. The cream should be at room temperature to prevent clumping. Once combined, the mixture should be smooth and glossy.
Unsalted butter adds a buttery richness that elevates the flavor profile. It should be melted and added to the mixture after the cream. The butter helps the truffles hold their shape and adds a silky finish. It also balances the sweetness of the chocolate. The butter should be added in small increments to avoid separation. Once incorporated, the mixture should be smooth.
Vanilla extract brings a fragrant warmth that ties all the flavors together. It should be added after the butter, allowing the aroma to disperse. Vanilla adds depth and complexity to the chocolate. The extract should be added in small amounts to avoid overpowering the chocolate. Once added, the mixture should be stirred until the vanilla is fully incorporated. The aroma of vanilla should fill the kitchen.
Additional shredded coconut is used to coat the truffles after they are formed. It should be rolled in a shallow dish for even coverage. This extra coconut adds a crunchy texture and a hint of tropical flavor. The coconut should be toasted lightly for extra flavor. It should be rolled in the mixture until fully coated. The result is a crisp, caramelized exterior.
Chopped nuts add a delightful crunch and a nutty flavor that complements the chocolate. They can be almonds, hazelnuts, or walnuts, depending on your preference. The nuts should be chopped finely to prevent large chunks. They should be mixed into the chocolate mixture before rolling. The nuts add a subtle crunch that contrasts with the smooth chocolate. The flavor of the nuts should be noticeable but not overpowering.
Cocoa powder is used to dust the truffles after they are formed. It adds a bitter note that balances the sweetness. The cocoa powder should be sifted to avoid lumps. It should be dusted lightly over the truffles. The cocoa powder adds a subtle bitterness that enhances the chocolate flavor. The final dusting should be even and light.
Sea salt flakes provide a subtle contrast that enhances the chocolate’s richness. They should be sprinkled over the truffles after the cocoa powder. The sea salt adds a delicate crunch and a burst of flavor. The salt should be added sparingly to avoid overpowering the chocolate. The final result should have a subtle salty note that complements the sweetness. The sea salt should be evenly distributed.
Everything’s prepped? Good. Let’s get into the real action. Grab a saucepan and set it on medium heat. Add the chocolate chips to the pan and stir until they’re completely melted. The chocolate should be glossy and free of lumps. Add the heavy cream and stir until the mixture is smooth. The mixture should be thick enough to coat the back of a spoon. Let it cool for a minute before adding butter.
Add the butter to the chocolate mixture, stirring until it’s fully incorporated. The mixture should become silky and glossy. Add the vanilla extract and stir until fully blended. The aroma of vanilla should fill the kitchen. Let the mixture cool to room temperature; this will make it easier to roll into truffles. Once cooled, the mixture should be thick but still pliable.
Take a spoonful of the mixture and roll it between your palms to form a ball. The ball should be about the size of a golf ball. Roll each ball in the sweetened shredded coconut until fully coated. The coconut should cling to the surface of the truffle. Place the coated truffles on a tray lined with parchment paper. Let them set for 10 minutes.
After 10 minutes, remove the truffles from the tray and roll them in additional shredded coconut. The second coating adds an extra layer of texture. Roll each truffle in the chopped nuts for a crunchy finish. The nuts should be evenly distributed over the surface. Then, dust the truffles with cocoa powder. The cocoa should be sifted to avoid clumps. Finally, sprinkle a pinch of sea salt flakes over the truffles.
This is the moment of truth. The truffles should be firm enough to hold their shape but still soft enough to melt in your mouth. The aroma should be intoxicating, with chocolate, coconut, and vanilla filling the air. The texture should be a perfect balance of silky chocolate and crunchy coconut. The finish should be a hint of salty brightness. If you’re satisfied, let the truffles chill in the fridge for at least an hour before serving. The chilling step is essential for the truffles to firm up.
Now that the truffles are chilled, it’s time to serve. Arrange them on a platter for a stunning presentation. The truffles should be bright and glossy, with a subtle sheen. The aroma will draw people in, and the first bite will be a revelation. Serve them at room temperature for the best flavor. If you prefer a firmer bite, keep them in the fridge until ready to serve. The truffles will still retain their creamy center and crunchy exterior.
The insider tricks that guarantee flawless results start with the right temperature. Chocolate should never exceed 120°F when melted, or it will seize. Use a thermometer to keep the heat steady. The second trick is to let the mixture cool slightly before rolling; this prevents the truffles from sticking to your hands. The third trick is to roll the truffles in a shallow dish of coconut, ensuring an even coating. The fourth trick is to chill the truffles for at least an hour to set the texture. The final trick is to store them in an airtight container to preserve freshness.
The temperature rule nobody follows is that chocolate should be melted over gentle heat, never boiling. A quick test is to touch the pan; if it’s too hot, the chocolate will seize and become grainy. The aroma of chocolate is a key indicator of proper melting; it should smell rich and sweet. The texture of the mixture should be smooth and glossy, not lumpy. The chocolate should be fully melted before adding cream, or it will create a gritty texture. This small detail makes a huge difference in the final product.
Your nose knows when the chocolate is ready. A sweet, buttery aroma indicates that the chocolate has reached the ideal temperature. If the aroma is faint or metallic, it’s a sign that the chocolate is undercooked. The scent of vanilla is also a cue; it should be fragrant without overpowering the chocolate. The aroma should be inviting, drawing people in. Trust your nose to guide you through the melting process. This sensory checkpoint ensures a perfect outcome.
A 5-minute rest after adding butter allows the flavors to meld. The butter should be fully incorporated, giving the mixture a silky finish. This rest also helps the mixture thicken slightly, making it easier to roll. The rest period is essential for achieving a smooth, even coating of coconut. The mixture should be thick but still pliable. This step ensures the truffles hold their shape while still being soft.
The final trick is to chill the truffles before serving. This step locks in the flavors and gives them a firm texture. The truffles should be stored in an airtight container to keep them fresh. If you’re making them ahead of time, keep them chilled for up to a week. The truffles will still be delicious, even after a few days. This storage tip keeps the truffles tasting fresh and indulgent.
This recipe is a playground for creativity. Swap the chocolate for dark chocolate for a richer flavor, or use white chocolate for a sweeter, creamier version. Add a splash of coconut milk to the mixture for a tropical twist. Mix in a pinch of cayenne pepper for a subtle heat that contrasts with the sweetness. Use toasted nuts for a crunchy texture that adds depth. The possibilities are endless, and each variation offers a new sensory experience.
Picture the truffles served at a holiday gathering, their glossy shells reflecting the warm light. The aroma of chocolate and coconut fills the room, and people gather around the platter. The truffles are the centerpiece of the dessert table, and the conversation turns to the secret recipe. Your friends will ask how you achieved such a perfect balance of flavors. You’ll proudly share the recipe, and they’ll be eager to try it themselves. The result is a shared experience that brings people together over sweet, creamy treats.
Storing the truffles is simple and effective. Keep them in a shallow airtight container in the refrigerator for up to a week. The truffles will stay fresh and firm, and the coconut coating will remain crisp. If you need to keep them for longer, freeze them in a single layer on parchment paper. When you’re ready to serve, let them thaw at room temperature for 10 minutes before rolling in extra coconut. The truffles will melt in your mouth, just like the first time you made them. This storage method preserves the texture and flavor.
If you’re short on time, you can freeze the truffles in a single layer on parchment paper for up to three months. When you’re ready to serve, let them thaw at room temperature for 10 minutes. Then, roll them in coconut or cocoa powder for a fresh coating. The truffles will still taste as good as the first time. This method is perfect for busy days or when you want a quick dessert. The truffles will still be creamy, crunchy, and utterly delightful.
The best reheating method is to let the truffles sit at room temperature for 10 minutes. This will soften the chocolate, making it easier to bite. If you prefer a firmer texture, keep them chilled until ready to serve. Adding a splash of water before reheating will steam the truffles back to perfection, restoring the silky texture. This trick ensures the truffles stay moist and delicious. The truffles should be served immediately after reheating for the best experience. This final step guarantees a perfect bite every time.