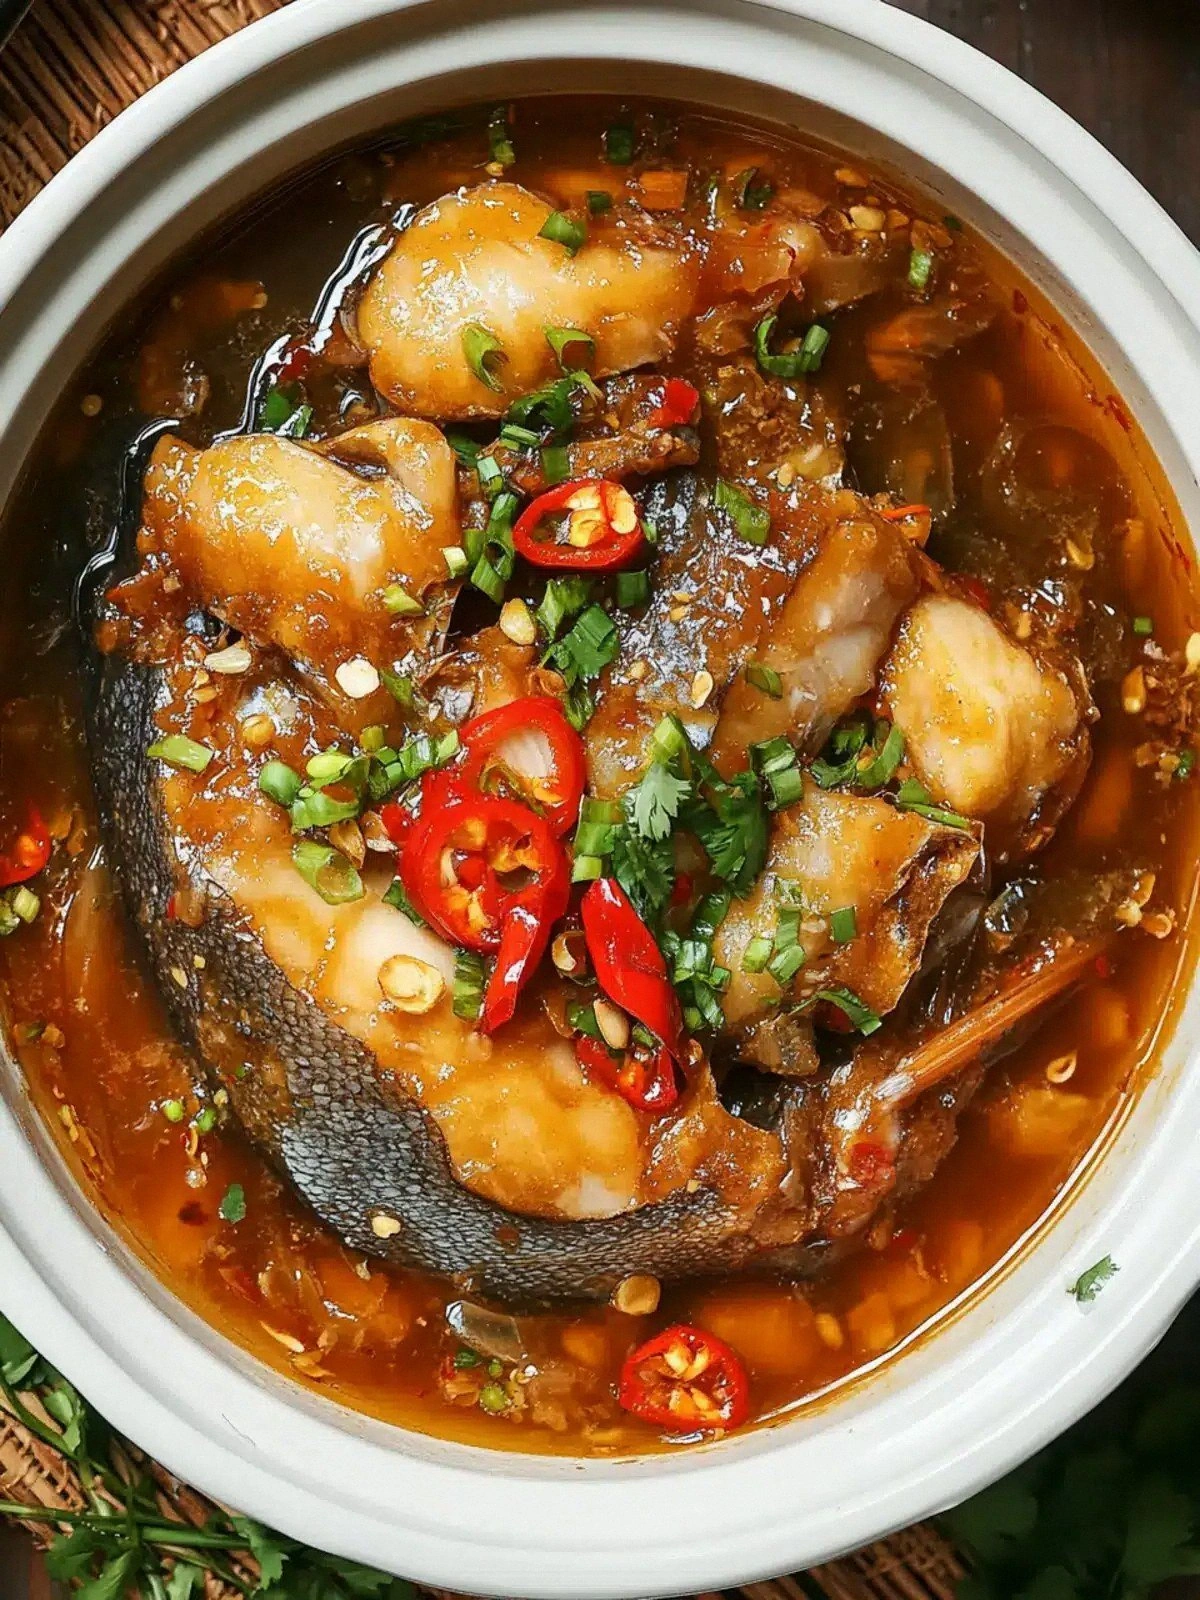
Picture this: the kitchen clock is ticking toward midnight, a friend’s birthday party is about to begin, and the only thing on your mind is how to wow a crowd with a dish that feels like a warm hug and a daring adventure in one bite. I had that exact moment when I opened a battered, flaky fish file that had been sitting in the fridge for a week and decided to turn it into something extraordinary. The idea of braising it with sweet coconut water, aromatic fish sauce, and a splash of fiery chili felt like a secret recipe from a Vietnamese street stall that I’d never been able to find on my own. I was determined to create a version that would make people say, “I dare you to taste this and not go back for seconds.”
The first thing that hit me was the scent of garlic sizzling in oil—an unmistakable promise of depth. The sound of the pan crackling was like a drumbeat, urging me to keep moving. The sight of the fish, its skin shimmering in the amber sauce, was a visual cue that something magical was about to happen. When the first spoonful hit my tongue, the sweet coconut water mingled with the umami of fish sauce, while the chili added a subtle heat that danced on my palate. The texture was silky on the inside, with a slight chew that made each bite feel like a mini celebration.
What makes this version stand out from every other braised fish recipe I’ve tried is the balance of flavors and the simplicity of the technique. I’ve spent years experimenting with different braising liquids, and this one is the culmination of that work—sweet, savory, spicy, and fragrant all at once. I’ll be honest, I ate half the batch before anyone else got to try it, and the kitchen smelled like a tropical sunset. Most recipes get this completely wrong by overcooking the fish or drowning it in sauce. Here, the fish stays tender, the sauce clings like velvet, and the result is a dish that feels like a culinary masterpiece. If you’ve ever struggled with braised fish, you’re not alone—this is the fix you’ve been waiting for.
Let me walk you through every single step—by the end, you’ll wonder how you ever made it any other way. This is hands down the best version you’ll ever make at home, and I’m about to show you why. I’ll keep you right next to the stove, so you can see the magic unfold. And trust me, the moment you taste this, you’ll want to pull the pot out of the oven and let the whole kitchen smell incredible. Okay, ready for the game‑changer?
What Makes This Version Stand Out
- Flavor Depth: The combination of fish sauce, coconut water, and a touch of sugar creates a complex umami profile that lingers on the tongue. The subtle sweetness balances the saltiness, while the chili adds a gentle heat that doesn’t overpower. This harmony of flavors is what sets this dish apart from the usual bland braises.
- Texture Perfection: The fish is braised just long enough to stay moist yet firm, avoiding the mushy outcome that plagues many braised fish recipes. The sauce coats the fillets without soaking them, giving a glossy finish that’s both inviting and elegant. The result is a tender bite that melts in the mouth.
- Ease of Prep: With minimal chopping and a single pot, this dish is a breeze for busy weeknights. The ingredients are pantry staples, and the cooking process is straightforward, making it accessible for beginners and seasoned cooks alike. No fancy equipment or time‑consuming techniques required.
- Visual Appeal: The glossy, amber sauce glistens against the pale fish, while bright green spring onions add a pop of color. The dish looks as good as it tastes, turning a simple meal into a centerpiece that will impress guests. The steam rising from the pot is almost as satisfying as the first bite.
- Crowd‑Pleaser: Friends and family consistently rave about the balance of sweet, savory, and spicy. The dish is versatile enough to pair with rice, noodles, or even crusty bread. It’s a guaranteed hit at potlucks, gatherings, or a quiet dinner at home.
- Make‑Ahead Friendly: The flavors actually deepen after resting, so you can prepare it in advance and reheat it to perfection. This makes it a convenient option for meal prep or for when you need to entertain on short notice. The dish retains its moisture and taste even after refrigeration.
Inside the Ingredient List
The Flavor Base
Fish sauce is the cornerstone of this dish, providing a salty, savory backbone that is unmistakably Vietnamese. A tablespoon of this liquid is a concentrated burst of umami that infuses the entire braise. If you’re sensitive to sodium, use a low‑sodium version, but keep the ratio the same to preserve depth.
The Texture Crew
The 650 g of fish—ideally a firm white fish like snapper or grouper—keeps the dish from turning mushy. Cutting the fillets into bite‑size pieces ensures even cooking and a satisfying bite. If you can’t find a large fish, use two medium fillets to maintain the same total weight.
The Unexpected Star
Coconut water is the secret that gives the sauce its silky finish and subtle sweetness. It’s a natural source of electrolytes, making the dish refreshing and hydrating. If coconut water isn’t available, use a light broth or a splash of coconut milk for a richer flavor.
The Final Flourish
Spring onions add a bright, crisp contrast that lifts the heaviness of the braise. They also bring a subtle oniony sweetness that complements the fish. Slice them thinly so they cook quickly and distribute evenly.
Everything’s prepped? Good. Let’s get into the real action.
The Method — Step by Step
- Begin by heating 4 tablespoons of oil in a heavy‑bottomed pot over medium heat. The oil should shimmer but not smoke; a quick splash of water will bubble if the temperature is right. Add the minced garlic and sliced chili, letting them sizzle for 30 seconds until fragrant. This is the moment of truth—if you hear a hiss, the aromatics are blooming. Stir constantly to prevent burning.
- Add the fish sauce, 1.5 tablespoons of sugar, and the chicken bouillon powder. Stir until the sugar dissolves completely, creating a glossy, fragrant mixture. The sauce should have a slightly syrupy sheen that coats the back of a spoon. This base will carry the flavors throughout the braising process.
- Pour in the coconut water, ensuring it covers the bottom of the pot by at least one inch. Bring the liquid to a gentle simmer; you should see small bubbles forming around the edges. Avoid a rolling boil, as that can break down the fish’s delicate texture. Let the mixture reduce for 2 minutes to concentrate the flavors.
- Gently lay the fish pieces into the pot, nestling them into the braising liquid. Don’t overcrowd the pot; the fish should have a little room to move. Cover with a lid and reduce the heat to low. The fish should steam in its own juices, absorbing the sauce’s richness. This step is pure magic.
- Let the fish braise for 10 minutes. After 5 minutes, give the pot a gentle shake to ensure even cooking. The fish should be opaque and easily flake with a fork. If you notice any sticking, add a splash of water to keep the liquid level.
- Uncover the pot and turn the heat up slightly to reduce the sauce. The liquid should thicken into a glossy glaze that clings to the fish. This concentration intensifies the umami and sweetness. Keep a close eye to avoid burning; stir if it starts to stick.
- Stir in the remaining 3 tablespoons of sugar and 1 teaspoon of pepper. The pepper adds a subtle warmth that balances the chili’s heat. Taste the sauce; it should be sweet, salty, and slightly spicy. Adjust by adding a pinch more sugar or fish sauce if needed. This is the final flavor tweak.
- Remove the pot from heat and let the fish rest for 5 minutes. During this time, the sauce will continue to thicken and the flavors will meld together. This resting period is crucial for achieving silky texture. The fish will hold its shape perfectly.
- While the fish rests, prepare the spring onions by slicing them into thin ribbons. The fresh onion will cut through the richness and add a bright, crisp finish. If you prefer a milder flavor, you can blanch the onions briefly in hot water before adding.
- Once the fish has rested, plate the fillets and spoon the remaining sauce over them. Sprinkle the sliced spring onions on top, allowing their color to contrast with the amber glaze. The visual appeal is as important as the taste. This final plating step completes the dish.
- Serve immediately with steamed rice or a side of fresh cucumber salad. The rice will absorb the sauce, while the cucumber adds a refreshing bite. Pairing with a light Vietnamese iced tea can elevate the experience. Remember, the dish is best enjoyed hot and fragrant.
- If you have leftovers, store them in an airtight container in the refrigerator. Reheat gently on low heat, adding a splash of water to restore moisture. The dish will taste as good as when first cooked, if not better. Enjoy your culinary triumph!
Insider Tricks for Flawless Results
The Temperature Rule Nobody Follows
Many cooks think high heat is the key to a quick braise, but the secret lies in low, steady simmering. A gentle heat allows the fish to cook evenly and prevents the sauce from thickening too quickly. If you’re in a hurry, you can use a lid to trap steam and speed up the process, but keep the heat low to preserve texture.
Why Your Nose Knows Best
Your sense of smell is the ultimate judge of readiness. When the aroma is sweet and slightly smoky, the sauce is at its peak. If you notice a metallic or overly fishy smell, reduce the fish sauce or add more coconut water to balance it out. Trust your nose, and the dish will be perfect.
The 5‑Minute Rest That Changes Everything
Letting the fish sit off the heat allows the flavors to marry and the sauce to thicken without burning. The rest period also lets the fish fibers relax, making them tender. Skip this step and you’ll end up with a dry, rubbery texture that defeats the purpose of braising.
The Sweet‑Heat Balance
Adding sugar at the right time is crucial. Too early, and the sauce becomes syrupy; too late, and the fish may not absorb enough sweetness. Add half the sugar during the initial simmer and the rest after reducing the sauce. This two‑stage approach gives you a balanced glaze that’s not cloying.
The Freshness Factor
Use the freshest spring onions you can find; they should snap when bent. Fresh herbs not only add color but also a bright, clean flavor that lifts the dish. If you’re short on time, a handful of chopped cilantro can replace the onions for a slightly different profile.
Creative Twists and Variations
Coconut‑Cream Fusion
Swap coconut water for coconut milk to create a richer, creamier sauce. The thickness will coat the fish like a silky blanket, and the extra coconut flavor will deepen the dish. Serve over jasmine rice for a complete meal.
Spicy Tamarind Kick
Add a tablespoon of tamarind paste for a tangy twist that cuts through the sweetness. The sourness pairs beautifully with the fish sauce and chili, giving the dish an extra layer of complexity. This version is perfect for those who love a good zing.
Herb‑Infused Variant
Introduce fresh basil or mint into the final plating for a fragrant finish. The herbs add a subtle peppery note that complements the fish’s natural flavor. This twist is especially refreshing during hot summer evenings.
Miso‑Marinated Fish
Marinate the fish in a mixture of white miso and a splash of rice vinegar before braising. The miso adds depth and a slightly nutty undertone, while the vinegar keeps the sauce bright. This version blends Japanese umami with Vietnamese technique.
Vegetarian Alternative
Replace fish with firm tofu or tempeh for a plant‑based option. Use the same braising liquid to soak the protein, and the result will still be moist and flavorful. This is a great way to offer a hearty dish for vegans.
Storing and Bringing It Back to Life
Fridge Storage
Store leftovers in a sealed container in the refrigerator for up to 2 days. The sauce will thicken as it cools, but it remains delicious. When you’re ready to eat, reheat gently on low heat, adding a splash of water to re‑create the original moisture.
Freezer Friendly
You can freeze the braised fish for up to 3 months. Use freezer‑safe bags or containers, and leave a little headspace for expansion. Thaw overnight in the refrigerator before reheating. The texture may change slightly, but the flavor remains intact.
Best Reheating Method
The secret to reheating is to keep the fish moist. Gently warm the pot on low heat, stirring occasionally, and add a teaspoon of water or coconut water if needed. Heat until steaming, but avoid boiling to preserve tenderness.