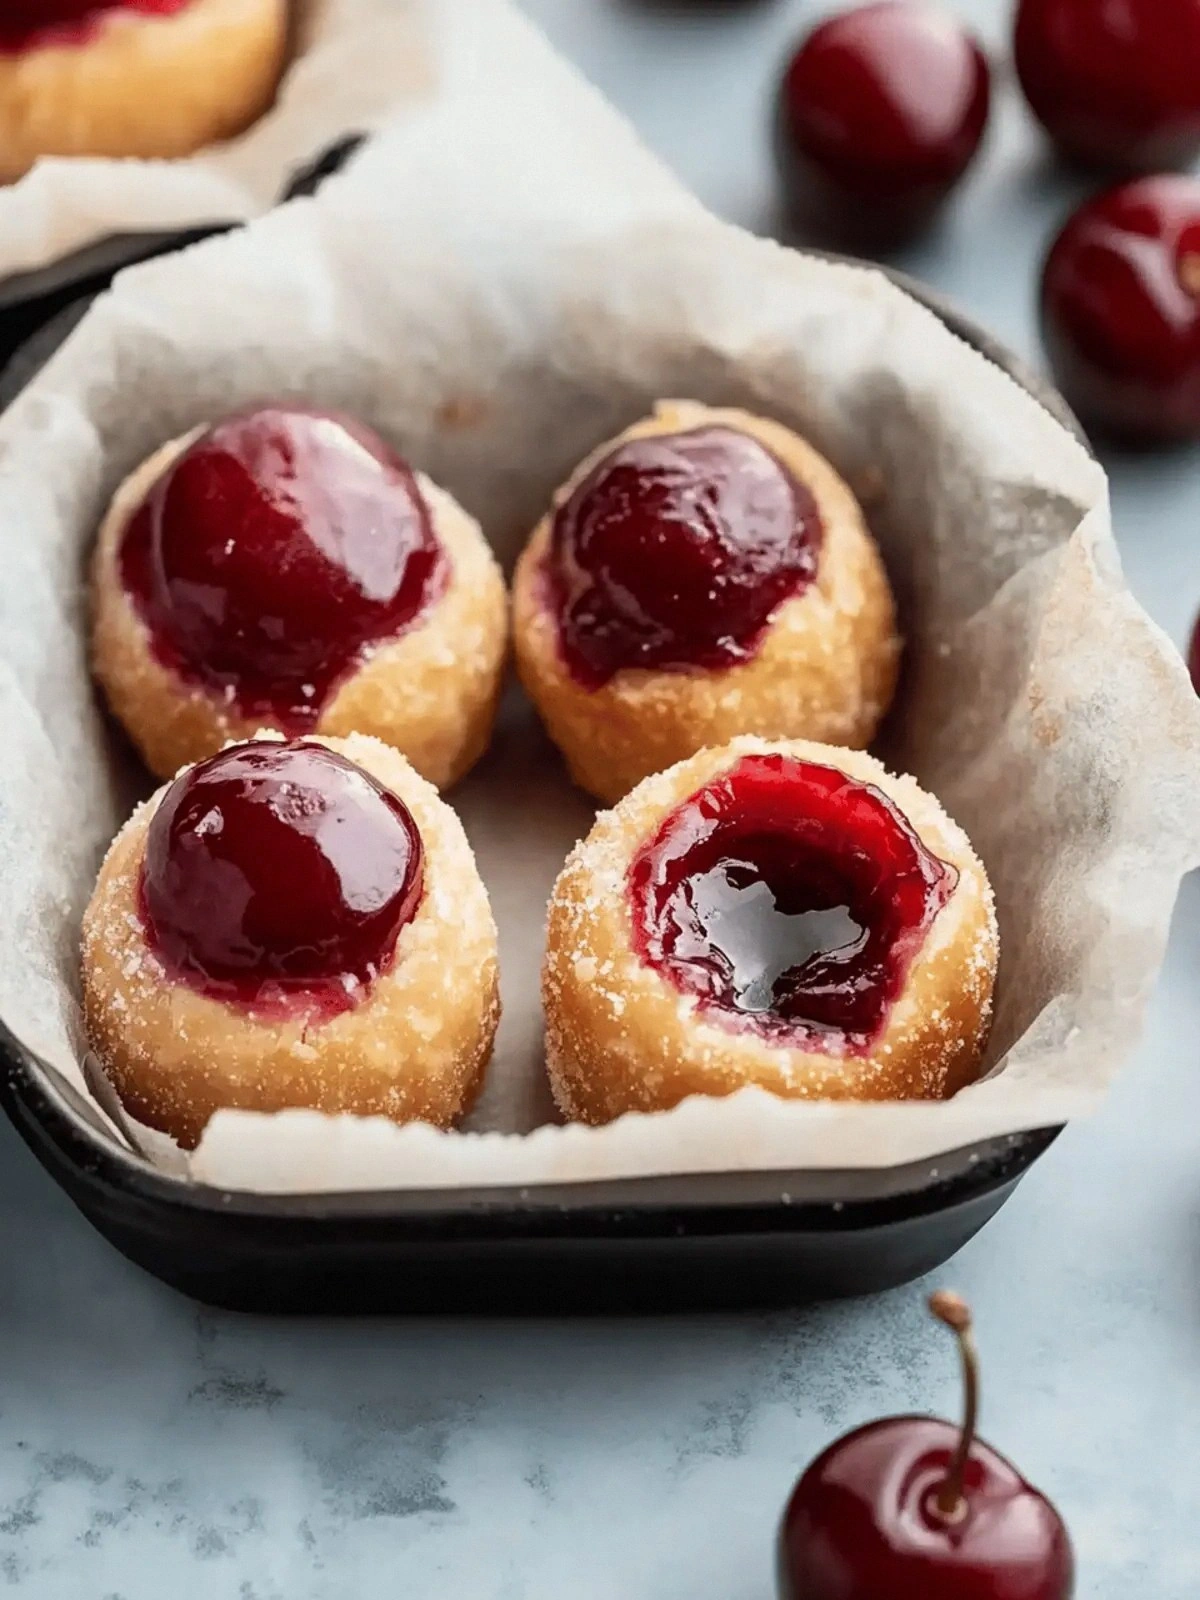
Picture this: I was in the middle of a family gathering, the living room buzzing with laughter and the scent of fresh popcorn, when I realized my pantry was a barren wasteland of ingredients. The only thing left was a box of crescent roll dough, a can of cherry pie filling, a cup of powdered sugar, and a splash of milk. I stared at the empty shelf, heart sinking, until a sudden burst of inspiration hit me like a lightning bolt—why not turn these humble staples into bite‑size, crowd‑pleasing morsels that could save the day? I was determined to create a dessert that would not only fill the void but also win the hearts of anyone who tasted it.
I grabbed the dough, and the buttery aroma hit me first, like a warm hug from a long‑lost friend. The sweet, tangy cherry filling sent a rush of nostalgia, reminding me of childhood afternoons spent watching my grandma bake. The powdered sugar added a delicate sparkle, almost like a sprinkle of stardust. When I tossed the dough together, the sound of it clinking against the counter felt like a drumbeat of anticipation. The moment the first bite hit my tongue, I could taste the crunch of the golden crust, the burst of tart cherries, and a faint, comforting sweetness that made my mouth water.
What sets this version apart from the countless other cherry pie bites out there is the sheer simplicity paired with an explosion of flavor. I’m talking about a recipe that takes a minute to assemble, a few minutes to bake, and delivers a dessert that feels like a gourmet treat. The dough’s buttery, flaky texture is elevated by the sweet‑tart cherry filling that coats the interior like velvet, while the powdered sugar dusting gives a final touch of elegance. The result is a bite that is crispy on the outside, juicy on the inside, and utterly addictive. I dare you to taste this and not go back for seconds—trust me, you’ll be craving more.
The best part? I discovered a little trick that turns a plain crescent roll dough into a crisp, golden shell that doesn’t get soggy from the filling. I’ll be honest—I ate half the batch before anyone else got to try it, and I’ve never been so proud of a kitchen experiment. Most recipes get this completely wrong, leaving the dough soggy or the filling too dry. This next part? Pure magic. Let me walk you through every single step—by the end, you’ll wonder how you ever made it any other way.
What Makes This Version Stand Out
- Flavor: The cherry filling is the star, bursting with natural tartness that balances the dough’s buttery richness. The powdered sugar finish adds a sweet, almost candy‑like dust that lingers on the palate.
- Texture: The dough crisps to a golden crunch while retaining a tender interior, creating a satisfying contrast that keeps guests coming back for more.
- Simplicity: With only four pantry staples, you can whip up a dessert in under 30 minutes—perfect for last‑minute entertaining.
- Uniqueness: By using crescent roll dough instead of traditional pie crust, you get a lighter, flakier bite that feels like a pastry but tastes like pie.
- Crowd Reaction: Even the pickiest eaters love the sweet‑tart combo; it’s a guaranteed hit at parties, potlucks, or a quick family dessert.
- Ingredient Quality: Using fresh, high‑quality cherry filling elevates the entire dish, turning an ordinary snack into a gourmet experience.
- Make‑ahead Potential: These bites can be baked ahead and reheated, making them ideal for busy days or large gatherings.
Alright, let's break down exactly what goes into this masterpiece...
Inside the Ingredient List
The Flavor Base
The cherry pie filling is the heart of this recipe. Its natural sweetness and tartness create a flavor profile that is both comforting and exciting. If you use a low‑sugar filling, the dough’s buttery taste will shine even brighter. A quick swap: try a mixed berry filling for a seasonal twist that keeps the same balance of sweet and tart.
The Texture Crew
Crescent roll dough brings flaky layers and a buttery crunch that is hard to beat. It’s pre‑rolled and ready to use, which saves time and reduces the risk of overworking the dough. If you’re in a hurry, you can use pre‑baked puff pastry sheets; just cut them into triangles to mimic the crescent shape. The key is to keep the dough cold until you’re ready to bake, ensuring a crisp edge.
The Unexpected Star
Powdered sugar is the finishing touch that turns these bites into a dessert worthy of a fancy dinner table. It melts slightly into a glaze that gives a subtle shine and a sweet finish. You can replace it with a dusting of cocoa powder for a chocolatey surprise, but the classic powdered sugar remains the most beloved choice. A pinch of sea salt on top can also enhance the overall flavor profile, making the sweet pop even more pronounced.
The Final Flourish
Milk is used to brush the dough, creating a golden, glossy crust. It also helps the powdered sugar stick and gives the bite a slight sheen. If you’re dairy‑free, a splash of almond milk or oat milk works just fine. A splash of vanilla extract in the milk can add an extra layer of aroma that lifts the entire dish.
Everything's prepped? Good. Let's get into the real action...
The Method — Step by Step
- Preheat your oven to 375°F (190°C). Line a baking sheet with parchment paper to prevent sticking. The oven’s heat will give the dough a golden finish while keeping the cherry filling juicy. If your oven runs hot, lower the temperature by 10–15°F to avoid burning.
- Take the crescent roll dough out of the fridge and let it sit at room temperature for about 5 minutes. This makes the dough easier to roll out without tearing. Keep a small bowl of warm water handy to keep your hands from sticking.
- Unroll the dough onto a lightly floured surface. Using a sharp knife or pizza cutter, cut the dough into triangles that are roughly 3 inches wide at the base. The size should be small enough for a bite but large enough to hold the filling.
- Place a spoonful of cherry pie filling onto the center of each triangle. Don’t overload it—just enough to cover the middle. The filling should be visible through the dough, giving a sneak peek of the juicy interior.
- Fold the dough over the filling, forming a triangle shape. Pinch the edges together to seal. If the dough is too sticky, dampen your fingers with a bit of water to make sealing easier.
- Brush each bite with a mixture of milk and a dash of vanilla extract. This not only gives a shiny glaze but also helps the powdered sugar adhere later. A light brush is enough; too much liquid can make the dough soggy.
- Place the prepared bites on the prepared baking sheet, leaving a little space between each. Bake for 12–15 minutes, or until the edges are a deep golden brown. Keep an eye on the color; the first sign of readiness is when the dough starts to pull away from the parchment.
- Remove the sheet from the oven and let the bites cool for 5 minutes. While they’re still warm, dust them generously with powdered sugar. The sugar will cling to the warm surface, creating a sweet crust that’s both crunchy and slightly sticky.
- Serve immediately or store in an airtight container for up to 2 days. If you need to reheat, pop them in a 350°F (175°C) oven for 3–4 minutes to revive the crispness.
- Enjoy your cherry pie bites with a glass of cold milk or a splash of espresso for a delightful contrast. The sweet, buttery flavor pairs wonderfully with a bold coffee, creating a dessert experience that feels both indulgent and comforting.
That's it — you did it. But hold on, I've got a few more tricks that'll take this to another level...
Insider Tricks for Flawless Results
The Temperature Rule Nobody Follows
Many bakers bake at a lower temperature, hoping to keep the dough from browning too quickly. The truth is, a higher temperature (375°F) creates a crisp, golden shell that locks in moisture. Keep a thermometer handy to ensure your oven hits the right heat; an oven that runs hot can cause the dough to burn before the filling sets.
Why Your Nose Knows Best
Trust your sense of smell while baking—when the dough starts to smell toasty and the edges pull away from the parchment, you’re in the sweet spot. If the scent is too sweet, the filling might be overcooked; if it’s too bland, the dough isn’t crisp enough. A quick sniff test can save you from a batch of under‑baked or over‑baked bites.
The 5-Minute Rest That Changes Everything
Letting the baked bites rest on the sheet for five minutes before dusting with powdered sugar is crucial. This brief pause allows the sugar to adhere better and gives the filling a chance to set. If you dust immediately, the sugar may slide off, ruining the presentation.
The Secret of the Brush
A light brush of milk is all you need to give a glossy finish. Using too much liquid can make the dough soggy, especially if you’re baking at a high temperature. If you prefer a richer glaze, whisk in a teaspoon of melted butter with the milk.
The Quick Chill Trick
After baking, place the bites on a wire rack to cool. This prevents condensation from forming and keeps the crust crisp. If you’re storing them, keep the rack in a dry area; moisture will make the dough soft over time.
The Final Flourish
For an extra pop of color, sprinkle a tiny pinch of ground paprika over the powdered sugar dusting. The subtle heat contrasts with the sweet cherry, creating a multi‑sensory experience. This is a simple tweak that elevates the dish from ordinary to extraordinary.
Creative Twists and Variations
This recipe is a playground. Here are some of my favorite ways to switch things up:
Nutty Crunch
Add chopped toasted pecans or walnuts to the filling for a nutty crunch that pairs wonderfully with the sweet cherries. The nuts add protein and a satisfying bite.
Spiced Delight
Stir a pinch of cardamom or allspice into the cherry filling for an aromatic twist. The spices complement the fruit’s tartness and give a warm, cozy feel.
Chocolate Swirl
Swap the powdered sugar dusting for a drizzle of melted dark chocolate. The bittersweet chocolate balances the cherry’s sweetness and creates a visually striking finish.
Almond Glaze
Replace the milk brush with almond milk and add a splash of almond extract. The nutty flavor enhances the dough and pairs beautifully with the cherry filling.
Mini Cheesecake Bite
Instead of cherry, use a small dollop of lemon curd or blueberry compote. The tangy filling gives a cheesecake‑like experience in bite‑size form.
Holiday Twist
During the winter season, sprinkle a dusting of cinnamon sugar instead of powdered sugar. The warm spice adds a festive feel that’s perfect for holiday gatherings.
Storing and Bringing It Back to Life
Fridge Storage
Store the cooled bites in an airtight container in the refrigerator for up to 2 days. Keep them in a single layer to prevent sticking. Before serving, let them sit at room temperature for about 10 minutes to regain some crispness.
Freezer Friendly
For longer storage, freeze the baked bites on a parchment‑lined tray until solid, then transfer to a freezer bag. They’ll keep for up to 3 months. When you’re ready to eat, reheat at 350°F for 5 minutes.
Best Reheating Method
Reheat the frozen or refrigerated bites in a 350°F oven for 5 minutes, or use a toaster oven for a quicker crisp. Add a tiny splash of water before reheating to create steam, which helps restore the dough’s flakiness.