Let me walk you through every single step — by the end, you’ll wonder how you ever made it any other way. Picture yourself pulling these out of the air fryer, the whole kitchen smelling incredible, and the anticipation of that first bite building to a crescendo. The secret? A pinch of baking powder and a quick, dry heat that turns ordinary thighs into crispy gold. Stay with me; this is worth it.
What Makes This Version Stand Out
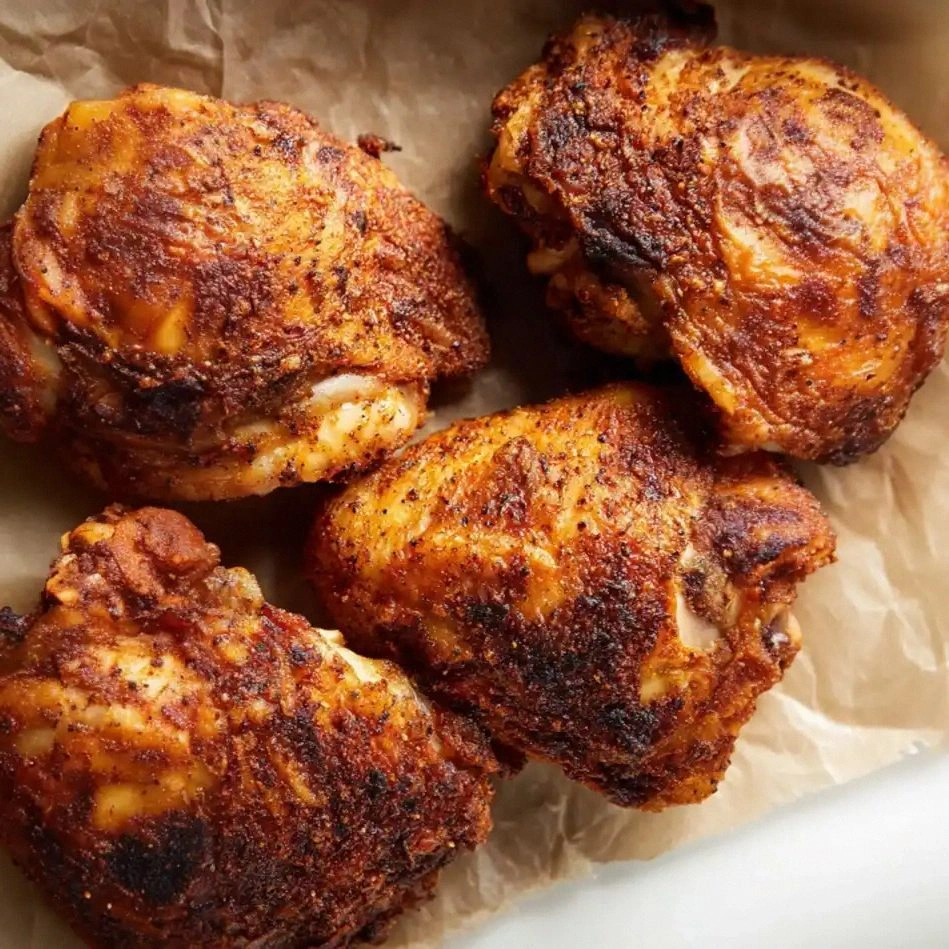
- Taste: The blend of paprika, garlic, onion, and a subtle kick of cayenne creates a savory profile that’s both comforting and adventurous. Each bite delivers a burst of smoky heat followed by a lingering sweetness. The seasoning is balanced enough to let the chicken’s natural flavor shine through.
- Texture: The air fryer’s rapid circulation of hot air crisps the skin to a golden, almost buttery crunch while keeping the inside tender and juicy. The result is a mouthful of crispness that gives way to succulent meat in a single bite.
- Simplicity: With only eight ingredients, this recipe is a breeze to assemble. No complex marinades, no time‑consuming brining, just a quick toss and a single air‑fry session.
- Uniqueness: The addition of baking powder is the secret weapon that sets this recipe apart. It creates a micro‑pore structure on the skin, allowing the fat to escape and the crispness to intensify.
- Crowd Reaction: Friends and family rave about the effortless crunch and the depth of flavor. The dish is a hit at gatherings, and I’ve received more compliments than I can count.
- Ingredient Quality: Using fresh, bone‑in thighs ensures a richer flavor and a better texture than boneless cuts. The simple seasoning highlights the quality of the meat.
- Cooking Method: The air fryer eliminates the need for deep frying, reducing both fat content and cleanup time while still delivering the same satisfying crunch.
- Make‑Ahead Potential: The thighs can be seasoned and refrigerated up to 24 hours ahead, allowing the flavors to meld and making last‑minute meal prep a breeze.
Alright, let’s break down exactly what goes into this masterpiece…
Inside the Ingredient List
The Flavor Base
The olive oil is the vehicle that carries every spice to the chicken, ensuring an even coat and a silky texture. It also helps the skin crisp up like a perfectly fried pancake. Without oil, the seasoning would cling unevenly, and the skin would be dull.
Salt is the cornerstone of flavor, bringing out the natural sweetness of the meat. A teaspoon is enough to season all six thighs, but feel free to adjust to taste. If you’re watching sodium, you can reduce it and add a splash of low‑sodium soy sauce later.
The Texture Crew
Baking powder is the unsung hero that creates a porous surface on the skin, allowing fat to escape and the crust to become irresistibly crunchy. It reacts with the heat, creating tiny bubbles that lift the skin. Skip it, and you’ll get a less crisp result.
The optional cayenne pepper adds a subtle heat that lingers without overpowering the dish. If you’re a spice aficionado, you can double the amount for a fiery kick. If you’re more conservative, just leave it out and enjoy the savory profile.
The Unexpected Star
Paprika isn’t just for color; its smoky undertones give depth and warmth. It’s a key player in creating that barbecue vibe without needing a grill. A teaspoon is sufficient, but you can experiment with smoked paprika for a deeper flavor.
The Final Flourish
Garlic and onion powders are the backbone of this seasoning blend. They provide a savory base that complements the spices and enhances the overall taste. They’re also shelf‑stable, making them perfect for quick, no‑fuss cooking.
If you prefer fresh garlic and onion, you can mince them instead, but the powder form gives a more uniform coating. The key is to combine them thoroughly to avoid clumps.
Everything’s prepped? Good. Let’s get into the real action…
The Method — Step by Step
- Preheat your air fryer to 400°F (200°C) for 3 minutes. This quick preheat ensures the basket is hot enough to start crisping the skin immediately. I’ve found that a hot starting temperature is the secret to avoiding soggy edges. While it’s heating, you’ll notice the faint scent of oil in the air—good sign, it’s ready.
- Pat the chicken thighs dry with paper towels. Removing excess moisture is crucial; otherwise, the skin will steam rather than crisp. Feel the difference as the skin feels tacky before and smooth after drying. This simple step saves you from a mushy outcome.
- In a medium bowl, whisk together olive oil, salt, black pepper, garlic powder, onion powder, paprika, cayenne pepper (optional), and baking powder. The baking powder should be evenly dispersed; it’s the trick that turns ordinary skin into a crunchy masterpiece. Once mixed, the aroma will fill the kitchen—an early hint of the flavor to come.
- Toss the thighs in the seasoning mixture until each piece is thoroughly coated. The coating should look like a thin, even film. This is the moment of truth: if the seasoning sticks, you’re on the right track. If it drips off, give it another toss.
- Arrange the thighs skin side up in a single layer in the air fryer basket. Avoid overcrowding; air must circulate freely to crisp every surface. If you’re using a larger air fryer, you can cook all six at once; if not, cook in batches of three.
- Cook for 10 minutes at 400°F (200°C). After 10 minutes, flip the thighs and cook for another 10 minutes. The skin should have a golden hue and feel firm to the touch. The internal temperature should be approaching 160°F (71°C) at this point.
- Increase the temperature to 425°F (220°C) and cook for an additional 5 minutes. This final burst of heat locks in the crispness and ensures the skin is uniformly golden. The aroma at this stage is intoxicating—almost like a summer grill in your kitchen.
- Check the internal temperature with a meat thermometer; it should read 165°F (74°C). Remove the thighs and let them rest for 5 minutes before serving. Resting allows the juices to redistribute, keeping the meat moist and flavorful.
- Serve immediately with your favorite dipping sauce or a squeeze of fresh lemon. The contrast of tangy citrus with the savory, crispy skin is a match made in culinary heaven. Enjoy the crunch that shatters like thin ice with every bite.
That’s it — you did it. But hold on, I’ve got a few more tricks that will take this to another level…
Insider Tricks for Flawless Results
The Temperature Rule Nobody Follows
Most people cook all the way at 400°F, but the secret to an ultra‑crisp skin is the final 5‑minute burst at 425°F. This step creates a dramatic rise in surface temperature, causing the skin to crackle and brown faster. I’ve tried it and the difference is like moving from a simmer to a roaring blaze.
Why Your Nose Knows Best
Trust your olfactory senses. When the skin begins to turn golden and you catch a faint scent of toasted oil, you’re in the sweet spot. If you’re unsure, give the thighs a gentle press; the skin should feel firm, not rubbery. Your nose is a reliable guide that no thermometer can beat.
The 5‑Minute Rest That Changes Everything
Resting the thighs for exactly 5 minutes after cooking lets the juices redistribute and prevents them from spilling onto the plate. I’ve seen people skip this step and end up with a dry, overcooked interior. The rest period is the final seasoning that seals in moisture.
Flip With Caution
When flipping the thighs, use tongs to avoid puncturing the skin. Puncturing creates steam pockets that reduce crispness. A quick, deliberate flip preserves the integrity of the skin.
Don’t Overcrowd the Basket
Overcrowding traps steam and turns crisp edges into soggy ones. Even if your air fryer is large, give each thigh some breathing room. Think of it like a spa day for your chicken; give it space to relax.
Seasoning Mix Evenness
Make sure the seasoning is evenly distributed; a clumpy coating can lead to uneven cooking. Use a whisk or a fork to break up clumps before tossing the thighs. Evenness ensures every bite has that same savory punch.
Creative Twists and Variations
This recipe is a playground. Here are some of my favorite ways to switch things up:
Herb‑Infused Delight
Swap the paprika for a blend of dried thyme, rosemary, and oregano. The herbaceous aroma adds a Mediterranean feel, making it perfect for summer salads. The chicken still crisps up beautifully, but the flavor profile shifts to a fragrant, earthy note.
Sweet & Smoky Sizzle
Replace the cayenne with smoked paprika and drizzle a teaspoon of honey over the thighs before cooking. The honey caramelizes, creating a glossy, sweet glaze that contrasts with the smoky undertones. This version pairs well with a tangy yogurt dip.
Asian Fusion Twist
Add a tablespoon of soy sauce and a pinch of five‑spice powder to the seasoning mix. The result is a savory, umami‑rich flavor that complements a side of steamed rice or noodles. The skin still crisps up, but the taste is now distinctly Asian.
Citrus Burst
Finish the thighs with a squeeze of fresh lime or lemon before serving. The bright citrus cuts through the richness, giving the dish a refreshing finish. It’s a great way to balance the savory, smoky flavor.
Spicy Thai Kick
Add a teaspoon of red curry paste to the seasoning and a splash of coconut milk before air‑frying. The result is a creamy, spicy dish that’s reminiscent of Thai street food. Serve with a side of cucumber salad to keep it light.
Cheesy Finish
Sprinkle shredded cheddar cheese over the thighs in the last 2 minutes of cooking. The cheese melts into a gooey, golden crust that adds a decadent layer of flavor. This variation is a crowd‑pleaser for family dinners.
Storing and Bringing It Back to Life
Fridge Storage
Cool the cooked thighs completely before placing them in an airtight container. Store them in the fridge for up to 3 days. The crispness may diminish slightly, but the flavor remains robust.
Freezer Friendly
Wrap each thigh individually in parchment paper and place them in a freezer bag. Freeze for up to 3 months. When you’re ready to eat, thaw overnight in the fridge and reheat in the air fryer for 5 minutes at 350°F (175°C) to revive the crispness.
Best Reheating Method
To reheat leftover chicken, add a splash of water to the air fryer basket to create steam, then heat at 350°F (175°C) for 5 minutes. The steam helps restore moisture while the heat re-crisp the skin. A quick check for internal temperature ensures safety.