Picture this: the kitchen is a battlefield, flour dusted like snow on a winter morning, and you’re staring at an empty pan that feels like a blank canvas. I had just finished a batch of plain chocolate chip cookies that came out flat and crumbly, and my roommate’s sarcastic comment that they “could’ve been a paperweight” echoed in my ears. That moment of culinary frustration sparked a mission—create a cookie that’s the ultimate blend of chewy, buttery, and indulgently creamy, with a twist that will make anyone say, “I dare you to taste this and not go back for seconds.”
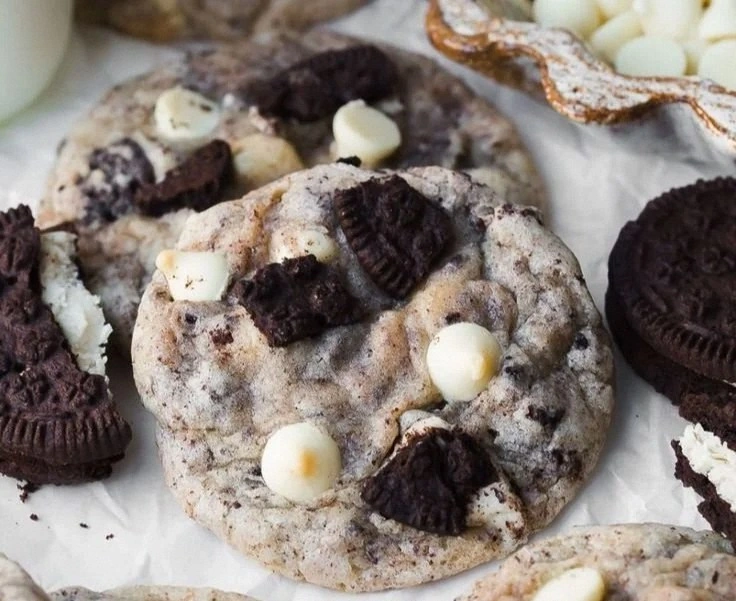
From the first whisk to the final oven pull, the aroma of vanilla and butter rises, mingling with the faint scent of crushed Oreos that promise a chocolatey surprise. The sound of dough being folded is a rhythmic drumbeat, while the sight of a spoonful of white chocolate chips glistening like tiny moons sets the stage for a visual feast. When the cookies finally slide onto the cooling rack, the heat still lingers, turning the edges into a golden‑brown perfection that crackles softly as they settle.
This isn’t just another cookie recipe; it’s a revelation that will change the way you think about dessert. The secret lies in the careful balance of flour and cornstarch, a dash of baking soda to lift the crumb, and the bold addition of crushed Oreos that give each bite a familiar crunch. The white chocolate chips add a silky melt that contrasts beautifully with the chewy dough, creating a flavor profile that’s both nostalgic and daring.
What makes this version stand out is that it’s built from the ground up with a focus on texture and flavor harmony. No more dry, crumbly cookies that crumble on your tongue; instead, you get a chewy, buttery bite that melts in your mouth, with a subtle crunch from the Oreo pieces. The recipe is simple enough for a beginner, yet sophisticated enough for a seasoned baker who wants to impress at a gathering. And the best part? It’s made with pantry staples—no fancy ingredients or obscure techniques required.
Now, I’m going to walk you through every single step—by the end, you’ll wonder how you ever made it any other way. From the first whisk to the final cooling rack, I’ll share the exact timing, temperatures, and sensory checkpoints that make this cookie a masterpiece. And if you’re curious about why certain ingredients are used, I’ve sprinkled in some insider secrets along the way. Get ready for a cookie adventure that’s as fun to make as it is to eat.
Alright, let’s break down exactly what goes into this masterpiece. The ingredients are simple, but each one plays a critical role in creating that perfect chewy, buttery texture. The combination of flour, cornstarch, and a pinch of baking soda lifts the dough just enough to give it that signature rise without compromising the chew. The crushed Oreos not only add flavor but also create pockets of chocolate that burst in your mouth. Meanwhile, the white chocolate chips melt into a creamy center that contrasts with the crunchy cookie base.
Before you even touch the dough, it’s worth noting a few key points that will make the baking process smoother. First, make sure your butter is softened to room temperature; this ensures it mixes evenly and creates a tender crumb. Second, use a mix of all-purpose flour and cornstarch—this combination gives the cookies a soft, chewy interior while keeping the edges crisp. Finally, don’t overmix the dough; a few lumps are fine and actually help maintain that chewy texture.
Now, let’s dive into the highlight boxes that will help you avoid common pitfalls and elevate your cookie game.
What Makes This Version Stand Out
- Texture: The blend of flour and cornstarch creates a chewy center while the edges crisp up to a golden brown. This dual texture is what makes each bite unforgettable.
- Flavor: Crushed Oreos deliver a familiar chocolate crunch, while white chocolate chips melt into a silky center that balances sweetness with richness.
- Ease: The recipe uses only pantry staples, so you won’t need a trip to a specialty store or a fancy kitchen gadget.
- Make‑ahead: The dough can be refrigerated for up to 48 hours, allowing you to bake fresh cookies whenever you like.
- Presentation: The cookies look like classic chocolate chip cookies but feel like a gourmet treat, making them perfect for parties or a cozy night in.
- Scalability: The ingredient list scales cleanly, so you can bake a single batch or a dozen with the same precision.
Alright, let’s break down exactly what goes into this masterpiece…
Inside the Ingredient List
The Flavor Base
All-purpose flour is the backbone of the dough, providing structure and a subtle nutty flavor. When combined with cornstarch, it creates a tender crumb that doesn’t crumble under your fingers. If you’re looking for a slightly healthier option, you can substitute whole wheat flour, but be prepared for a denser texture that may affect the chew.
The Texture Crew
Cornstarch is the secret weapon that keeps the cookies from becoming too dense. It absorbs moisture, giving the dough a lightness that translates into a chewy bite. A pinch of baking soda and baking powder work together to lift the dough slightly, creating that classic cookie rise without making them cakey.
The Unexpected Star
Crushed Oreos are more than just a flavor enhancer—they add a subtle crunch and a chocolatey depth that pairs beautifully with the white chocolate chips. The cookies’ color also changes, giving them a visually appealing contrast that makes them Instagram‑worthy.
The Final Flourish
White chocolate chips melt into a creamy center that adds a luxurious, silky texture. If you prefer a darker chocolate flavor, you can swap them for semi‑sweet chips, but the result will be less sweet and more intense. For an extra twist, sprinkle a pinch of sea salt on top before baking to bring out the chocolate’s richness.
Everything’s prepped? Good. Let’s get into the real action.
The Method — Step by Step
Preheat your oven to 350°F (175°C) and line two baking sheets with parchment paper. The parchment prevents sticking and makes cleanup a breeze. This step ensures even heat distribution, which is crucial for uniform browning.
In a medium bowl, whisk together the flour, cornstarch, baking powder, baking soda, and salt. The dry mix should look like a fine, pale powder. This dry blend is essential for the cookie’s structure and rise.
In a separate large bowl, beat the softened butter with a hand mixer until pale and fluffy—about 2–3 minutes. This incorporates air and creates a light, buttery base. The fluffiness will carry the sugar and eggs into a smooth batter.
Add the granulated sugar to the butter and beat until the mixture is light and slightly glossy. This step caramelizes the sugar slightly, adding depth of flavor to each bite.
Crack the egg into a small bowl and whisk it lightly. Add the egg to the butter mixture along with the vanilla extract. Beat until fully combined; the mixture should look silky. The egg binds the dough and adds richness.
Gradually fold the dry ingredients into the wet mixture using a spatula. Mix just until incorporated—overmixing can develop gluten and make the cookies tough.
Fold in the coarsely chopped Oreos and white chocolate chips. The chips should be evenly distributed to ensure a consistent flavor in every bite.
Drop rounded tablespoonfuls of dough onto the prepared baking sheets, spacing them 2 inches apart. This spacing allows the cookies to spread without merging.
Bake for 12–14 minutes, or until the edges are golden brown and the centers still look slightly undercooked. The cookies will set as they cool.
Remove the sheets from the oven and let the cookies cool on the pans for 5 minutes. Then transfer them to a wire rack to cool completely. The cooling time allows the cookies to firm up and develop their final texture.
That’s it — you did it. But hold on, I’ve got a few more tricks that’ll take this to another level.
Insider Tricks for Flawless Results
The Temperature Rule Nobody Follows
Many bakers bake at a high temperature to get a quick rise, but that can lead to uneven edges. I keep my oven at a steady 350°F and use an oven thermometer to ensure accuracy. This consistent heat gives the cookies a uniform golden color and a perfect chew.
Why Your Nose Knows Best
Before you even touch the dough, give it a sniff. A buttery, vanilla aroma is a sign that the butter and sugar have blended properly. If the scent is weak, the butter might not be fully incorporated.
The 5-Minute Rest That Changes Everything
After mixing, let the dough rest for 5 minutes before scooping. This allows the flour to absorb moisture fully, which results in a softer texture.
The Chill Trick
Refrigerate the dough for 30 minutes before baking. Chilled dough bakes more slowly, which helps the cookies spread less and stay thicker.
Flipping the Flavors
For a caramel twist, add a tablespoon of caramel sauce to the dough. The caramel will melt into pockets of sweetness that complement the white chocolate.
Using a Silicone Mat
Instead of parchment, try a silicone baking mat. It’s reusable and provides a slightly different texture on the cookie edges.
Creative Twists and Variations
This recipe is a playground. Here are some of my favorite ways to switch things up:
Nutty Crunch
Replace half the Oreos with finely chopped toasted almonds. The nuttiness pairs well with the sweet white chocolate, giving a new depth of flavor.
Minty Surprise
Add a teaspoon of peppermint extract to the dough. The mint complements the chocolate and adds a refreshing finish.
Spiced Delight
Stir in ¼ teaspoon of cinnamon and a pinch of nutmeg. The warm spices give the cookies a cozy, autumnal feel.
Chocolate‑Loaded
Swap the white chocolate chips for dark chocolate chunks. The bitterness balances the sweetness of the Oreos, creating a sophisticated flavor profile.
Cookie Dough Swirl
Fold in a tablespoon of cookie dough into the batter for a double cookie experience. The extra dough adds a chewy, nostalgic element.
Gluten‑Free Variation
Use a gluten‑free flour blend in place of all-purpose flour, but reduce the baking soda to ¼ teaspoon to avoid a metallic aftertaste.
Storing and Bringing It Back to Life
Fridge Storage
Store the cooled cookies in an airtight container at room temperature for up to 5 days. The airtight seal keeps the cookies fresh and chewy.
Freezer Friendly
Place the cookies in a freezer‑proof bag and freeze for up to 3 months. When you’re ready to enjoy, let them sit at room temperature for 15 minutes before eating.
Best Reheating Method
Reheat the cookies in a 300°F oven for 5 minutes. For a quick fix, microwave on low for 10–15 seconds. Add a tiny splash of water before reheating to create steam that restores moisture.