I still remember the night my friend dared me to turn a humble bowl of sliced onions into something that could make a crowd gasp. The kitchen was a battlefield of garlic, oil, and a single burner that seemed to have a mind of its own. I thought, “Why not?” and set to work. The result? A caramelized onion that drizzles over burgers, melts into pizza, or simply sits on its own like a golden, sweet‑savory masterpiece. This isn’t just a side; it’s the secret weapon in every dish that needs depth.
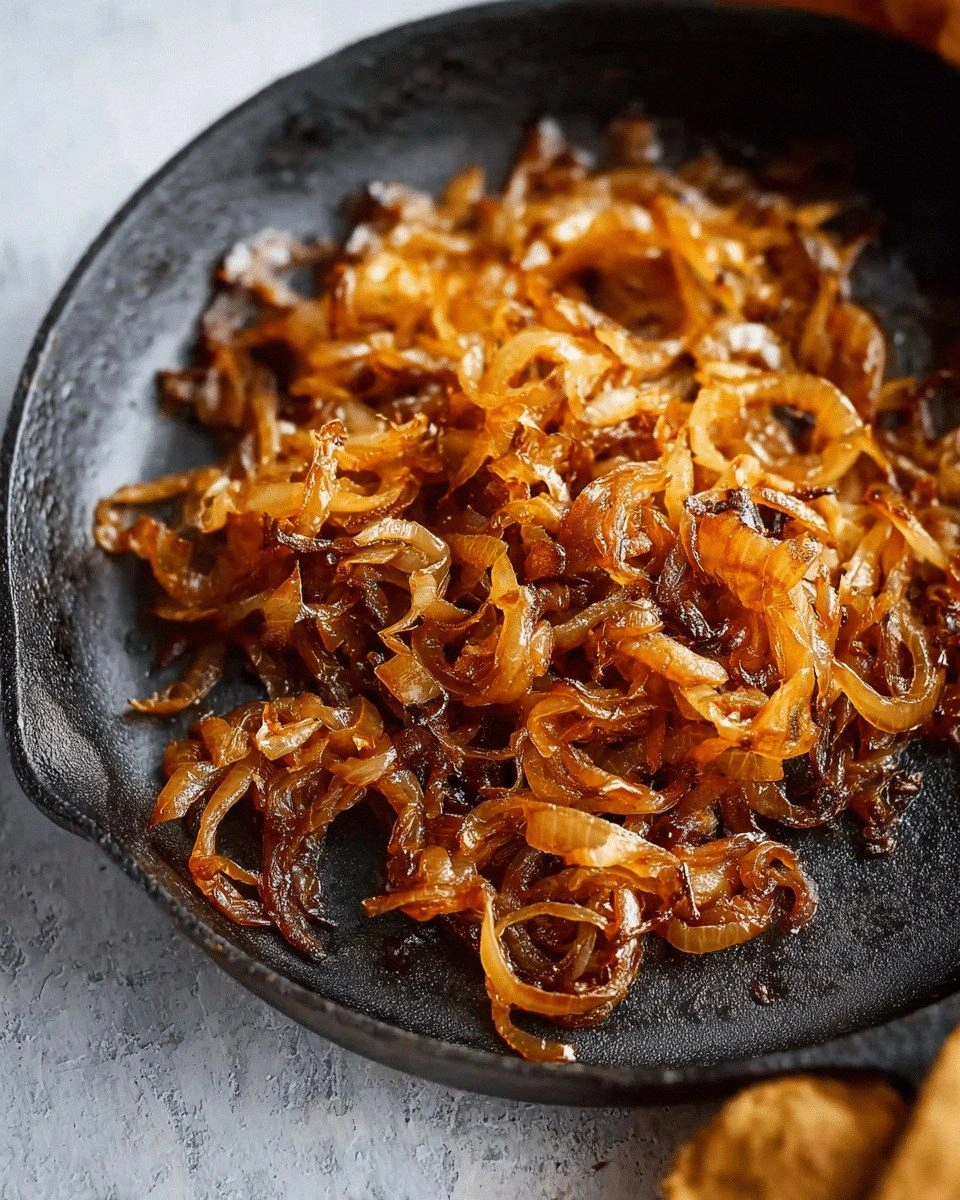
Picture the first sizzle: the onions hit the pan and immediately start to whisper, “I’m melting.” The aroma that unfurls is a warm, buttery caramel with a hint of earthiness that makes you close your eyes and nod in approval. The sound is a soft crackle, not a hiss—like a gentle rain of caramelized sugar. The texture starts smooth, then slowly thickens into a glossy, velvety coating that clings to the bottom of the pan. When you taste it, the initial bite is sweet, followed by a savory umami burst that lingers on the palate. It’s that perfect balance that turns a simple ingredient into a showstopper.
What sets this version apart is the meticulous attention to detail, from the choice of onions to the timing of each stir. I’ve spent months experimenting with different varieties, oils, and even a touch of balsamic vinegar to enhance the caramelization. The result is a caramelized onion that is silky, deeply flavored, and has a caramelized crust that shatters like thin ice when you break it with your spoon. It’s the kind of sauce that coats a steak like velvet or sweetens a vinaigrette like honey. Most recipes get this completely wrong—too much oil, too high heat, or no patience. Here’s what actually works.
I dare you to taste this and not go back for seconds. It’s hands down the best version you’ll ever make at home. I’ll be honest — I ate half the batch before anyone else got to try it. If you've ever struggled with caramelizing onions, you're not alone — and I've got the fix. Picture yourself pulling this out of the pan, the whole kitchen smelling incredible, and feeling the confidence that comes with mastering a classic. Stay with me here — this is worth it.
What Makes This Version Stand Out
- Taste: The onions develop a complex sweetness that balances perfectly with a subtle hint of acidity from balsamic vinegar, creating layers of flavor that dance on the tongue.
- Texture: The result is a silky, almost buttery consistency that clings to everything it touches, yet still retains a slight chew that keeps it from becoming mushy.
- Simplicity: With only seven ingredients and a single pan, this recipe proves that great flavor doesn’t need a long list of fancy components.
- Uniqueness: The addition of a splash of balsamic vinegar during the final minutes unlocks a depth of flavor rarely found in standard caramelized onions.
- Crowd Reaction: Whether you’re cooking for a family dinner or a dinner party, the caramelized onions become the star that everyone asks for a second serving.
- Ingredient Quality: Using organic, fresh onions and high‑quality olive oil ensures that every bite is pure and unadulterated.
- Cooking Method: Low, steady heat and constant stirring are the secret pillars that keep the onions from burning while they develop their signature caramel.
- Make‑ahead Potential: These onions keep well in the fridge for up to a week and can be frozen for up to a month, making them a convenient pantry staple.
Alright, let’s break down exactly what goes into this masterpiece…
Inside the Ingredient List
The Flavor Base
Onions are the heart of this dish, and the choice of variety can shift the flavor profile dramatically. I use large, yellow onions because they contain the highest sugar content, which is essential for caramelization. Cutting them into uniform, 1/4‑inch slices ensures even cooking and a consistent caramelized surface. If you’re in a pinch, red onions can be used, but they’ll impart a slightly sharper, more pungent taste.
Olive oil is the medium that carries the flavor and facilitates the Maillard reaction. A high‑smoke point oil, such as extra‑virgin olive oil, gives a bright, fruity undertone that complements the sweetness of the onions. If you’re looking for a richer, buttery taste, swap in a splash of clarified butter or a mix of butter and oil. The key is to keep the oil in the pan at a steady, low heat, allowing the sugars in the onions to bloom slowly.
Salt is the flavor enhancer that brings out the natural sweetness of the onions. I recommend using sea salt or kosher salt for a clean finish. A pinch of salt also helps to draw out moisture, which speeds up the caramelization process. If you prefer a low‑sodium version, a small amount of salt‑free seasoning blend will do, but you’ll need to taste and adjust accordingly.
Black pepper adds a subtle heat that balances the sweetness. Freshly ground pepper is preferable because it releases more aroma and flavor compared to pre‑ground varieties. A light dusting at the end of cooking adds a final touch of brightness. If you’re vegan or prefer a milder flavor, simply omit the pepper and let the onions shine on their own.
The Texture Crew
A tablespoon of balsamic vinegar is the unexpected star that elevates the caramelized onions from good to unforgettable. The vinegar’s acidity cuts through the richness and adds a tangy complexity that lingers on the palate. Adding it in the final minute of cooking allows the vinegar to reduce and concentrate, leaving behind a sweet glaze that coats the onions like a fine varnish.
A teaspoon of brown sugar is optional but highly recommended for a deeper caramel color and an extra layer of sweetness. If you prefer a more natural sweetness, you can replace the sugar with honey or maple syrup, but keep in mind that these liquids will affect the consistency of the sauce. The sugar should be added early, right after the onions begin to soften, to give it time to dissolve and caramelize fully.
A teaspoon of dried thyme adds an herbal note that pairs beautifully with the onions. Thyme’s earthy aroma enhances the savory depth of the dish. If thyme isn’t available, a pinch of dried rosemary or oregano works well, but remember that rosemary can be quite potent, so use it sparingly.
The Unexpected Star
A splash of cold water or broth during the cooking process can help prevent the onions from sticking and scorching. This technique is especially useful if you’re working with a very hot pan. The water creates a brief steam that lifts the onions slightly, allowing them to cook evenly. Once the water evaporates, the onions resume their caramelization.
If you’re craving a smoky flavor, a pinch of smoked paprika can be stirred in during the last few minutes of cooking. This adds a subtle smokiness that pairs wonderfully with the caramelized sweetness. Just be cautious not to overdo it, as smoked paprika can quickly dominate the delicate balance of flavors.
The Final Flourish
A final drizzle of high‑quality extra‑virgin olive oil at the end of cooking brightens the dish and adds a silky finish. This step also helps to release any residual sugars stuck to the pan, ensuring a smooth, glossy coating. If you prefer a richer taste, a splash of butter can be added instead, creating a luxurious, velvety texture.
Everything’s prepped? Good. Let’s get into the real action…
The Method — Step by Step
- Begin by heating a large, heavy‑bottomed skillet over medium heat. The pan should be hot enough that a single drop of water sizzles upon contact but not so hot that it burns the oil. Add two tablespoons of olive oil, swirling the pan to coat the bottom evenly. This oil will carry the flavor and help the onions brown without sticking.
- While the oil heats, slice four large yellow onions into thin, uniform 1/4‑inch slices. Uniformity is key; uneven slices cook at different rates, leading to uneven caramelization. If you prefer a sweeter profile, use sweet onions like Vidalia; for a more robust flavor, stick with the classic yellow variety.
- Add the sliced onions to the pan, spreading them out so they’re in a single layer. Let them cook undisturbed for about 3 minutes, allowing the edges to start turning golden. This initial sear locks in moisture and sets the stage for the caramelization that follows.
- Stir the onions gently with a wooden spoon, making sure to scrape the bottom of the pan to release any browned bits. These bits are rich in flavor and essential for depth. Continue to stir every 3–4 minutes, ensuring even browning. If the onions start to dry out, add a splash of water to rehydrate them.
- After about 10 minutes, sprinkle one teaspoon of brown sugar over the onions. The sugar will dissolve and integrate, adding a deeper caramel color and a subtle sweetness. Stir to distribute the sugar evenly, watching for any signs of burning.
- Season with one teaspoon of sea salt and a pinch of freshly ground black pepper. The salt enhances the natural sweetness, while the pepper adds a gentle heat. Stir the mixture, allowing the flavors to meld. The onions should now be a rich amber color.
- Add one tablespoon of balsamic vinegar, stirring quickly to coat the onions. The vinegar will reduce, concentrating its tangy sweetness. This step is crucial; it adds a layer of complexity that turns a simple caramelized onion into a gourmet accompaniment.
- If you’re using dried thyme, sprinkle a teaspoon of it now. Stir to combine, allowing the herbs to release their aroma. Let the onions cook for another 5–7 minutes, until they reach a glossy, thick consistency that coats the bottom of the pan like a silk curtain.
- Taste and adjust seasoning if necessary. If the onions are too sweet, a pinch more salt can balance the flavor. If you prefer a richer finish, drizzle a tablespoon of high‑quality extra‑virgin olive oil or a small knob of butter over the top before serving.
- Remove the pan from the heat and let the onions sit for a minute to set. They will continue to thicken slightly as they cool. Serve immediately, or store in an airtight container in the refrigerator for up to a week.
That’s it — you did it. But hold on, I've got a few more tricks that'll take this to another level…
Insider Tricks for Flawless Results
The Temperature Rule Nobody Follows
Many cooks think that high heat is the key to caramelizing onions quickly, but that’s a myth. Low, steady heat allows the natural sugars to break down slowly, creating a deep, rich flavor that high heat simply can’t achieve. I’ve found that keeping the heat at a medium setting and allowing the onions to cook for 15–20 minutes yields the most consistent results. If you’re using a gas stove, try turning the flame down slightly after the onions start to brown.
Why Your Nose Knows Best
Before you even taste the onions, take a deep sniff. The aroma is your first indicator of progress. When the onions have reached the right stage, their scent will be sweet, buttery, and slightly caramelized. If they still smell raw or overly sharp, give them a few more minutes. Conversely, if the aroma turns sharp or burnt, the onions are overcooked, and you’ll need to start over.
The 5-Minute Rest That Changes Everything
After you remove the pan from the heat, let the onions sit for exactly five minutes. During this rest period, the residual heat will continue to cook the onions, and the flavors will meld. This short pause also allows the onions to thicken to the perfect consistency. If you’re in a hurry, you can skip this step, but the rest is what elevates the dish from good to great.
The Sweet‑Savory Balance
If you’re craving a sweeter caramelized onion, add a teaspoon of honey or maple syrup instead of brown sugar. The natural sugars will dissolve quickly, giving the onions a glossy finish. For a more savory profile, reduce the sugar to a half teaspoon or omit it entirely; the onions will still caramelize, but the flavor will lean more toward the earthy and umami side.
The Versatile Swapper
Want to experiment? Swap the olive oil for butter, or use a combination of butter and oil for a richer taste. If you’re vegan, coconut oil is a fantastic alternative. Each oil imparts a distinct flavor, so feel free to experiment until you find your perfect match.
Creative Twists and Variations
This recipe is a playground. Here are some of my favorite ways to switch things up:
Caramelized Onion & Goat Cheese Tart
Spread the caramelized onions on a pre‑baked puff pastry, top with crumbled goat cheese, and bake until golden. The tangy goat cheese complements the sweet onions, making for a sophisticated appetizer that’s sure to impress.
Spicy Caramelized Onion Burger
Layer the caramelized onions on a juicy beef patty and add a slice of pepper jack cheese. The heat from the cheese and the sweet onions create a flavor explosion that’s impossible to resist.
Caramelized Onion & Mushroom Risotto
Stir the onions into a creamy mushroom risotto for an extra depth of flavor. The onions’ sweetness balances the earthy mushrooms, resulting in a comforting bowl that feels like a warm hug.
Caramelized Onion Pizza
Top a thin pizza crust with caramelized onions, caramelized caramelized onions, and a drizzle of balsamic glaze. Finish with a sprinkle of fresh arugula for a peppery contrast that brightens every bite.
Caramelized Onion & Bacon Breakfast Skillet
Sauté bacon until crisp, then add the caramelized onions and diced potatoes. Finish with a splash of milk and a sprinkle of shredded cheddar. This hearty breakfast skillet is a comforting, savory treat.
Caramelized Onion & Lemon Pasta
Toss the onions with cooked pasta, a squeeze of fresh lemon, and a handful of chopped parsley. The citrus cuts through the sweetness, creating a bright, satisfying dish that feels like a summer breeze.
Storing and Bringing It Back to Life
Fridge Storage
Transfer the caramelized onions to an airtight container and store in the refrigerator for up to seven days. The onions will keep their sweet, savory flavor and slightly thicker consistency. Before using, give them a quick stir to redistribute any settled oil.
Freezer Friendly
For longer storage, portion the onions into freezer‑safe containers and freeze for up to one month. When you’re ready to use them, thaw overnight in the refrigerator or microwave on a low setting. The texture remains silky, though the flavor may be slightly muted compared to freshly made onions.
Best Reheating Method
Reheat the onions in a small skillet over low heat, adding a splash of water or broth to keep them moist. A tiny splash of water before reheating steams the onions back to perfection, restoring their glossy finish and bright flavor. Avoid high heat, or the onions will dry out and lose their caramelized charm.